REST API マニュアル(ver1.12.0)
REST API マニュアル 情報
- ALIファームウェア バージョン:
ver. 1.12.0 - 著者: Keigan
REST API 共通
基本
REST API を使⽤して、AMRの動作を制御します。
コンテンツ形式
リクエスト及びレスポンスの Body について、基本的に JSON 形式で情報のやり取りを⾏います。
ヘッダー
JSONを送信するため、以下を追加します。
Content-Type: application/jsonURL(アドレス)
REST API にアクセスするためのアドレスは以下です。
http://[IP Address]:9085/[Path][IP Address]
LAN経由の場合は、ルーター側でIPアドレスを割り当て、または固定設定を行うことにより、決定される。
- 直接
AMRのアクセスポイントに接続する場合・・・10.0.60.1 - ローカルエリアネットワーク
LAN経由で接続する場合・・・192.XXX.X.XX
[Path]
次項 REST API リスト で定義する Path を⽤いる。
HTTPメソッド
| HTTPメソッド | 内容 |
|---|---|
| GET | リソースを取得します。 |
| POST | リソースを新しく追加します。 |
| PUT | 指定されたリソースを修正します。 |
| DELETE | 指定されたリソースを削除します。 |
GET ・・・・・・引数をクエリパラメータに設定(URLの Path 末尾に「?」を付随)POST、PUT、DELETE・・・・引数をBodyに設定
基本的なフロー
基本的な運⽤⽅法は以下とする。
M1マップの選択M2現在位置の設定T1タスクセットの再⽣ または T2 タスクセットのダイレクト再⽣T3タスクセットの再⽣停⽌T4タスクセットの再開
エラーからの復帰
T6-3エラー状態から復帰 を使⽤します。
単体の地点に移動
T7指定位置へ移動 を使⽤します。
マップの取得
M4マップの取得を⾏います。
REST API リスト
| No. | 機能 | HTTP メソッド | Path |
|---|---|---|---|
| T1 | タスクセットの再⽣ | POST | /v2/taskset/exec |
| T2 | タスクセットの直接再⽣ | POST | /v2/taskset/direct_exec |
| T3 | タスクセットの再⽣停⽌ | POST | /v2/taskset/abort |
| T4 | タスクセットの再開 | POST | /v2/taskset/resume |
| T5 | タスクセットのリスト取得 | GET | /v2/taskset/tasksets |
| T6-1 | Idでタスクセットの取得 | GET | /v2/taskset |
| T6-2 | タスクセットの追加 | POST | /v2/taskset |
| T6-3 | タスクセットの削除 | DELETE | /v2/taskset/delete |
| T6-4 | 名前でタスクセットの取得 | GET | /v2/taskset |
| T6-5 | 名前でタスクセットの実行 | POST | /v2/taskset /exec_by_name |
| T7 | エラー状態から復帰 | POST | /v2/error/reset |
| T8 | 指定位置へ移動 | POST | /v2/task/move_position |
| T9 | タスクセットの名前変更 | PUT | /v2/taskset/name |
| T10 | タスクセットを他のマップへ移動 | PUT | /v2/taskset/mapid |
| T11 | タスクセットのcmdsを変更 | PUT | /v2/taskset/tasks |
| T12 | タスクセットの一時停止 | POST | /v2/taskset/pause |
| T13 | 充電ステーションへ移動し、ドッキングする | POST | /v2/charging/dock_to_charging_station |
| T14 | 充電ステーションから離れる | POST | /v2/charging/undock_from_charging_station |
| T15 | 充電ステーション座標の取得 | GET | /v2/calibration/get_charging_station_pose |
| M1 | マップのリスト取得 | GET | /v2/map/maps |
| M2-1 | Idでマップの選択 | POST | /v2/map/select |
| M2-2 | 名前でマップの選択 | POST | /v2/map/select |
| M3 | 現在位置の設定 | POST | /v2/map/initial_position |
| M4-1 | マップidでマップを取得 | GET | /v2/map |
| M4-2 | マップ名で、マップを取得 | GET | /v2/map |
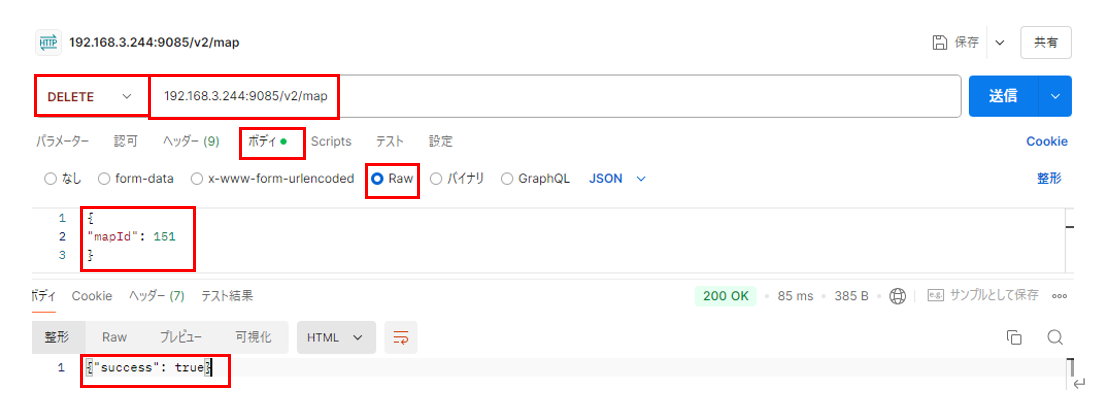
| M5-1 | マップの削除 | DELETE | /v2/map |
| M5-2 | マップの追加 | POST | /v2/map |
| M6 | マップスキャンの開始、中止 | POST | /v2/map/mapping/start |
| M7 | スキャンしたマップの保存 | POST | /v2/map/mapping/save |
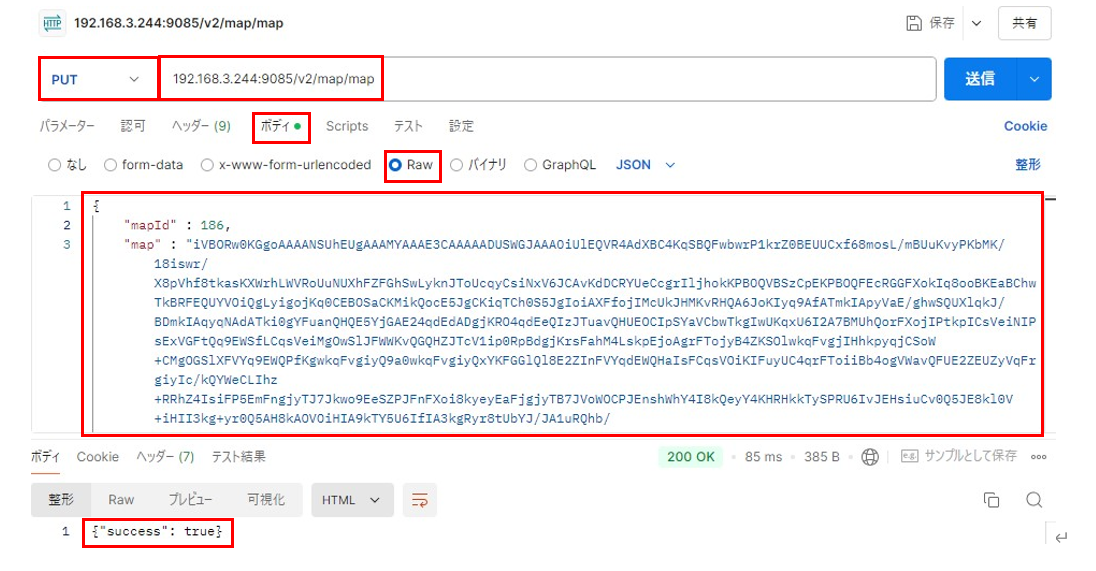
| M8 | マップデータを変更 | PUT | /v2/map/map |
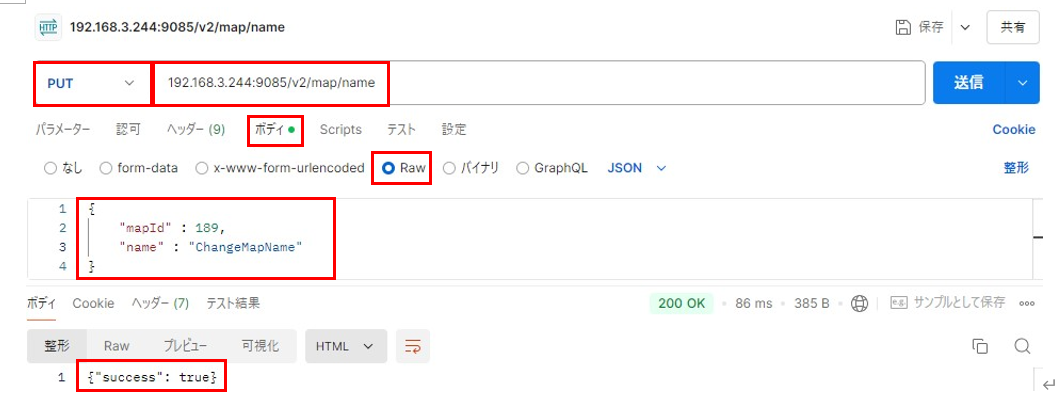
| M9 | マップデータの名前を変更 | PUT | /v2/map/name |
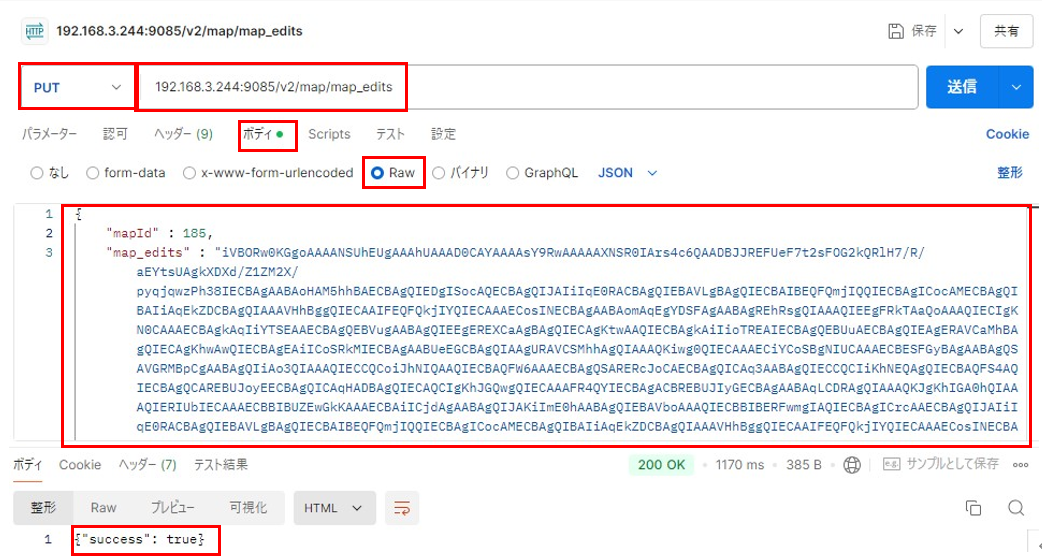
| M10 | マップデータの走行可能領域を変更 | PUT | /v2/map/map_edits |
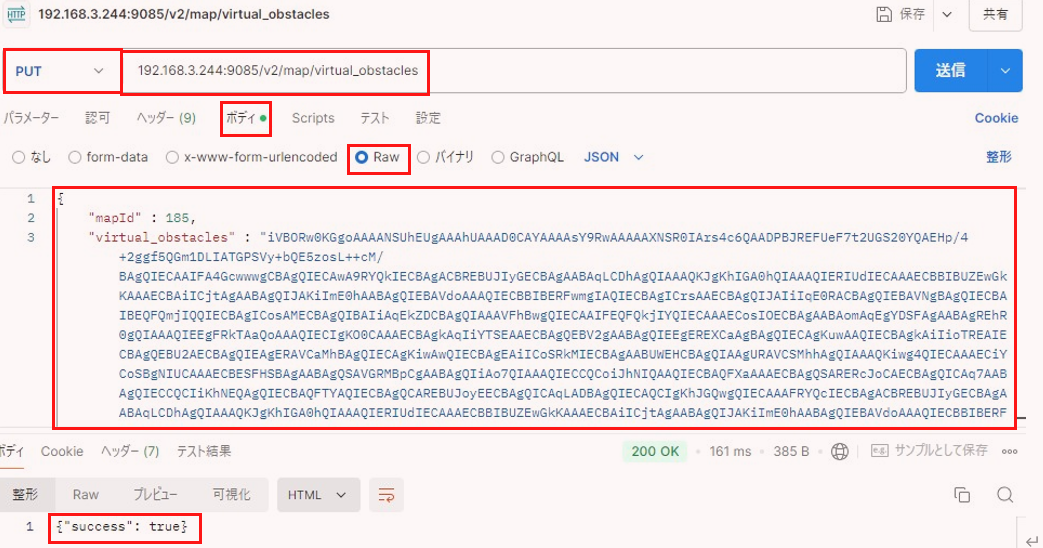
| M11 | マップデータの走行不可領域を変更 | PUT | /v2/map/virtual_obstacles |
| M12 | マップデータの減速エリアを変更 | PUT | /v2/map/speed_limit_zones[KJ6] |
| M13 | マップデータのランドマークを変更 | PUT | V2/map/landmarks[KJ7] |
| STG1 | KeiganALIの基本設定情報を取得 | GET | /v2/settings |
| STG2 | KeiganALIの最高速度を変更 | POST | /v2/settings/max_speed |
| STG3 | スピーカーの音量を変更 | POST | /v2/settings/speaker_volume |
| STG4 | フットプリントを設定 | POST | /v2/settings/amr_footprint |
| STG5 | JOG運転時の直進速度の変更 | POST | /v2/settings/manual_control/translational_speed |
| STG6 | JOG運転時の旋回速度の変更 | POST | /v2/settings/manual_control/rotational_speed |
| STG7 | クリフ(崖)センサの有効/無効設定 | POST | /v2/settings/manual_control/cliff_detection |
| STG8 | ライントレースゲイン(PID)値の設定 | POST | /v2/settings/manual_control/line_tracer_pid_gains |
| STG9 | ライントレースHSV rangeの設定 | POST | /v2/settings/v2/settings/line_tracer_hsv_range |
| STG10 | 自己位置測位パラメーターの取得 | GET | /v2/settings/v2/settings/cauchy_range |
| STG11 | 自己位置測位パラメーターの設定 | POST | /v2/settings/v2/settings/cauchy_range |
| STG12 | LiDARフィルターの取得 | GET | /v2/settings/v2/settings/lidar_filter |
| STG13 | LiDARフィルターの設定 | POST | /v2/settings/v2/settings/lidar_filter |
| STG14 | 直進ゲインの有効/無効設定 | POST | 直進ゲインの有効/無効を設定する |
| STG15 | 直進ゲインの設定 | POST | 直進ゲイン(Kp, Ki, Kd)を設定する |
| STG16 | ユーザーサウンドの追加 | PUT | /v2/settings/v2/settings/user_sound |
| STG17 | ユーザーサウンドの削除 | DELETE | /v2/settings/v2/settings/user_sound |
| STG18 | ユーザーサウンドの取得 | GET | /v2/settings/v2/settings/user_sound |
| STG19 | ユーザーサウンドリストの取得 | GET | /v2/settings/v2/settings/user_sound/list |
| S1 | システムのシャットダウン | POST | /v2/system/shutdown |
| S2 | システムの再起動 | POST | /v2/system/restart |
| S3 | ロボットコントローラの再起動 | POST | /v2/system/controller/reboot |
| C1 | ライントレースオフセット(前後)値の取得 | GET | /v2/system/calibration/line_tracer_offset |
| C2 | ライントレースオフセット(前後)値の設定 | POST | /v2/system/calibration/line_tracer_offset |
| C3 | ライントレースオフセット(左右)値の取得 | GET | /v2/calibration/line_tracer_side_offset |
| C4 | ライントレースオフセット(左右)値の設定 | POST | /v2/calibration/line_tracer_side_offset |
| C5 | ライントレースオフセット値(壁際で停止)の設定 | GET | /v2/calibration/line_tracer_wall_distance_offset |
| C6 | ライントレースオフセット値(壁際で停止)の設定 | POST | /v2/calibration/line_tracer_wall_distance_offset |
| C7 | 充電ドッキング距離のオフセットの取得 | GET | /v2/calibration/docking_distance_offset |
| C8 | 充電ドッキング距離のオフセットの設定 | POST | /v2/calibration/docking_distance_offset |
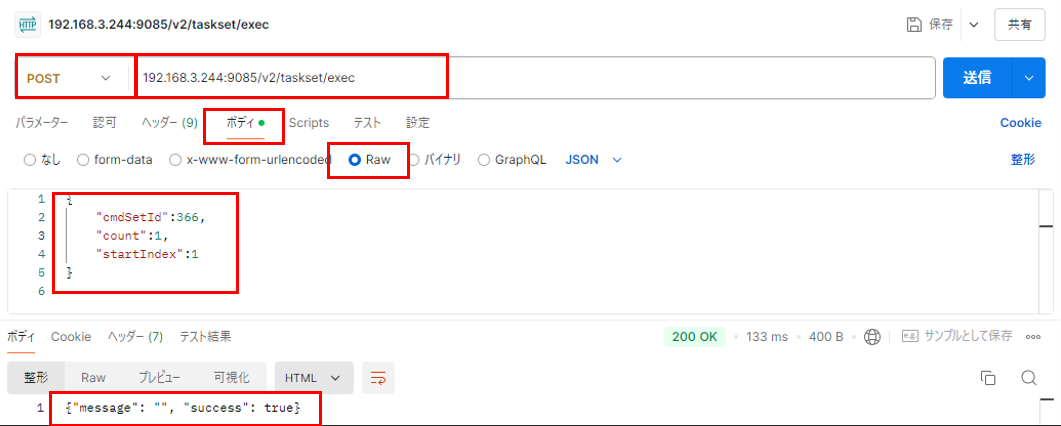
T1 タスクセットの再⽣
| Path | Method | Function |
|---|---|---|
| /v2/taskset/exec | POST | 指定idの taskSet を再生する |
Request Body
{
"cmdSetId": <int32> 	#taskset ID
"count":<int32>		#Unusd,Number of repeat
"startIndex":<int32>	#Index of starting task
}
Response Body
{
"message": <string>
"success": <bool>
}
APIプラットフォーム(例:Postman)
参考コード例 Python
import requests     					#「requests」ライブラリのインストールが必要です
import json
url = 'http://xxx.xxx.x.xxx:9085/v2/taskset/exec'       	#IPアドレスを入力
params = {
    "cmdSetId":xxx,    					#cmdSetId, count, startIndexを入力
    "count":x,
    "startIndex":x
    }
res = requests.post(url, json=params)
data = json.loads(res.text)
print(data)
参考コード例 Javascript
<script>
let request = new XMLHttpRequest();
request.open("POST", "http://xxx.xxx.x.xxx:9085/v2/taskset/exec", true); 		//IPアドレスを入力
request.setRequestHeader("content-type", "application/json;charset=UTF-8");
request.responseType = "json";
let body = { cmdSetId: xxx, count: x, startIndex: x }; 					//cmdSetId, count, startIndexを入力
request.send(JSON.stringify(body));
request.onload = function () {
  window.alert(JSON.stringify(this.response));
};
 </script>
T2 タスクセットのダイレクト再⽣
| Path | Method | Function |
|---|---|---|
| /v2/taskset/direct_exec | POST | taskSet を直接再生する |
Request Body
{
"cmds" <string> 		# taskset json
}
例
{
    "cmds": [
        {
            "arg": {
                "ignoreTheta": true,
                "passingPoint": false,
                "enableObstacleAvoidance": false,
                "disableStartAnnouncement": false,
                "disableStopAnnouncement": false,
                "fastRotation": false,
                "mode": 0,
                "fastStopping": false,
                "x": 2.327471801946775,
                "y": 2.849605112286424,
                "theta": 1.47598,
                "pathWidth": 1,
                "obstacleTimeout": 0,
                "type": 0,
                "enableRerouteRecovery": false,
                "disableReplanning": false,
                "name": ""
            },
            "cmdType": 100
        }
    ]
}Response Body
{
  "message": <string>,
  "success": <bool>
}
APIプラットフォーム(例:Postman)
参考コード例 Python
import requests  					# 「requests」ライブラリのインストールが必要です
import json

url = 'http://xxx.xxx.x.xxx:9085/v2/taskset/direct_exec'  	# IPアドレスを入力
params = {
    "cmds": [
        {
            "arg": {					#cmdTypeに合ったcmdsの内容を記述
			…
            },
            "cmdType": xxx				#cmdTypeを入力
        }
    ]
}
res = requests.post(url, json=params)
data = json.loads(res.text)
print(data)
参考コード例 Javascript
<script>
let request = new XMLHttpRequest();
request.open("POST", "http://xxx.xxx.x.xxx:9085/v2/taskset/direct_exec", true); //IPアドレスを入力
request.setRequestHeader("content-type", "application/json;charset=UTF-8");
request.responseType = "json";
let body = {
cmds: [
{
arg: {
… //cmdTypeに合ったcmdsの内容を記述
},
cmdType: xxx,
},
],
};
request.send(JSON.stringify(body));
request.onload = function () {
window.alert(JSON.stringify(this.response));
};
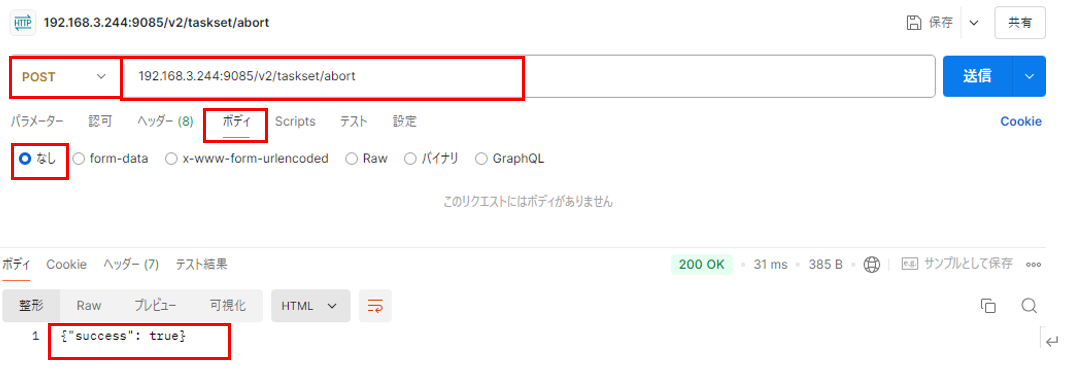
</script>T3 タスクセットの再⽣停⽌
| Path | Method | Function |
|---|---|---|
| /v2/taskset/abort | POST | taskSet の再⽣を停⽌する |
Request Body: なし
Response Body
{
  "success": <bool>
}
APIプラットフォーム(例:Postman)
参考コード例 Python
import requests						#「requests」ライブラリのインストールが必要です
import json
url = 'http://xxx.xxx.x.xxx:9085/v2/taskset/abort'     	#IPアドレスを入力
res = requests.post(url)
data = json.loads(res.text)
print(data)
参考コード例 Javascript
<script>
let request = new XMLHttpRequest();
request.open('POST', 'http://192.XXX.X.XX:9085/v2/taskset/abort', true); //IPアドレスを入力
request.setRequestHeader('content-type', 'application/json;charset=UTF-8');
request.responseType = 'json';
request.send();
request.onload = function() {
window.alert( JSON.stringify( this.response ) );
};
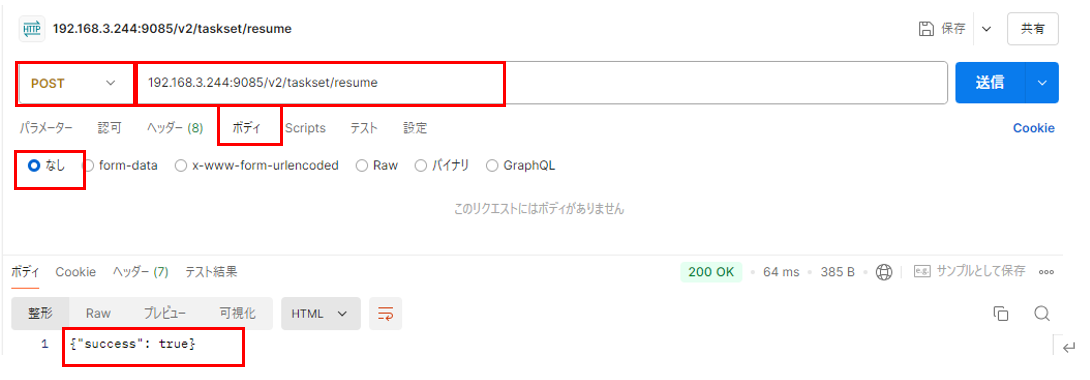
</script>T4 タスクセットの再開
| Path | Method | Function |
|---|---|---|
| /v2/taskset/resume | POST | taskSet の再⽣を再開する |
Request Body: なし
Response Body
{
  "success": <bool>
}
APIプラットフォーム(例:Postman)
参考コード例 Python
import requests    					#「requests」ライブラリのインストールが必要です
import json
url = 'http://xxx.xxx.x.xxx:9085/v2/taskset/resume'    	#IPアドレスを入力
res = requests.post(url)
data = json.loads(res.text)
print(data)
参考コード例 Javascript
<script>
let request = new XMLHttpRequest();
request.open("POST", "http:// xxx.xxx.x.xxx:9085/v2/taskset/resume", true); //IPアドレスを入力
request.setRequestHeader("content-type", "application/json;charset=UTF-8");
request.responseType = "json";
request.send();
request.onload = function () {
window.alert(JSON.stringify(this.response));
};
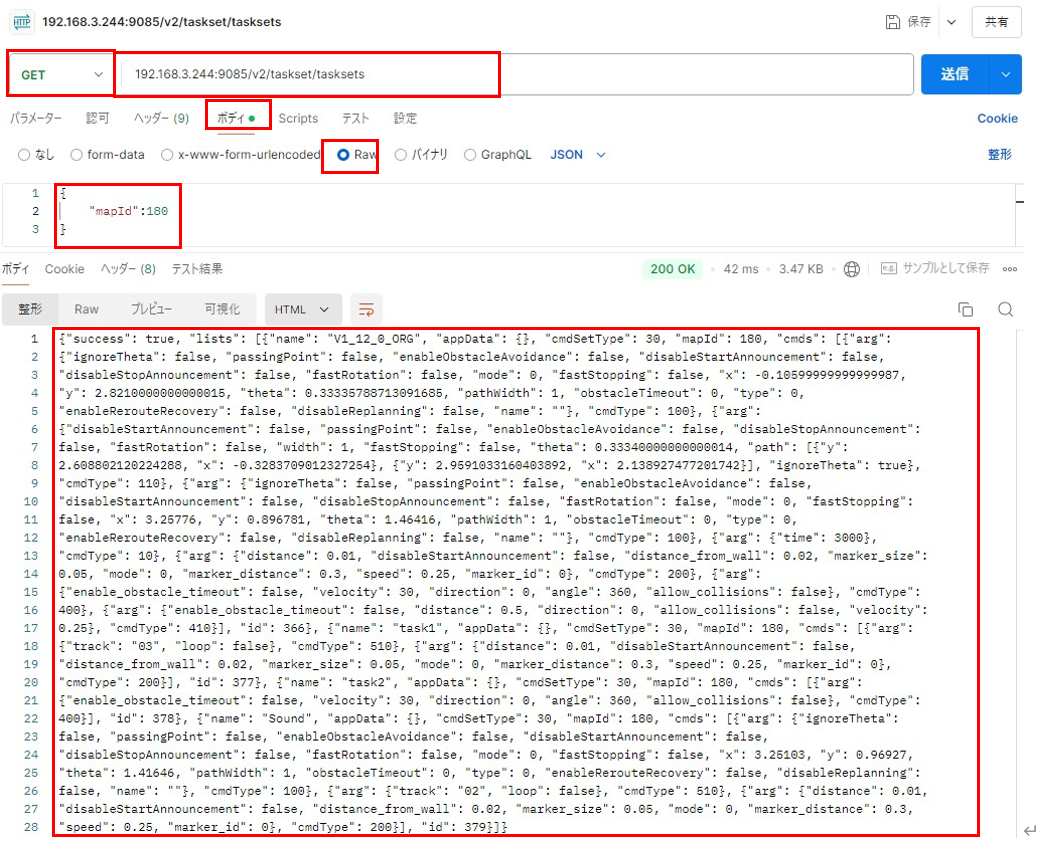
</script>T5 タスクセットのリスト取得
| Path | Method | Function |
|---|---|---|
| /v2/taskset/tasksets | GET | taskSet のリストを取得する |
Request Body
 {
"mapId" :<int32>
}
Request Body
{
'success': True,
'lists': [
    {
        'name': 'xxxx', 			#Taskset Name
        'appData': {}, 			# 拡張予約
        'cmdSetType': xx, 		# cndSet type
        'mapId': xxx, 			#map id
        'cmds': [
            {'arg': {
              ... 			#cmdTypeに合ったcmdsの内容
                },
                'cmdType': xxx		#cmd type
                },
		.
		.
        ],
        'id': xxx				# taskset id
    },
    {
        'name': 'xxxx',
        'appData': {},
        'cmdSetType': xx,
        'mapId': xxx,
        'cmds': [
            {'arg': {
              ...
                },
                'cmdType': xxx
                },
		.
		.
        ],
        'id': xxx
    },
]APIプラットフォーム(例:Postman)
参考コード例 Python
import requests    					#「requests」ライブラリのインストールが必要です
import json
url = 'http://xxx.xxx.x.xxx:9085/v2/taskset/tasksets'      	#IPアドレスを入力
params = {'mapId':xxx}                              	#mapIdを入力
res = requests.get(url, json=params)
data = json.loads(res.text)
print(data)
参考コード例 Javascript
<script>
let request = new XMLHttpRequest();
request.open( "GET", "http://xxx.xxx.x.xxx:9085/v2/taskset/tasksets?mapId=xxx",  true); 	//IPアドレス、mapIdを入力
request.setRequestHeader("content-type", "application/json;charset=UTF-8");
request.responseType = "json";
request.send();
request.onload = function () {
  window.alert(JSON.stringify(this.response));
};
</script>NG例
request.open('GET', 'http://192.xxx.x.xxx9085/v2/taskset/taskset, true);
request.setRequestHeader('content-type', 'application/json;charset=UTF-8');
request.responseType = 'json';
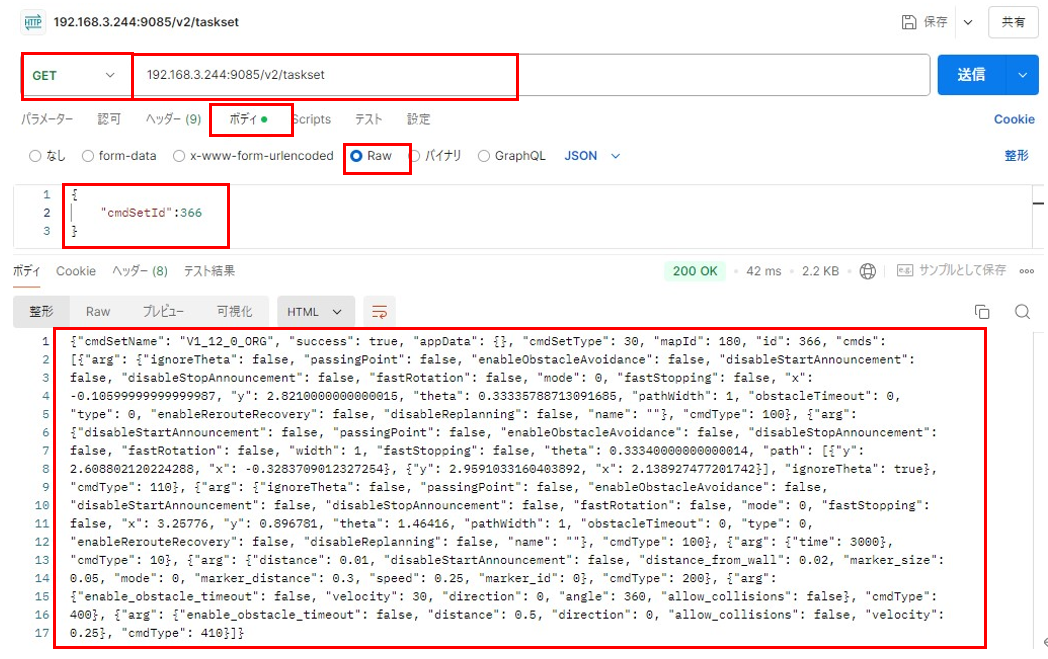
request.send(JSON.stringify({mapId:xxx})); //GETメソッドでは引数をBodyにして送信できませんT6-1 idでタスクセットの取得
| Path | Method | Function |
|---|---|---|
| /v2/taskset | GET | 指定idのtaskSetを取得する |
Request Body
{
"cmdSetId":<int32> 		#taskset ID
}
Response Body
{
	"cmdSetName": "xxx",		#タスクセット名
	"success": true,
	"appData": {},				#拡張予約
	"cmdSetType": 30,			#固定値
	"mapId": xxx,				#map id
	"id": xxx,				#taskSet id
	"cmds": [
		{
			"arg": {
					.	#cmdTypeに合ったcmdsの内容
					.
			},
			"cmdType": xxx
		},
		.
		.
			"arg": {
					.
					.
			},
			"cmdType": xxx
		}
}APIプラットフォーム(例:Postman)
参考コード例 Python
import requests					#「requests」ライブラリのインストールが必要です
import json
url = 'http://xxx.xxx.x.xxx:9085/v2/taskset'    	#IPアドレスを入力
params = {'cmdSetId':xxx}				#cmdSetIdを入力
res = requests.get(url, json=params)
data = json.loads(res.text)
print(data)
参考コード例 Javascript
<script>
    let request = new XMLHttpRequest();
    request.open('GET', 'http://192.xxx.x.xxx:9085/v2/taskset?cmdSetId=xxx', true);		//IPアドレス、cmdSetIdを入力
    request.setRequestHeader('content-type', 'application/json;charset=UTF-8');
    request.responseType = 'json';
    request.send();
    request.onload = function() {
        window.alert( JSON.stringify( this.response ) );
      };
</script>NG例
request.open('GET', 'http://192.XXX.X.XX:9085/v2/taskset, true);
request.setRequestHeader('content-type', 'application/json;charset=UTF-8');
request.responseType = 'json';
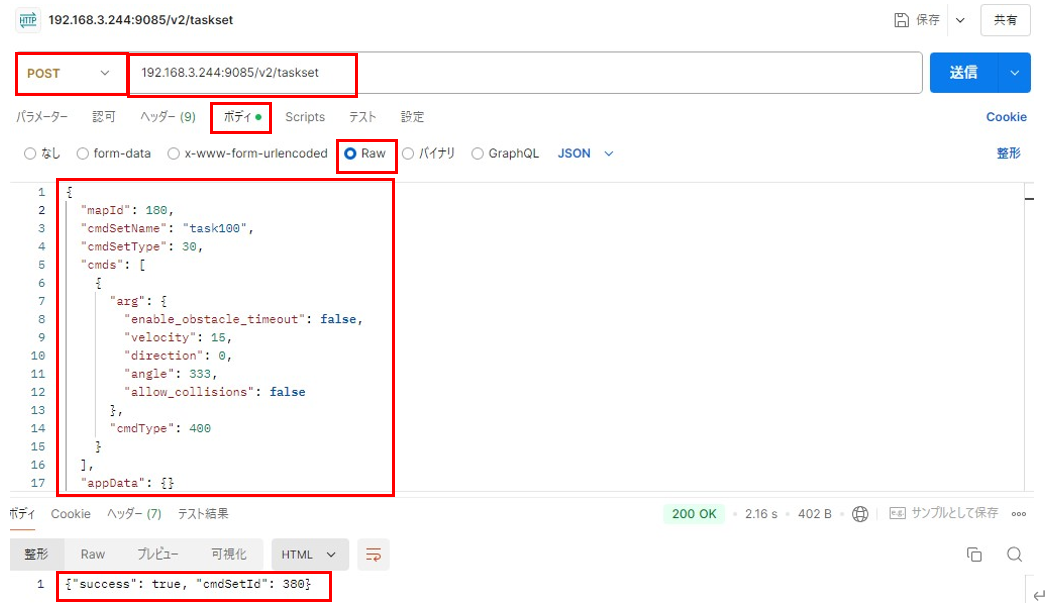
request.send(JSON.stringify({cmdSetId:XXX})); //GETメソッドでは引数をBodyにして送信できませんT6-2 タスクセットの追加
| Path | Method | Function |
|---|---|---|
| /v2/taskset | POST | taskSet を追加する |
Request Body
json
{
  "mapId": xxx,			#map id
  "cmdSetName": "xxx",		#タスクセット名
  "cmdSetType": 30,		#固定値
  "cmds": [
    {
      "arg": {
		.		#cmdTypeに合ったcmdsの内容
		.
      },
      "cmdType": xxx
    },
	.
	.
    {
      "arg": {
		.
		.
      },
      "cmdType": xxx
    }
  ],
  "appData": {}
}Response Body
{
"success":<bool>
"cmdSetId":<int32>		#Ali側でナンバリングされたtaskSet id
}
APIプラットフォーム(例:Postman)
参考コード例 Python
import requests                       	#「requests」ライフラリのインストールが必要です
import json
url = 'http://xxx.xxx.x.xxx:9085/v2/taskset'    	#IPアドレスを入力
params = {
  "mapId": xxx,               			# mapId, cmdSetName, cmdsを入力
  "cmdSetName": "xxx",
  "cmdSetType": 30,       			# cmdSetTypeは30の固定値
  "cmds": [
    {
      "arg": {
		.				#cmdTypeに合ったcmdsの内容
		.
      },
      "cmdType": xxx
    },
	.
	.
   {
      "arg": {
		.
		.
      },
      "cmdType": xxx
    }
  ],
  "appData": {}
}
res = requests.post(url, json=params)
data = json.loads(res.text)
print(data)
参考コード例 Javascript
<script>
let request = new XMLHttpRequest();
request.open("POST", "http://xxx.xxx.x.xxx:9085/v2/taskset", true); //IPアドレスを入力
request.setRequestHeader("content-type", "application/json;charset=UTF-8");
request.responseType = "json";
let body = {
mapId: xxx, //mapId, cmdSetName, cmdsを入力
cmdSetName: "xxx",
cmdSetType: 30, //固定値
cmds: [
{
arg: {
. //cmdTypeに合ったcmdsの内容
.
},
cmdType: xxx,
},
.
.
arg: {
.
.
},
cmdType: xxx, //cmd typeを入力
}
],
appData: {}, //拡張予約
};
request.send(JSON.stringify(body));
request.onload = function () {
window.alert(JSON.stringify(this.response));
};
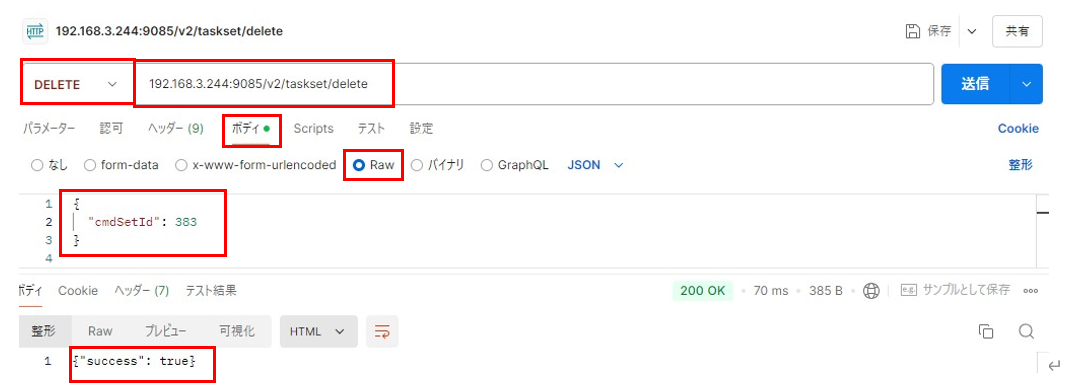
</script>T6-3 タスクセットの削除
| Path | Method | Function |
|---|---|---|
| /v2/taskset/delete | DELETE | taskSet を削除する |
Request Body
{
"cmdSetId" <int32>
}
Response Body
{
"success":<bool>
}
APIプラットフォーム(例:Postman)
参考コード例 Python
import requests 					#「requests」ライブラリのインストールが必要です
import json

url = 'http://xxx.xxx.x.xxx:9085/v2/taskset/delete' 	#IPアドレスを入力
params = {'cmdSetId': xxx }         		#cmdSetIdを入力
res = requests.delete(url, json=params)
data = json.loads(res.text)
print(data)
参考コード例 Javascript
<script>
    let request = new XMLHttpRequest();
    request.open('DELETE', 'http://192.XXX.X.XX:9085/v2/taskset/delete', true); 	//IPアドレスを入力
    request.setRequestHeader('content-type', 'application/json;charset=UTF-8');
    request.responseType = 'json';
    let body ={'cmdSetId':XXX};       						//cmdSetIdを入力
    request.send(JSON.stringify(body));
    request.onload = function() {
        window.alert( JSON.stringify( this.response ) );
      };
</script>
T6-4 名前でタスクセットの取得
| Path | Method | Function |
|---|---|---|
| /v2/taskset | GET | 指定名前のtaskSetを取得する |
Request Body
{
"cmdSetname":<string> #taskset name
}
Response Body
{
	"cmdSetName": "xxx",			#タスクセット名
	"success": true,
	"appData": {},				#拡張予約
	"cmdSetType": 30,			#固定値
	"mapId": xxx,				#map id
	"id": xxx,				#taskSet id
	"cmds": [
		{
			"arg": {
					.	#cmdTypeに合ったcmdsの内容
					.
			},
			"cmdType": xxx
		},
		.
		.
			"arg": {
					.
					.
			},
			"cmdType": xxx
		}
}APIプラットフォーム(例:Postman)
参考コード例 Python
import requests      					#「requests」ライブラリのインストールが必要です
import json
url = 'http://xxx.xxx.x.xxx:9085/v2/taskset_by_name' 	#IPアドレスを入力
params = {"cmdSetName": "xxx"}           		#タスクセット名を入力
res = requests.get(url, json=params)
data = json.loads(res.text)
print(data)
参考コード例 Javascript
<script>
    let request = new XMLHttpRequest();
    request.open('GET', 'http://192.XXX.X.XX:9085/v2/taskset?cmdSetName=XXX', true);	#IPアドレス、cmdSetIdを入力
    request.setRequestHeader('content-type', 'application/json;charset=UTF-8');
    request.responseType = 'json';
    request.send();
    request.onload = function() {
        window.alert( JSON.stringify( this.response ) );
      };
</script>NG例
request.open('GET', 'http://192.XXX.X.XX:9085/v2/taskset_by_name, true);
request.setRequestHeader('content-type', 'application/json;charset=UTF-8');
request.responseType = 'json';
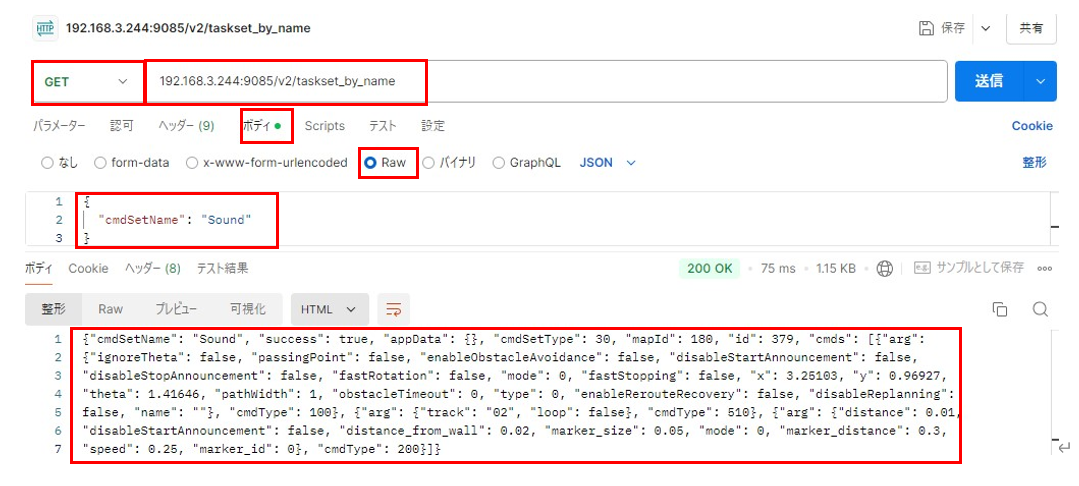
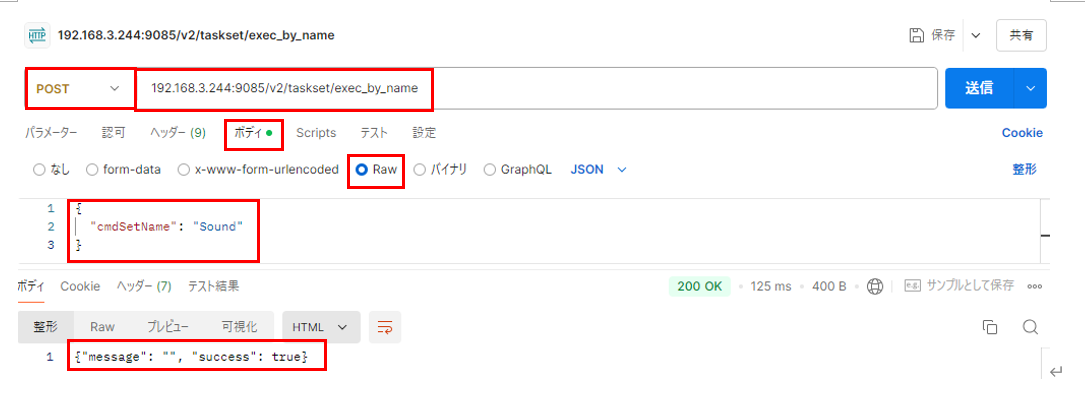
request.send(JSON.stringify({cmdSetname:XXX})); //GETメソッドでは引数をBodyにして送信できませんT6-5 名前でタスクセットを実行
| Path | Method | Function |
|---|---|---|
| /v2/taskset/exec_by_name | POST | 名前でタスクセットを実行 |
Request Body
{
"cmdSetname":<string> #taskset name
}
Response Body
{
"success":<bool>
}
APIプラットフォーム(例:Postman)
参考コード例 Python
import requests      					#「requests」ライブラリのインストールが必要です
import json
url = 'http://xxx.xxx.x.xxx:9085/v2/taskset_by_name' 	#IPアドレスを入力
params = {"cmdSetName": "xxx"}           		#タスクセット名を入力
res = requests.post(url, json=params)
data = json.loads(res.text)
print(data)
参考コード例 Javascript
<script>
let request = new XMLHttpRequest();
request.open("POST", "http://xxx.xxx.x.xxx:9085/v2/taskset/exec_by_name", true); 	//IPアドレスを入力
request.setRequestHeader("content-type", "application/json;charset=UTF-8");
request.responseType = "json";
let body = { cmdSetName: "xxx" }; 							//cmdSetId, count, startIndexを入力
request.send(JSON.stringify(body));
request.onload = function () {
      window.alert(JSON.stringify(this.response));
};
</script>NG例
request.open('GET', 'http://192.XXX.X.XX:9085/v2/taskset_by_name, true);
request.setRequestHeader('content-type', 'application/json;charset=UTF-8');
request.responseType = 'json';
request.send(JSON.stringify({cmdSetname:XXX}));
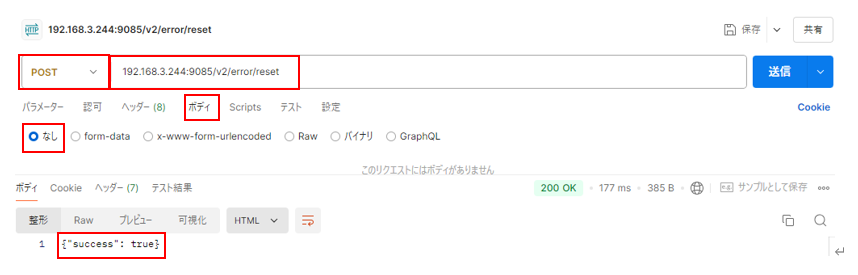
//GETメソッドでは引数をBodyにして送信できませんT7 エラー状態から復帰
| Path | Method | Function |
|---|---|---|
| /v2/error/reset | POST | エラー状態から復帰する |
Request Body: なし
Response Body
{
"success":<bool>
}
APIプラットフォーム(例:Postman)
参考コード例 Python
import requests   				#「requests」ライブラリのインストールが必要です
import json
url = 'http://xxx.xxx.x.xxx:9085/v2/error/reset'  	#IPアドレスを入力
res = requests.post(url)
data = json.loads(res.text)
print(data)
参考コード例 Javascript
<script>
let request = new XMLHttpRequest();
request.open("POST", "http://xxx.xxx.x.xxx:9085/v2/error/reset", true); //IPアドレスを入力
request.setRequestHeader("content-type", "application/json;charset=UTF-8");
request.responseType = "json";
request.send();
request.onload = function () {
window.alert(JSON.stringify(this.response));
};
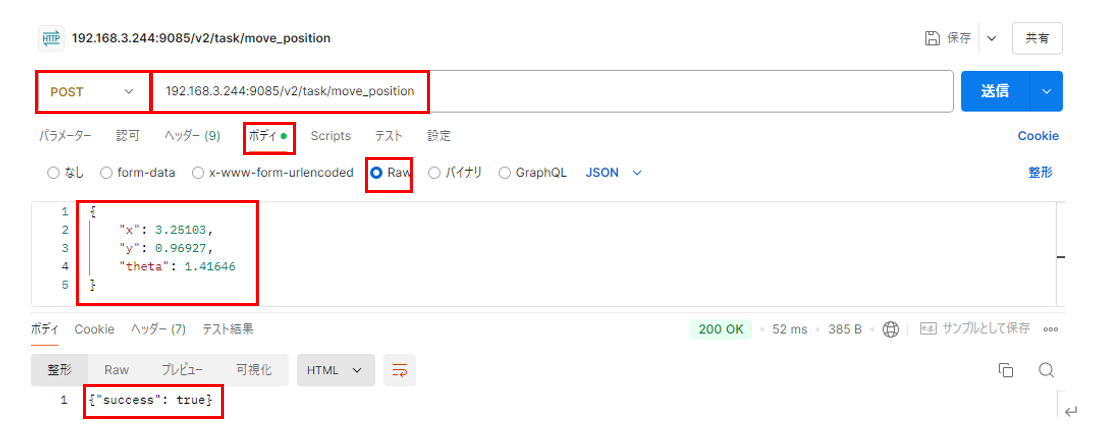
</script>T8 指定位置へ移動
| Path | Method | Function |
|---|---|---|
| /v2/task/move_position | POST | 指定位置へ移動 |
Request Body
{
"x": <float32>           	# x, (マップ原点に対する AMR 座標)
"y": <float32>           	# y, (マップ原点に対する AMR 座標)
"theta": <float32>       	# Machine angle (radian) (実機の⽅向)
"type":<int32>           	# 拡張予約
}
Response Body
{
"success":<bool>
}
APIプラットフォーム(例:Postman)
参考コード例 Python
import requests                                           		#「requests」ライブラリのインストールが必要です
import json

url = 'http://192.XXX.X.XX:9085/v2/task/move_position'    	#IPアドレスを入力
params = {'x':XXX, 'y':XXX, 'theta':XXX}                  		#x, y, thetaを入力
res = requests.post(url, json=params)
data = json.loads(res.text)
print(data)
参考コード例 Javascript
<script>
let request = new XMLHttpRequest();
request.open('POST', 'http://xxx.xxx.x.xxx:9085/v2/task/move_position', true); //IPアドレスを入力
request.setRequestHeader('content-type', 'application/json;charset=UTF-8');
request.responseType = 'json';
let body = {x:xxx, y:xxx, theta:xxx}; //x, y, thetaを入力
request.send(JSON.stringify(body));
request.onload = function() {
window.alert( JSON.stringify( this.response ) );
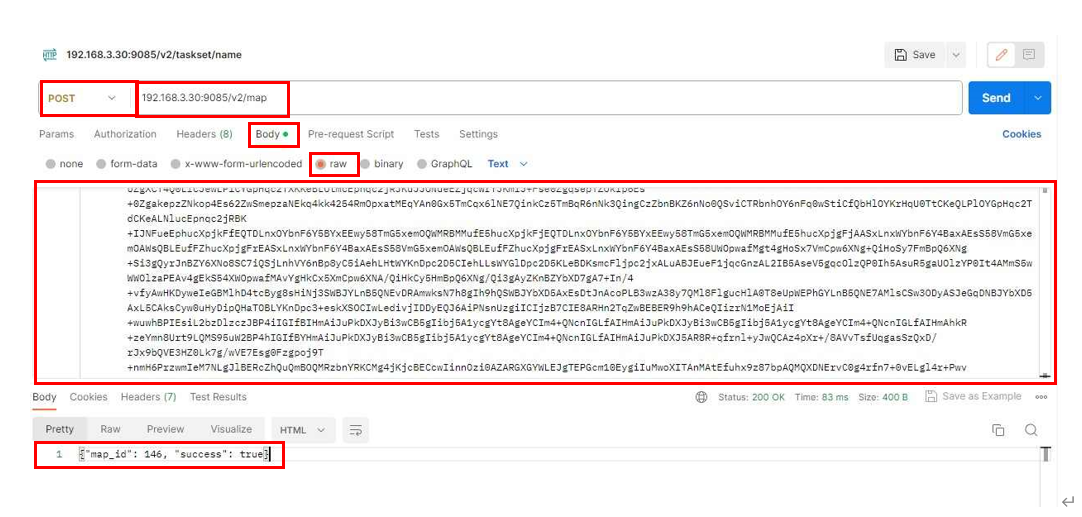
};
</script>T9 タスクセットの名前変更
| Path | Method | Function |
|---|---|---|
| /v2/taskset/name | PUT | 指定idのタスクセットの名前変更 |
Request Body
{
 "cmdSetId": <int32>
 "name": <string>
}
Response Body
{
 "success": <bool>
}
APIプラットフォーム(例:Postman)

参考コード例 Python
import requests                                        		#「requests」ライブラリのインストールが必要です
import json

url = 'http://xxx.xxx.x.xxx:9085/v2/taskset/name'       	#IPアドレスを入力
params = { "cmdSetId":xxx "name": “xxx” }                	#cmdSetId, nameを入力
res = requests.put(url, json=params)
data = json.loads(res.text)
print(data)
参考コード例 Javascript
<script>
let request = new XMLHttpRequest();
request.open('PUT', 'http://xxx.xxx.x.xxx:9085/v2/taskset/name', true); //IPアドレスを入力
request.setRequestHeader('content-type', 'application/json;charset=UTF-8');
request.responseType = 'json';
let body = {cmdSetId : xxx, name : “xxx”}; //cmdSetId, nameを入力
request.send(JSON.stringify(body));
request.onload = function() {
window.alert( JSON.stringify( this.response ) );
};
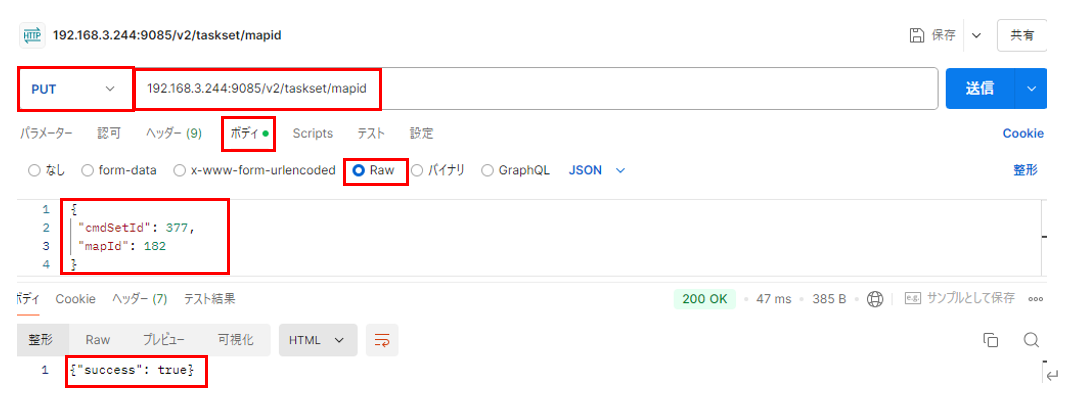
</script>T10 タスクセットを他のマップへ移動
| Path | Method | Function |
|---|---|---|
| /v2/taskset/mapId | PUT | 指定idのタスクセットを他のマップへ移動 |
Request Body
{
 "cmdSetId": <int32>
 "mapId": <int32>
}
Response Body
{
  "success": <bool>
}
APIプラットフォーム(例:Postman)
参考コード例 Python
import requests                                        		#「requests」ライブラリのインストールが必要です
import json
url = 'http://xxx.xxx.x.xxx:9085/v2/taskset/mapid'       	#IPアドレスを入力
params = { "cmdSetId":xxx, "mapId":xxx}               	#cmdSetId, mapIdを入力
res = requests.put(url, json=params)
data = json.loads(res.text)
print(data)
参考コード例 Javascript
<script>
let request = new XMLHttpRequest();
request.open('PUT', 'http://xxx.xxx.x.xxx:9085/v2/taskset/mapid', true); //IPアドレスを入力
request.setRequestHeader('content-type', 'application/json;charset=UTF-8');
request.responseType = 'json';
let body = {cmdSetId :xxx, mapId :xxx }; //cmdSetId, mapIdを入力
request.send(JSON.stringify(body));
request.onload = function() {
window.alert( JSON.stringify( this.response ) );
};
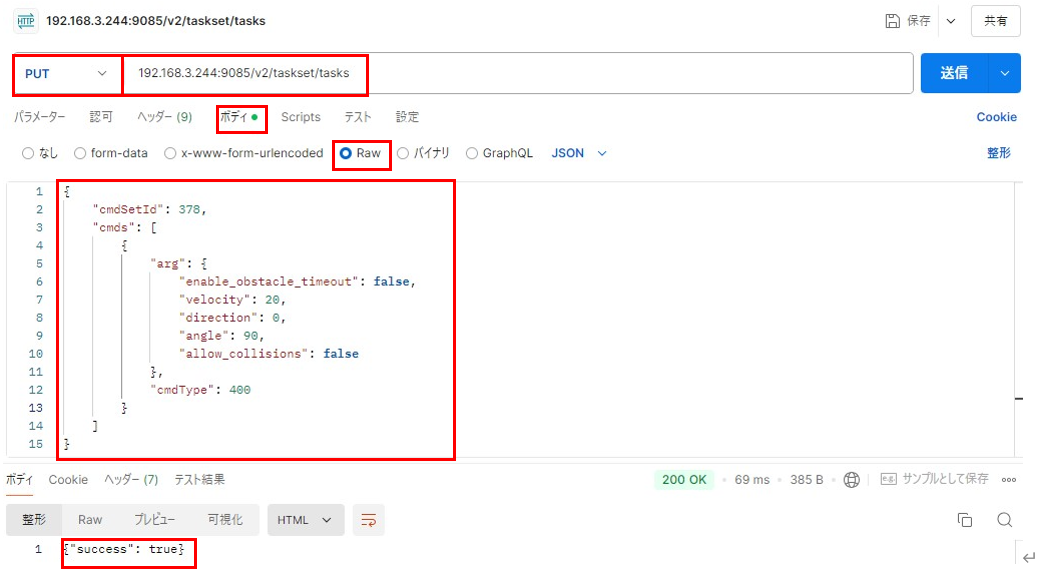
</script>T11 タスクセットのcmdsを変更
| Path | Method | Function |
|---|---|---|
| /v2/taskset/tasks | PUT | 指定idのタスクセットのcmdsを変更 |
Request Body
{
 "cmdSetId": <int32>
 "cmds": <string>
}
Response Body
{
 "success": <bool>
}
APIプラットフォーム(例:Postman)
参考コード例 Python
import requests                                        			#「requests」ライブラリのインストールが必要です
import json
url = 'http://xxx.xxx.x.xxx:9085/v2/taskset/tasks'      		#IPアドレスを入力
params = { "cmdSetId":xxx,
           "cmds":[
			{
                    		"arg":{
                        		    …                         		#cmdTypeに合ったcmdsの内容を記述
                          		 },
                   		 "cmdType":xxx                      	#cmdTypeを入力
                  		},
			,
			.
			{
                    		"arg":{
                        		    …                    		#cmdTypeに合ったcmdsの内容を記述
                          		 },
                   		 "cmdType":xxx                      	#cmdTypeを入力
                  		}
		]
            }
res = requests.put(url, json=params)
data = json.loads(res.text)
print(data)
参考コード例 Javascript
<script>
let request = new XMLHttpRequest();
request.open('PUT', 'http://xxx.xxx.x.xxx:9085/v2/taskset/tasks', true); //IPアドレスを入力
request.setRequestHeader('content-type', 'application/json;charset=UTF-8');
request.responseType = 'json';
let body = { cmdSetId :xxx,
cmds :[
{
arg :{
… //cmdTypeに合ったcmdsの内容を記述
},
cmdType :xxx //cmdTypeを入力
},
,
.
{
arg :{
… //cmdTypeに合ったcmdsの内容を記述
},
cmdType :xxx //cmdTypeを入力
}
]
}
request.send(JSON.stringify(body));
request.onload = function() {
window.alert( JSON.stringify( this.response ) );
};
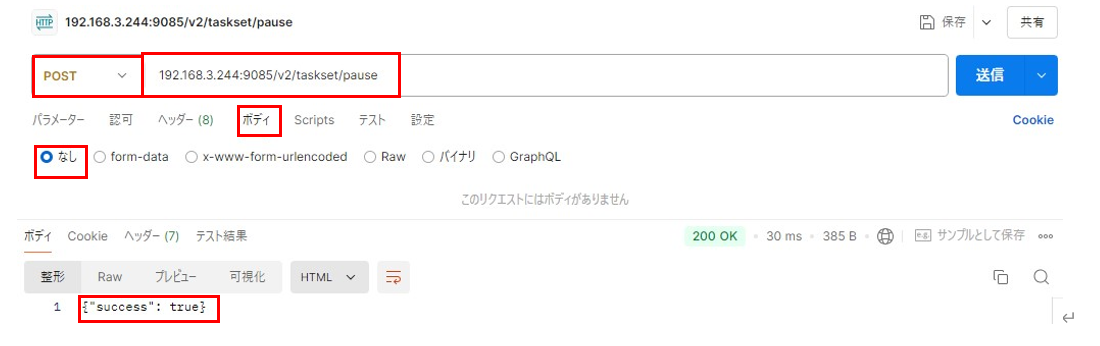
</script>T12 タスクセットの一時停止
| Path | Method | Function |
|---|---|---|
| /v2/taskset/pause | POST | タスクセットの再生を一時停止する |
Request Body : なし
Response Body
{
  "success": <bool>
}
APIプラットフォーム(例:Postman)
参考コード例 Python
import requests                                        		#「requests」ライブラリのインストールが必要です
import json
url = 'http://xxx.xxx.x.xx:9085/v2/taskset/pause'     	#IPアドレスを入力
res = requests.post(url)
data = json.loads(res.text)
print(data)
参考コード例 Javascript
<script>
let request = new XMLHttpRequest();
request.open('POST', 'http://192.XXX.X.XX:9085/v2/taskset/pause', true); //IPアドレスを入力
request.setRequestHeader('content-type', 'application/json;charset=UTF-8');
request.responseType = 'json';
request.send();
request.onload = function() {
window.alert( JSON.stringify( this.response ) );
};
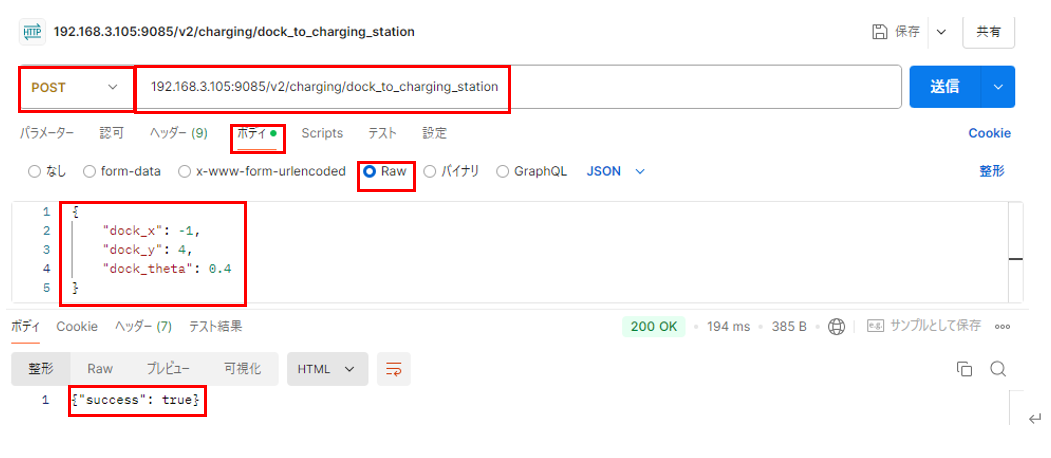
</script>T13 充電ステーションへ移動し、ドッキングする
| Path | Method | Function |
|---|---|---|
| /v2/charging/dock_to_charging_station | POST | 充電ステーションへ移動し、ドッキングする |
Request Body :
{
"dock_x": <float32>,
"dock_y": <float32>,
"dock_theta": <float32>
}
Response Body
{
 "success": <bool>
}
APIプラットフォーム(例:Postman)
参考コード例 Python
import requests                                        				#「requests」ライブラリのインストールが必要です
import json
url = 'http://xxx.xxx.x.xxx:9085/v2/charging/dock_to_charging_station'       	#IPアドレスを入力
params = {
	"dock_x":xxx,
	"dock_y":xxx,
	"dock_theta":xxx
}
res = requests.post(url, json=params)
data = json.loads(res.text)
print(data)
参考コード例 Javascript
<script>
let request = new XMLHttpRequest();
request.open('POST', 'http://xxx.xxx.x.xxx:9085/v2/charging/dock_to_charging_station ', true); //IPアドレスを入力
request.setRequestHeader('content-type', 'application/json;charset=UTF-8');
request.responseType = 'json';
let body = { //充電ステーションの座標
dock_x: xxx,
dock_y: xxx,
dock_theta: xxx
};
request.send(JSON.stringify(body));
request.onload = function() {
window.alert( JSON.stringify( this.response ) );
};
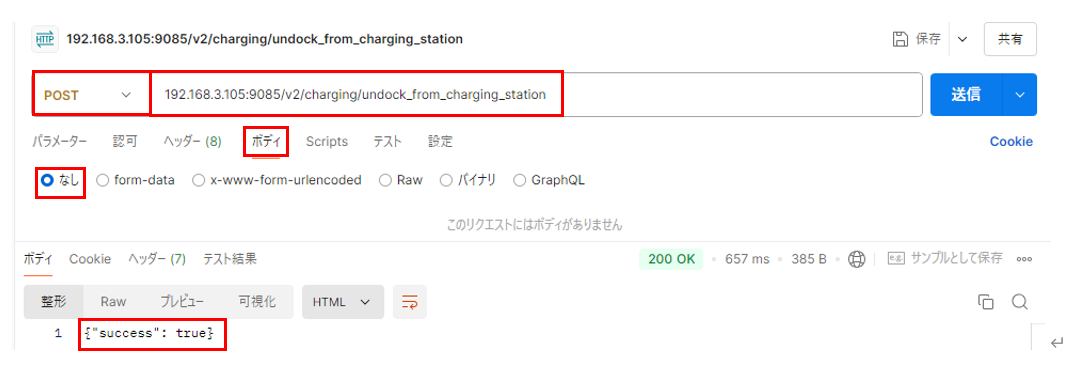
</script>T14 充電ステーションから離れる
| Path | Method | Function |
|---|---|---|
| /v2/charging/undock_from_charging_station | POST | 充電ステーションから離れる |
Request Body なし
Response Body
{
 "success": <bool>
}
APIプラットフォーム(例:Postman)
参考コード例 Python
import requests                                        				#「requests」ライブラリのインストールが必要です
import json
url = 'http://xxx.xxx.x.xxx:9085/v2/charging/undock_from_charging_station'       	#IPアドレスを入力
res = requests.post(url)
data = json.loads(res.text)
print(data)
参考コード例 Javascript
<script>
let request = new XMLHttpRequest();
request.open('POST', 'http://xxx.xxx.x.xxx:9085/v2/charging/undock_from_charging_station ', true); //IPアドレスを入力
request.setRequestHeader('content-type', 'application/json;charset=UTF-8');
request.responseType = 'json';
request.send();
request.onload = function() {
window.alert( JSON.stringify( this.response ) );
};
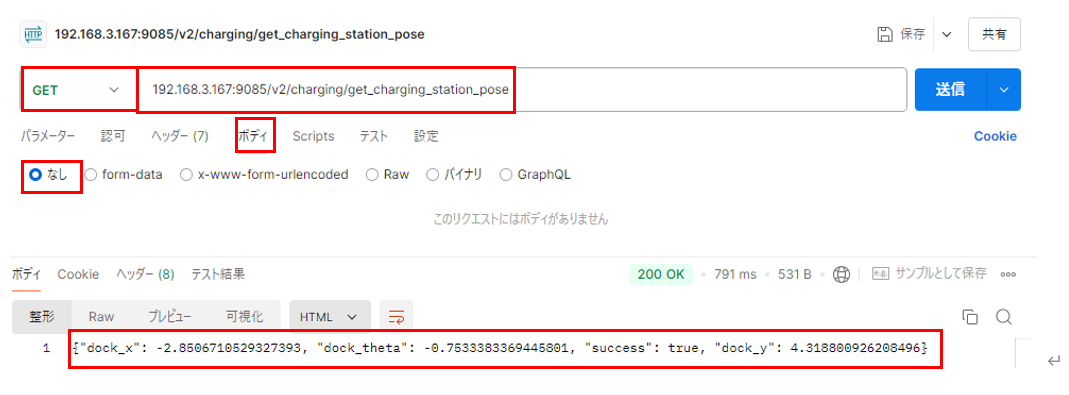
</script>T15 充電ステーション座標の取得
| Path | Method | Function |
|---|---|---|
| /v2/calibration/get_charging_station_pose | GET | 充電ステーションの座標を取得する |
Request Body なし
Response Body
{
"dock_x": <float32>,    				#充電ステーションのx座標
"dock_y": <float32>,    				#充電ステーションのy座標
"dock_theta": <float32>,    			#充電ステーションの角度
“success”: <bool >
}
APIプラットフォーム(例:Postman)
参考コード例 Python
import requests                                          					#「requests」ライブラリのインストールが必要です
import json
url = 'http://xxx.xxx.x.xxx:9085/v2/charging/get_charging_station_pose '             	#IPアドレスを入力
res = requests.get(url)
data = json.loads(res.text)
print(data)
参考コード例 Javascript
<script>
let request = new XMLHttpRequest();
request.open('GET', 'http://xxx.xxx.x.xxx:9085/v2/calibration/docking_distance_offset', true); //IPアドレスを入力
request.setRequestHeader('content-type', 'application/json;charset=UTF-8');
request.responseType = 'json';
request.send();
request.onload = function() {
window.alert( JSON.stringify( this.response ) );
};
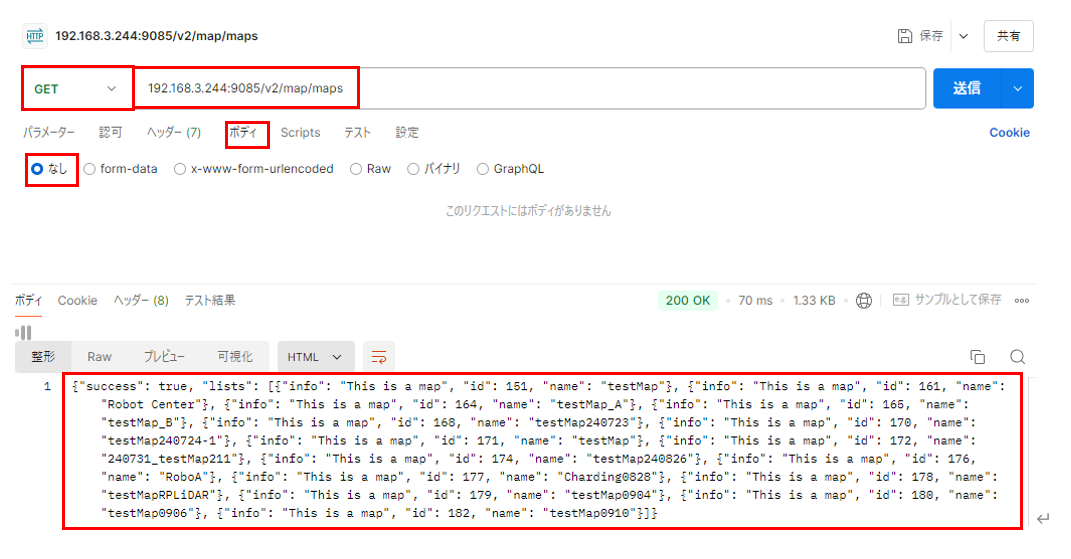
</script>M1 マップのリスト取得
| Path | Method | Function |
|---|---|---|
| /v2/map/maps | GET | マップのリストを取得する |
Request Body: なし
Response Body
{
"success": <bool >
"lists": [   …   ]            	#JSON
}
"list"
[
  {
    "info": "<string>",  # map info (Reserved, not used)
    "id": <uint32>,      # map id
    "name": "<string>"   # map name
  },
  .
  .
  {
    "info": "<string>",   # map info (Reserved, not used)
    "id": <uint32>,       # map id
    "name": "<string>"    # map name
  }
]
APIプラットフォーム(例:Postman)
参考コード例 Python
import requests                                          		#「requests」ライブラリのインストールが必要です
import json
url = 'http://192.XXX.X.XX:9085/v2/map/maps'             	#IPアドレスを入力
res = requests.get(url)
data = json.loads(res.text)
print(data)
参考コード例 Javascript
<script>
let request = new XMLHttpRequest();
request.open('GET', 'http://192.XXX.X.XX:9085/v2/map/maps', true); //IPアドレスを入力
request.setRequestHeader('content-type', 'application/json;charset=UTF-8');
request.responseType = 'json';
request.send();
request.onload = function() {
window.alert( JSON.stringify( this.response ) );
};
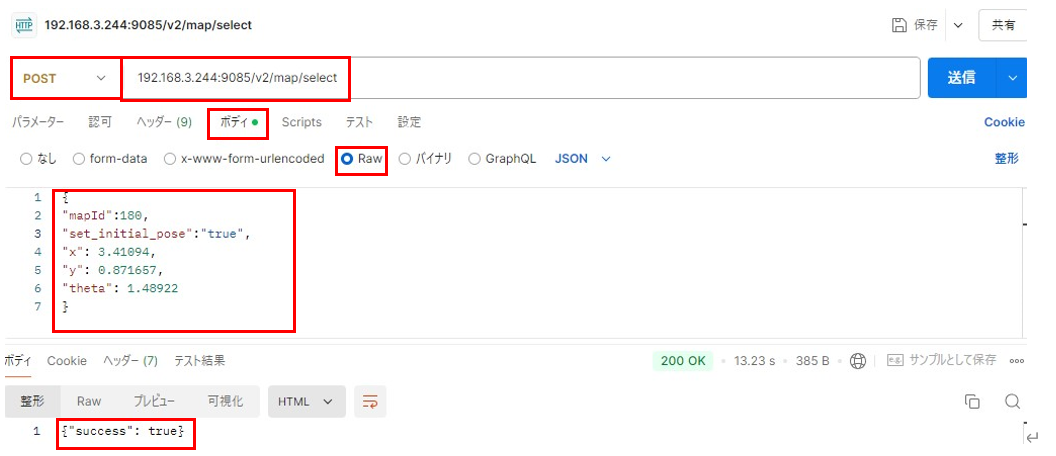
</script>M2-1 idを指定してマップの選択
| Path | Method | Function |
|---|---|---|
| /v2/map/select | POST | idを指定してマップを選択する |
「M10: マップデータの走行可能領域を変更」/v2/map/map_edits「M11: マップデータの走行不可領域を変更」/v2/map/virtual_obstacles「M12: マップデータの減速エリアを変更」/v2/map/speed_limit_zones「M13: マップデータのランドマークを変更」/v2/map/landmarks
を送信後は、マップへ正しく反映させるために、必ず本APIを送信してください。
Request Body
{
	"mapId":xxx,			#mapIdを入力
	"set_initial_pose":<bool>,  	#イニシャルポジションを有効/無効
	"x":<float64>,			#イニシャルポジションのx座標
	"y":<float64>,			#イニシャルポジションのx座標
	"theta":<float64> 			#イニシャルポジションの向き
}
Response Body
{
"success":<bool>
}
APIプラットフォーム(例:Postman)
参考コード例 Python
import requests                                        	#「requests」ライブラリのインストールが必要です
import json
url = 'http://xxx.xxx.x.xxx:9085/v2/map/select'         		#IPアドレスを入力
params = {
	"mapId":xxx,						#mapIdを入力
	"set_initial_pose":<bool>,     				#イニシャルポジションを有効/無効
	"x": xxx,		    					#イニシャルポジションのx座標
	"y": xxx,		    					#イニシャルポジションのx座標
	"theta": xxx						#イニシャルポジションの向き
	}
res = requests.post(url, json=params)
data = json.loads(res.text)
print(data)
参考コード例 Javascript
<script>
let request = new XMLHttpRequest();
request.open("POST", "http://xxx.xxx.x.xxx:9085/v2/map/select", true); //IPアドレスを入力
request.setRequestHeader("content-type", "application/json;charset=UTF-8");
request.responseType = "json";
let body = {
mapId: xxx, // mapIdを入力
set_initial_pose: <bool>, //</bool>イ ニシャルポジションを有効/無効
x: xxx, //</float64>イニシャルポジションのx座標
y: xxx, //</float64>イニシャルポジションのx座標
theta: xxx //</float64>イニ/シャルポジションの向き
};
request.send(JSON.stringify(body));
request.onload = function () {
window.alert(JSON.stringify(this.response));
};
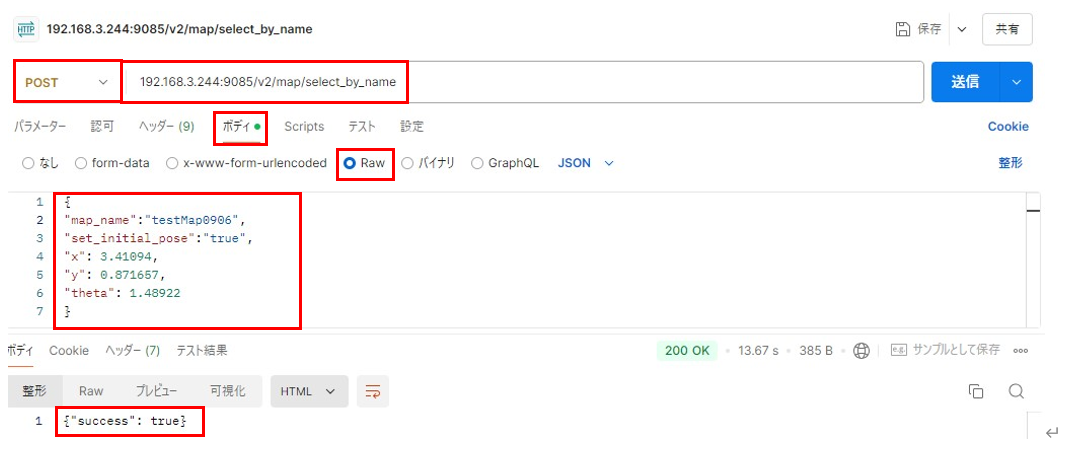
</script>M2-2 名前でマップの選択
| Path | Method | Function |
|---|---|---|
| /v2/map/select_by_name | POST | 名前を指定してマップを選択する |
「M10: マップデータの走行可能領域を変更」/v2/map/map_edits「M11: マップデータの走行不可領域を変更」/v2/map/virtual_obstacles「M12: マップデータの減速エリアを変更」/v2/map/speed_limit_zones「M13: マップデータのランドマークを変更」/v2/map/landmarks
を送信後は、マップへ正しく反映させるために、必ず本APIを送信してください。
Request Body
{
"map_name":<string>		#MapNameを入力
	"set_initial_pose":<bool>,  	#イニシャルポジションを有効/無効
	"x":<float64>,			#イニシャルポジションのx座標
	"y":<float64>,			#イニシャルポジションのx座標
	"theta":<float64> 			#イニシャルポジションの向き}
Response Body
{
"success":<bool>
}
APIプラットフォーム(例:Postman)
参考コード例 Python
import requests                                        	#「requests」ライブラリのインストールが必要です
import json
url = 'http://xxx.xxx.x.xxx:9085/v2/map/select'         		#IPアドレスを入力
params = {
	"map_name":xxx,						#map名を入力
	"set_initial_pose":<bool>,     				#イニシャルポジションを有効/無効
	"x": xxx,		    					#イニシャルポジションのx座標
	"y": xxx,		    					#イニシャルポジションのx座標
	"theta": xxx						#イニシャルポジションの向き
	}
res = requests.post(url, json=params)
data = json.loads(res.text)
print(data)
参考コード例 Javascript
<script>
let request = new XMLHttpRequest();
request.open("POST", "http://xxx.xxx.x.xxx:9085/v2/map/select_by_name”, true); //IPアドレスを入力
request.setRequestHeader(“content-type”, “application/json;charset=UTF-8”);
request.responseType = “json”;
let body = {
map_name: xxx, // map名を入力
set_initial_pose: <bool>, //</bool>イ ニシャルポジションを有効/無効
x: xxx, //</float64>イニシャルポジションのx座標
y: xxx, //</float64>イニシャルポジションのx座標
theta: xxx, //</float64>イニ/シャルポジションの向き
};
request.send(JSON.stringify(body));
request.onload = function () {
window.alert(JSON.stringify(this.response));
};
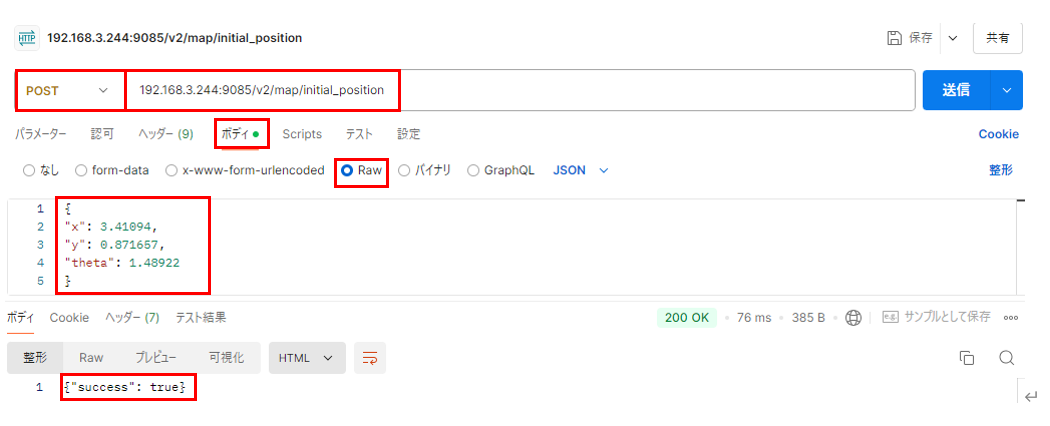
</script>M3 現在位置の設定
| Path | Method | Function |
|---|---|---|
| /v2/map/initial_position | POST | 選択中のマップに対して⾃機の現在位置を設定する |
Request Body
{
"x": <float32>           	# ros_native_x, (マシン相対座標)
"y": <float32>		# ros_native_y, (マシン相対座標)
"theta": <float32> 	# Machine angle (radian) (実機の⽅向)
}
Response Body
{
"success":<bool>
}
APIプラットフォーム(例:Postman)
参考コード例 Python
import requests                                        	#「requests」ライブラリのインストールが必要です
import json
url = 'http://xxx.xxx.x.xxx:9085/v2/map/initial_position'         	#IPアドレスを入力
params = {
	"x": xxx,		                                	#イニシャルポジションのx座標
	"y": xxx,		                                	#イニシャルポジションのx座標
	"theta": xxx		                            #イニシャルポジションの向き
	}
res = requests.post(url, json=params)
data = json.loads(res.text)
print(data)
参考コード例 Javascript
<script>
let request = new XMLHttpRequest();
request.open("POST", "http://xxx.xxx.x.xxx:9085/v2/map/initial_position", true); //IPアドレスを入力
request.setRequestHeader("content-type", "application/json;charset=UTF-8");
request.responseType = "json";
let body = {
x: xxx, //</float64>イニシャルポジションのx座標
y: xxx, //</float64>イニシャルポジションのx座標
theta: xxx, //</float64>イニ/シャルポジションの向き
};
request.send(JSON.stringify(body));
request.onload = function () {
window.alert(JSON.stringify(this.response));
};
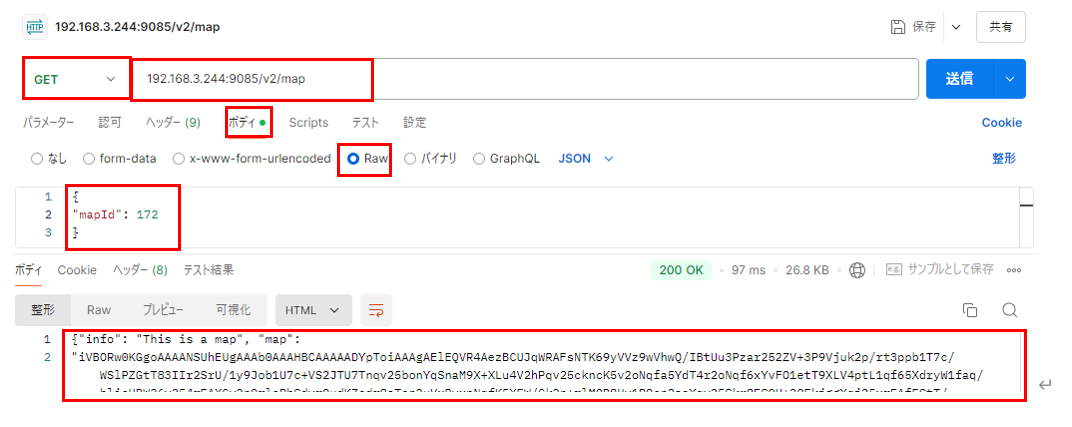
</script>M4-1 マップの取得
| Path | Method | Function |
|---|---|---|
| /v2/map | GET | 指定idのマップを取得する |
Request Body
{
"mapId":<int32>
}
Response Body
{
"info": <string>,                                   	#map info reservation. Not used.
"map": <string (base64)>,             			#map png
"name": <string>,                                   	#map name
"success" : <bool>,                                 	#true:Done, false:failure
“landmarks”:[
	{
	“info”:<string>,					#Not used.
	“other:{“defaultHome”:<bool>},   			#Default setting
	“name”:<string>,					#landmark name
	“location”:{
		“y”:<float32>,				#y, (マップ原点に対するlandmark座標)
		“x”:<float32>,				#x, (マップ原点に対するlandmark座標)
		“theta”:<float32>				#angle (radian) (Landmarkの⽅向)
			}
	}
],
"map_edits": <string (base64)>,         	    #edits png
"virtual_obstacles": <string (base64)>,   	#obst png
"map_h: <uint32>,                                  	 #ADD map png width pixel
"yaml": <string>,                                   	#map yaml including origin and resolution}
“speed_limit_zones”:[
	{
	“color”<color hex code>,				#color of speed limit zone
	“speed”:<float32>,				#setting spped of speed limit zone
	“zone:[
		[<float32>,<float32>]			#corner1 of speed limit zone
		[<float32>,<float32>]			#corner2 of speed limit zone
		[<float32>,<float32>]			#corner3 of speed limit zone
		[<float32>,<float32>]			#corner4 of speed limit zone
	}
],
"map_w: <uint32>,                          		#ADD map png width pixel
"iniYaml": <string>,                               	#initial_pose yaml
"id" : <uint32>                                   	#map id
}
APIプラットフォーム(例:Postman)
参考コード例 Python
import requests                    		#「requests」ライブラリのインストールが必要です
import json
url = 'http://xxx.xxx.x.xxx:9085/v2/map'        	#IPアドレスを入力
params = {'mapId':xxx}                         #mapIdを入力
res = requests.get(url, json=params)
data = json.loads(res.text)
print(data)
参考コード例 Javascript
<script>
    let request = new XMLHttpRequest();
    request.open('GET', 'http://xxx:.xxx.x.xxx:9085/v2/map?mapId=xxx', true); 		//IPアドレス, mapIdを入力
    request.setRequestHeader('content-type', 'application/json;charset=UTF-8');
    request.responseType = 'json';
    request.send();
    request.onload = function() {
        window.alert( JSON.stringify( this.response ) );
      };
</script>NG例
request.open('GET', 'http://192.XXX.X.XX:9085/v2/map, true);
request.setRequestHeader('content-type', 'application/json;charset=UTF-8');
request.responseType = 'json';
request.send(JSON.stringify({mapId:XXX}));  //GETメソッドでは引数をBodyにして送信できません
説明
info : 拡張予約
map: マップの画像データ (拡張子 png)
name : マップ名
success : コマンド成功・失敗
landmarks: ランドマーク位置情報
map_edits: マップの形状編集データ (拡張子 png)
virtual_obstacles: 走行不可領域のデータ (拡張子 png)
map_h: マップ高さ(単位 pixel)
yaml: マップ原点情報と解像度情報を含む
speedlimitzones: 減速エリア領域情報
map_w: マップ幅(単位 pixel)
iniYaml: AMR初期位置情報
id : マップid
yaml について
KeiganALI でマップを作成した場合⾃動で⽣成され、マップに紐付けられる。以下のようなデータとなる。
image: map.png                       	#マップの画像データ名
resolution: 0.050000               	#地図の解像度(5cm=0.05), 固定値
origin: [-8.000000, -11.200000, 0.000000] 	#マップの原点座標
resolution は 0.05 (単位 m) 固定。
origin は、マップ原点に対する、マップ左下のコーナー点の座標(マップ原点の定義)となる。
詳細は後半「座標指定について」を参照下さい。
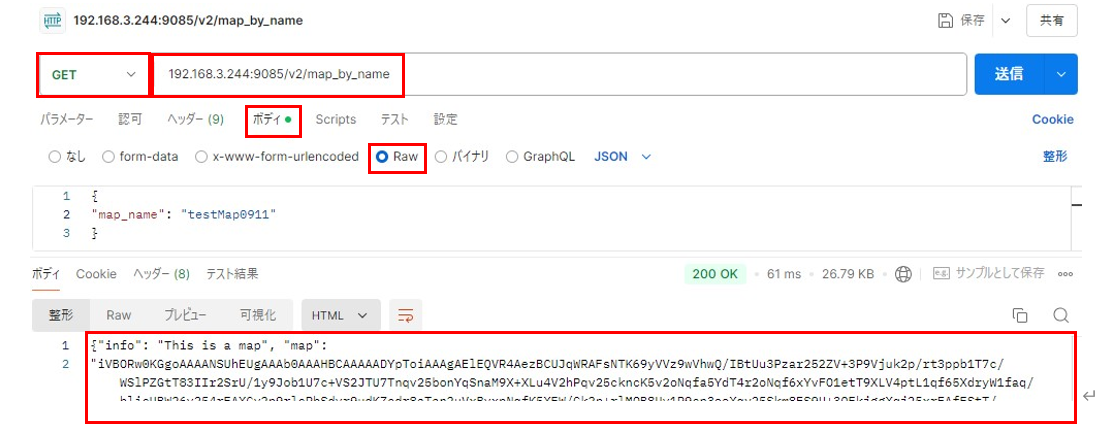
M4-2 マップ名で、マップを取得
| Path | Method | Function |
|---|---|---|
| /v2/map | GET | 指定マップ名のマップを取得する |
Request Body
{
"map_name":<string>
}
Response Body
{
"info": <string>,                                   	#map info reservation. Not used.
"map": <string (base64)>,             			#map png
"name": <string>,                                   	#map name
"success" : <bool>,                                 	#true:Done, false:failure
“landmarks”:[
	{
	“info”:<string>,					#Not used.
	“other:{“defaultHome”:<bool>},   			#Default setting
	“name”:<string>,					#landmark name
	“location”:{
		“y”:<float32>,				#y, (マップ原点に対するlandmark座標)
		“x”:<float32>,				#x, (マップ原点に対するlandmark座標)
		“theta”:<float32>				#angle (radian) (Landmarkの⽅向)
			}
	}
],
"map_edits": <string (base64)>,         	#edits png
"virtual_obstacles": <string (base64)>,   	#obst png
"map_h: <uint32>,                                  	 #ADD map png width pixel
"yaml": <string>,                                   	#map yaml including origin and resolution}
“speed_limit_zones”:[
	{
	“color”<color hex code>,				#color of speed limit zone
	“speed”:<float32>,				#setting spped of speed limit zone
	“zone:[
		[<float32>,<float32>]			#corner1 of speed limit zone
		[<float32>,<float32>]			#corner2 of speed limit zone
		[<float32>,<float32>]			#corner3 of speed limit zone
		[<float32>,<float32>]			#corner4 of speed limit zone
	}
],
"map_w: <uint32>,                          		#ADD map png width pixel
"iniYaml": <string>,                               	#initial_pose yaml
"id" : <uint32>                                   	#map id
}
APIプラットフォーム(例:Postman)
参考コード例 Python
import requests                        		#「requests」ライブラリのインストールが必要です
import json
url = 'http://xxx.xxx.x.xxx:9085/v2/map_by_name'    	#IPアドレスを入力
params = {'map_name':"xxx"}              		#mapIdを入力
res = requests.get(url, json=params)
data = json.loads(res.text)
print(data)
参考コード例 Javascript
<script>
let request = new XMLHttpRequest();
request.open("GET", "http://xxx.xxx.x.xxx:9085/v2/map_by_name", true); 		//IPアドレスを入力
request.setRequestHeader("content-type", "application/json;charset=UTF-8");
request.responseType = "json";
let body = { map_name: "xxx" }; 						//マップ名を入力
request.send(JSON.stringify(body));
request.onload = function () {
      window.alert(JSON.stringify(this.response));
};
</script>NG例
request.open('GET', 'http://192.XXX.X.XX:9085/v2/map, true);
request.setRequestHeader('content-type', 'application/json;charset=UTF-8');
request.responseType = 'json';
request.send(JSON.stringify({map_name:XXX}));  //GETメソッドでは引数をBodyにして送信できません
M5-1 マップの削除
| Path | Method | Function |
|---|---|---|
| /v2/map | DELETE | 指定idのマップを削除 |
Request Body
{
  "mapId": <int32>
}
Response Body
{
  "success": <bool>
}
APIプラットフォーム(例:Postman)
参考コード例 Python
import requests                                        		#「requests」ライブラリのインストールが必要です
import json
url = 'http://xxx.xxx.x.xxx:9085/v2/map'                	#IPアドレスを入力
params = { "mapId":xxx }                    		#mapIdを入力
res = requests.delete(url, json=params)
data = json.loads(res.text)
print(data)
参考コード例 Javascript
<script>
let request = new XMLHttpRequest();
request.open("DELETE", "http://xxx.xxx.x.xxx:9085/v2/map", true); 		//IPアドレスを入力
request.setRequestHeader("content-type", "application/json;charset=UTF-8");
request.responseType = "json";
let body = { mapId: xxx }; 							//mapIdを入力
request.send(JSON.stringify(body));
request.onload = function () {
  window.alert(JSON.stringify(this.response));
};
 </script>
M5-2 マップの追加
| Path | Method | Function |
|---|---|---|
| /v2/map | POST | マップを追加する |
Request Body
{
  "map_name": <string>            #map name
  "map": <string(base64)>                #map png
  "map_edits": < string(base64)>          #edits png
  "virtual_obstacles": < string(base64)>  #obst png
  "map_yaml": <string>            #map yaml including origin and resolution
  "init_yaml": <string>           #initial_pose yaml
“landmarks”:[
	{
	“info”:<string>,			#landmark info reservation. Not used.
	“other:{“defaultHome”:<bool>},   #Default setting
	“name”:<string>,			#landmark name
	“location”:{
		“y”:<float32>,		#y, (マップ原点に対するlandmark座標)			“x”:<float32>,		#x, (マップ原点に対するlandmark座標)
		“theta”:<float32>		#angle (radian) (Landmarkの⽅向)
			}
	}
] ,
“speed_limit_zones”:[
	{
	“color”<color hex code>,			#color of speed limit zone
	“speed”:<float32>,				#setting spped of speed limit zone
	“zone:[
		[<float32>,<float32>]			#corner1 of speed limit zone
		[<float32>,<float32>]			#corner2 of speed limit zone
		[<float32>,<float32>]			#corner3 of speed limit zone
		[<float32>,<float32>]			#corner4 of speed limit zone
	}
 ]
}
Response Body
{
 "mapId": <int32>
 "success": <bool>
}
APIプラットフォーム(例:Postman)
参考コード例 Python
import requests                               #「requests」ライブラリのインストールが必要です
import json

url = 'http://192.XXX.X.XX:9085/v2/map'       #IPアドレスを入力
params = {
  "map_name":XXX.png,                         #任意のマップ名を入力
  "map":"iVB0Rw0KGg~~中省略~~SuQmCC",         #追加するマップデータ(png)
  "map_edits":"",                             #追加する走行可能領域のマップデータ(png), 必要な場合のみ
  "virtual_obstacles":"",                     #追加する走行不可領域のマップデータ(png), 必要な場合のみ
  "map_yaml":"image: map.png\nresolution: 0.050000\norigin: [-6.400000, -9.600000, 0.000000]\nnegate: 0\noccupied_thresh: 0.65\nfree_thresh: 0.196\n",
                                              #originの値のみ変更可, 他は固定値
  "init_yaml":"initial_pos_x: 0.11\ninitial_pos_y: 0.15\ninitial_pos_a: -3.00\n"
                                              #KeiganALIの初期位置情報, 必要な場合のみ
          }

res = requests.post(url, json=params)
data = json.loads(res.text)
print(data)
参考コード例 Javascript
<script>
let request = new XMLHttpRequest();
request.open('POST', 'http://192.XXX.X.XX:9085/v2/map', true); #IPアドレスを入力
request.setRequestHeader('content-type', 'application/json;charset=UTF-8');
request.responseType = 'json';
let body = {
'map_name':XXX.png, #任意のマップ名を入力
'map':"iVB0Rw0KGg~~中省略~~SuQmCC", #追加するマップデータ(png)
'map_edits':"", #追加する走行可能領域のマップデータ(png), 必要な場合のみ
'virtual_obstacles':"", #追加する走行不可領域のマップデータ(png), 必要な場合のみ
'map_yaml':"image: map.png\nresolution: 0.050000\norigin: [-6.400000, -9.600000, 0.000000]\nnegate: 0\noccupied_thresh: 0.65\nfree_thresh: 0.196\n",
#originの値のみ変更可, 他は固定値
'init_yaml':"initial_pos_x: 0.11\ninitial_pos_y: 0.15\ninitial_pos_a: -3.00\n"
#KeiganALIの初期位置情報, 必要な場合のみ
};
request.send(JSON.stringify(body));
request.onload = function() {
window.alert( JSON.stringify( this.response ) );
};
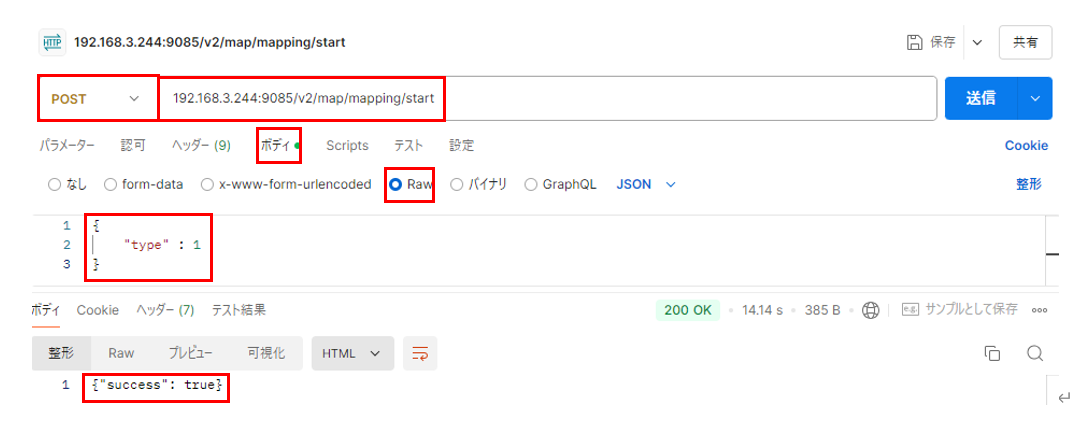
</script>M6 マップスキャンの開始、中止
| Path | Method | Function |
|---|---|---|
| /v2/map/mapping/start | POST | マップのスキャンの開始・中止 |
Request Body
{
  "type": <uint32>  // 1:start, 2:stop
}
Response Body
{
  "success": <bool>
}
APIプラットフォーム(例:Postman)
参考コード例 Python
import requests                                             	#「requests」ライブラリのインストールが必要です
import json
url = 'http://xxx.xxx.x.xxx:9085/v2/map/mapping/start'       #IPアドレスを入力
params = {
           "type":x                             	#マップスキャンの開始:1 , 中止2
           }
res = requests.post(url, json=params)
data = json.loads(res.text)
print(data)
参考コード例 Javascript
<script>
let request = new XMLHttpRequest();
request.open('POST', 'http://xxx.xxx.x.xxx:9085/v2/map/mapping/start', true); //IPアドレスを入力
request.setRequestHeader('content-type', 'application/json;charset=UTF-8');
request.responseType = 'json';
let body = {
'type':1 //マップスキャンの開始:1 , 中止2
};
request.send(JSON.stringify(body));
request.onload = function() {
window.alert( JSON.stringify( this.response ) );
};
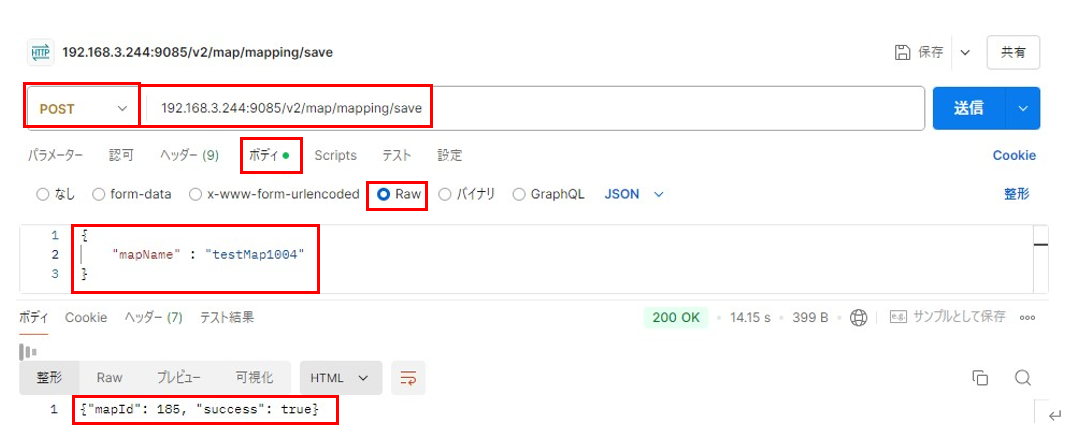
</script>M7 スキャンしたマップの保存
| Path | Method | Function |
|---|---|---|
| /v2/map/mapping/save_map | POST | スキャンしたマップの保存 |
Request Body
{
  "mapName": <string>  #マップ名
}
Response Body
{
 "success": <bool>
 "mapId": <int32>
}
APIプラットフォーム(例:Postman)
参考コード例 Python
import requests                                                		#「requests」ライブラリのインストールが必要です
import json
url = 'http://xxx.xxx.x.xxx:9085/v2/map/mapping/save'       		#IPアドレスを入力
params = {
          "mapName":"xxx"                               	#追加したいマップ名を入力
          }
res = requests.post(url, json=params)
data = json.loads(res.text)
print(data)
参考コード例 Javascript
<script>
    let request = new XMLHttpRequest();
    request.open('POST', 'http://xxx.xxx.x.xxx:9085/v2/map/mapping/save', true);  	//IPアドレスを入力
    request.setRequestHeader('content-type', 'application/json;charset=UTF-8');
    request.responseType = 'json';
    let body = {
    	'mapName':"xxx"                               			//追加したいマップ名を入力
    };
    request.send(JSON.stringify(body));
    request.onload = function() {
        window.alert( JSON.stringify( this.response ) );
      };
 </script>
M8 マップデータを変更
| Path | Method | Function |
|---|---|---|
| /v2/map/map | PUT | 指定idのマップを変更する |
Request Body
{
  "mapId": <int32>   #map id
  "map": <uint8[]>   #map png
}
Response Body
{
 "success": <bool>
}
APIプラットフォーム(例:Postman)
参考コード例 Python
import requests                                                		#「requests」ライブラリのインストールが必要です
import json
url = 'http://xxx.xxx.x.xxx:9085/v2/map/map'                    	#IPアドレスを入力
params = {
            "mapId":xxx,                              	#任意のmapIdを入力
            "map": "iVB0Rw0KGg~~中省略~~SuQmCC"        	#追加するマップデータ(png)
           }
res = requests.put(url, json=params)
data = json.loads(res.text)
print(data)
参考コード例 Javascript
<script>
    let request = new XMLHttpRequest();
    request.open('PUT', 'http://xxx.xxx.x.xxx:9085/v2/map/map', true);  #IPアドレスを入力
    request.setRequestHeader('content-type', 'application/json;charset=UTF-8');
    request.responseType = 'json';
   let body = {
   	'mapId':xxx,                                          //任意のmapIdを入力
       'map':"iVB0Rw0KGg~~中省略~~SuQmCC"                  //追加するマップデータ(png)
                };
    request.send(JSON.stringify(body));
    request.onload = function() {
        window.alert( JSON.stringify( this.response ) );
      };
 </script>
M9 マップデータの名前を変更
| Path | Method | Function |
|---|---|---|
| /v2/map/name | PUT | 指定idのマップの名前を変更する |
Request Body
{
  "mapId": <int32>   #map id
  "name": <string>   #map name
}
Response Body
{
 "success": <bool>
}
APIプラットフォーム(例:Postman)
参考コード例 Python
import requests                                                		#「requests」ライブラリのインストールが必要です
import json

url = 'http://xxx.xxx.x.xxx:9085/v2/map/name'                    	#IPアドレスを入力
params = {
            "mapId":xxx,          				#変更するmapIdを入力
            "name":"ABCD"             			#変更したいマップの名前を入力
           }
res = requests.put(url, json=params)
data = json.loads(res.text)
print(data)
参考コード例 Javascript
<script>
    let request = new XMLHttpRequest();
    request.open('PUT', 'http://xxx.xxx.x.xxx:9085/v2/map/name', true);  		//IPアドレスを入力
    request.setRequestHeader('content-type', 'application/json;charset=UTF-8');
    request.responseType = 'json';
   let body = {
   	'mapId':xxx,                                           		//任意のmapIdを入力
       'name':"ABCD"                                          		//変更したいマップの名前を入力
                };
    request.send(JSON.stringify(body));
    request.onload = function() {
        window.alert( JSON.stringify( this.response ) );
      };
 </script>
M10 マップデータの走行可能領域を変更
| Path | Method | Function |
|---|---|---|
| /v2/map/map_edits | PUT | 指定idのマップデータの走行可能領域を変更 |
コマンドを送信しないと、正しくマップへ反映されません。
Request Body
{
  "mapId": <int32>   #map id
  "map_edits": <string(base64)> #map_edits png
}
Response Body
{
 "success": <bool>
}
APIプラットフォーム(例:Postman)
参考コード例 Python
import requests                                               		#「requests」ライブラリのインストールが必要です
import json
url = 'http://xxx.xxx.x.xxx:9085/v2/map/map_edits'             	#IPアドレスを入力
params = {
    "mapId":xxx,                                      	#任意のmapIdを入力
    "map_edits":"iVB0Rw0KGg~~中省略~~SuQmCC"          	#追加する走行可能領域のマップデータ(png)
           }
res = requests.put(url, json=params)
data = json.loads(res.text)
print(data)
参考コード例 Javascript
<script>
    let request = new XMLHttpRequest();
    request.open('PUT', 'http://xxx.xxx.x.xxx:9085/v2/map/map_edits', true); 	//IPアドレスを入力
    request.setRequestHeader('content-type', 'application/json;charset=UTF-8');
    request.responseType = 'json';
   let body = {
   	'mapId':xxx,                                    //任意のmapIdを入力
   	'map_edits':"iVB0Rw0KGg~~中省略~~SuQmCC"       //追加する走行可能領域のマップデータ(png)
                };
    request.send(JSON.stringify(body));
    request.onload = function() {
        window.alert( JSON.stringify( this.response ) );
      };
 </script>
M11 マップデータの走行不可領域を変更
| Path | Method | Function |
|---|---|---|
| /v2/map/virtual_obstacles | PUT | 指定idのマップデータの走行不可領域を変更 |
コマンドを送信しないと、正しくマップへ反映されません。
Request Body
{
  "mapId": <int32>   			#map id
  "virtual_obstacles": <string(base64)> 	#virtual_obstacles png
}
Response Body
{
 "success": <bool>
}
APIプラットフォーム(例:Postman)
参考コード例 Python
import requests                                                		#「requests」ライブラリのインストールが必要です
import json
url = 'http://xxx.xxx.x.xxx:9085/v2/map/virtual_obstacles'      	#IPアドレスを入力
    params = {
        "mapId":xxx,                                       #任意のmapIdを入力
        "virtual_obstacles":"iVB0Rw0KGg~~中省略~~SuQmCC"   	#追加する走行不可領域のマップデータ(png)
           }
res = requests.put(url, json=params)
data = json.loads(res.text)
print(data)
参考コード例 Javascript
<script>
let request = new XMLHttpRequest();
request.open('PUT', 'http://xxx.xxx.x.xxx:9085/v2/map/virtual_obstacles', true); //IPアドレスを入力
request.setRequestHeader('content-type', 'application/json;charset=UTF-8');
request.responseType = 'json';
let body = {
'mapId':xxx, //任意のmapIdを入力
'virtual_obstacles':"iVB0Rw0KGg~~中省略~~SuQmCC" //追加する走行不可領域のマップデータ(png)
};
request.send(JSON.stringify(body));
request.onload = function() {
window.alert( JSON.stringify( this.response ) );
};
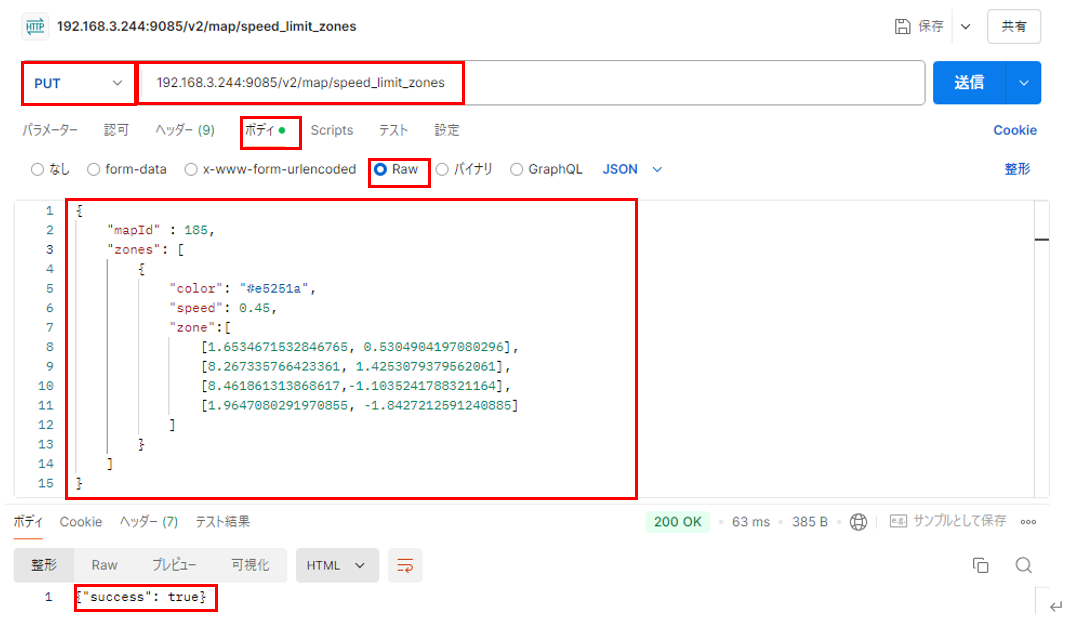
</script>M12 マップデータの減速エリアを変更
| Path | Method | Function |
|---|---|---|
| /v2/map/speed_limit_zones | PUT | 指定idのマップデータの走行不可領域を変更 |
コマンドを送信しないと、正しくマップへ反映されません。
Request Body
{
  "mapId": <int32>   						#map id
  "zones":[
    {
    “color”:<string, hex color>,
    “speed”:<float64>,
    “zone”[
         [<float64>,<float64>],[<float64>,<float64>],[<float64>,<float64>],[<float64>,<float64>]
        ]
    }
	.
    .
    “color”:<string, hex color>,
    “speed”:<float64>,
    “zone”[
         [<float64>,<float64>],[<float64>,<float64>],[<float64>,<float64>],[<float64>,<float64>]
        ]
    }
]
Response Body
{
 "success": <bool>
}
APIプラットフォーム(例:Postman)
参考コード例 Python
 import requests                                 		#「requests」ライブラリのインストールが必要です
import json
url = 'http://xxx.xxx.x.xxx:9085/v2/map/speed_limit_zones'      	#IPアドレスを入力
params = {
            "mapId":xxx,                               	#任意のmapIdを入力
            "zones": [						#任意の色、速度、領域を入力
                {
                    "color": "#xxx",
                    "speed": xxx,
                    "zone":[
                        [xxxx, xxxx],
                        [xxxx xxxx],
                        [xxxx,xxxx],
                        [xxxx,xxxx]
                        ]
                }
            ]
}
res = requests.put(url, json=params)
data = json.loads(res.text)
print(data))
参考コード例 Javascript
<script>
let request = new XMLHttpRequest();
request.open("PUT", "http://xxx.xxx.x.xxx:9085/v2/map/speed_limit_zones", true); //IPアドレスを入力
request.setRequestHeader("content-type", "application/json;charset=UTF-8");
request.responseType = "json";
let body = {
mapId: xxx, //任意のmapIdを入力
zones: [ //追加する減速エリアのマップデータ(color,speed,zone)
{
color: "#xxx",
speed: xxx,
zone: [
[xxx, xxx,
[xxx, xxx],
[xxx, xxx],
[xxx, xxx],
],
},
],
};
request.send(JSON.stringify(body));
request.onload = function () {
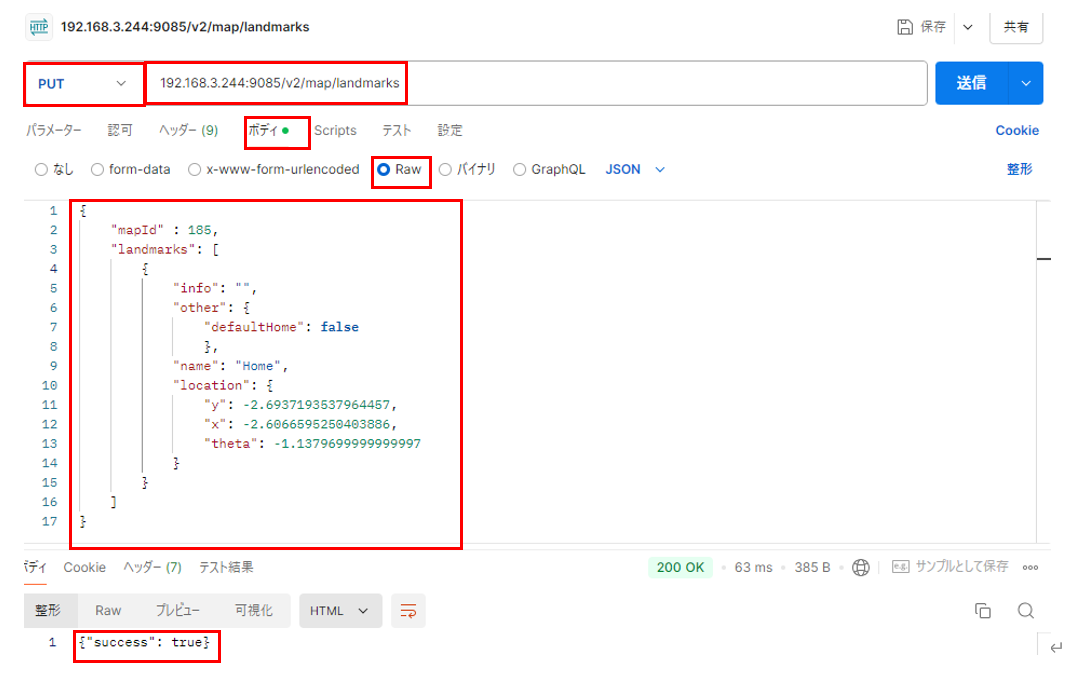
window.alert(JSON.stringify(this.response));M13 マップのランドマークを変更
| Path | Method | Function |
|---|---|---|
| /v2/map/landmarks | PUT | 指定idのマップデータの走行不可領域を変更 |
コマンドを送信しないと、正しくマップへ反映されません。
Request Body
{
  "mapId": <int32>   #map id
  "landmarks":[
    	{
    		“info”:<string>, # reserve
    		“other”: {“defaultHome”:<boo;>},
     		“name”:<string>,
     		“location”:{
      		“x”:<float64>,
            		“y”:<float64>,
            		“theta”:<float64>
              }
]
}
Response Body
{
 "success": <bool>
}
APIプラットフォーム(例:Postman)
参考コード例 Python
import requests                                      #「requests」ライブラリのインストールが必要です
import json
url = 'http://xxx.xxx.x.xxx:9085/v2/map/landmarks'      	#IPアドレスを入力
params = {
        "mapId":xxx,                     		#任意のmapIdを入力
       "landmarks":[					#追加するランドマークのデータ()
          {
          “info”:<string>,
               “other”: {“defaultHome”:<boo;>},
               “name”:<string>,
               “location”:{
            		“x”:<float64>,
                  	“y”:<float64>,
                  	“theta”:<float64>
                    }
                }
            ]
}
res = requests.put(url, json=params)
data = json.loads(res.text)
print(data)
参考コード例 Javascript
<script>
let request = new XMLHttpRequest();
request.open("PUT", "http://192.168.3.244:9085/v2/map/landmarks", true); //IPアドレスを入力
request.setRequestHeader("content-type", "application/json;charset=UTF-8");
request.responseType = "json";
let body = { //任意のmapIdを入力
mapId: xxx,
landmarks: [
{
info: "",
other: {
defaultHome: <bool>,
},
name: "xxx",
location: {
y: xxx,
x: xxx,
theta:xxx,
},
},
],
};
request.send(JSON.stringify(body));
request.onload = function () {
window.alert(JSON.stringify(this.response));
};
</script>
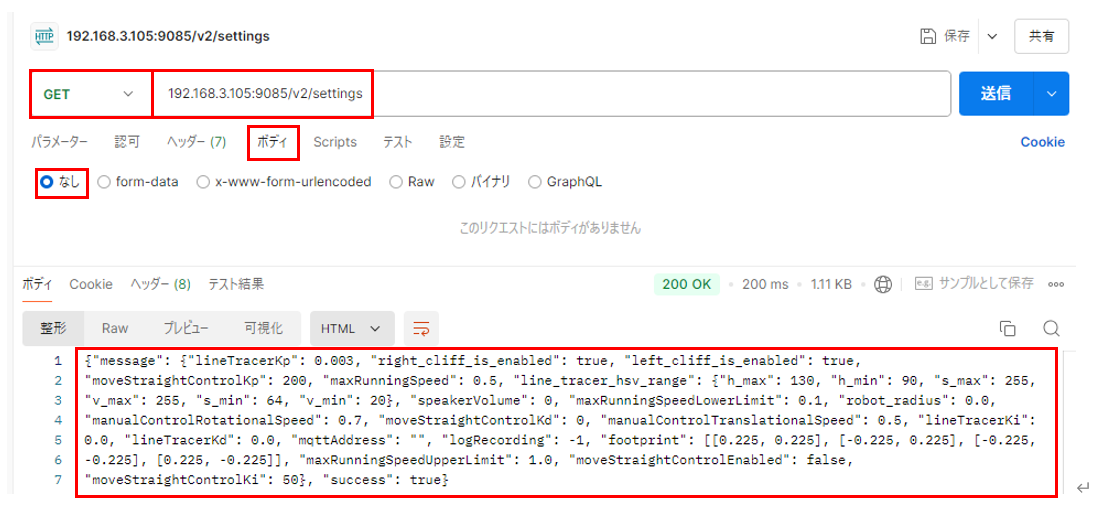
</script>STG1 KeiganALIの基本設定情報を取得
| Path | Method | Function |
|---|---|---|
| /v2/settings | GET | KeiganALIの基本情報を取得する |
Request Body: なし
Response Body
{
  "message": {
    "lineTracerKp": 0.003,				#ライントレースゲインKp
    "right_cliff_is_enabled": <bool>,			#クリフセンサ(右)を有効
    "left_cliff_is_enabled": <bool>,				#クリフセンサ(左)を有効
    "moveStraightControlKp": 200,			#直進ゲインKp
    "maxRunningSpeed": <float64>,			#自動運転最高速度
    "line_tracer_hsv_range": {				#ライン検知HSV値
      "h_max": <unit8>,					#h(色相)最大値(0-179)
      "h_min": <unit8>,					#h(色相)最小値(0-179)
      "s_max": <unit8>					#s(彩度)最大値	(0-255)
      "v_max": <unit8>,					#v(明度)最大値(0-255)
      "s_min": <unit8>,					#s(色彩)最小値(0-255)
      "v_min": <unit8>					#v(明度)最小値(0-255)
    },
    "speakerVolume": <int32>,                   #音量設定
    "maxRunningSpeedLowerLimit": <float64>,		#自動運転 最低速度
    "robot_radius": <float64>,				#AMR半径
    "manualControlRotationalSpeed": <float64>,		#マニュアル操作 旋回速度
    "moveStraightControlKd": 0,				#直進ゲインKd
    "manualControlTranslationalSpeed": 0.5,		#マニュアル操作 最高速度
    "lineTracerKi": <float64>,				#ライントレースゲインKi
    "lineTracerKd": <float64>,				#ライントレースゲインKd
    "mqttAddress": <string>,				#mqttアドレス
    "logRecording": <int32>,				#ログ記録 1 or -1
    "footprint": [					#フットプリントサイズ
      [<float64>, <float64>],
      [<float64>, <float64>],
      [<float64>, <float64>],
      [<float64>, <float64>]
    ],
    "maxRunningSpeedUpperLimit":  <float64>,		#自動運転 最高速度
    "moveStraightControlEnabled": <bool>,			#直進ゲイン設定 有効/無効
    "moveStraightControlKi": <float64>,			#直進ゲインKi
  },
  "success": <bool>					#レスポンス
}
APIプラットフォーム(例:Postman)
参考コード例 Python
import requests                                                	#「requests」ライブラリのインストールが必要です
import json
url = 'http://xxx.xxx.x.xxx:9085/v2/settings'              #IPアドレスを入力
res = requests.get(url)
data = json.loads(res.text)
print(data)
参考コード例 Javascript
<script>
let request = new XMLHttpRequest();
request.open('GET', 'http://xxx.xxx.x.xxx:9085/v2/settings', true); //IPアドレスを入力
request.setRequestHeader('content-type', 'application/json;charset=UTF-8');
request.responseType = 'json';
request.send();
request.onload = function() {
window.alert( JSON.stringify( this.response ) );
};
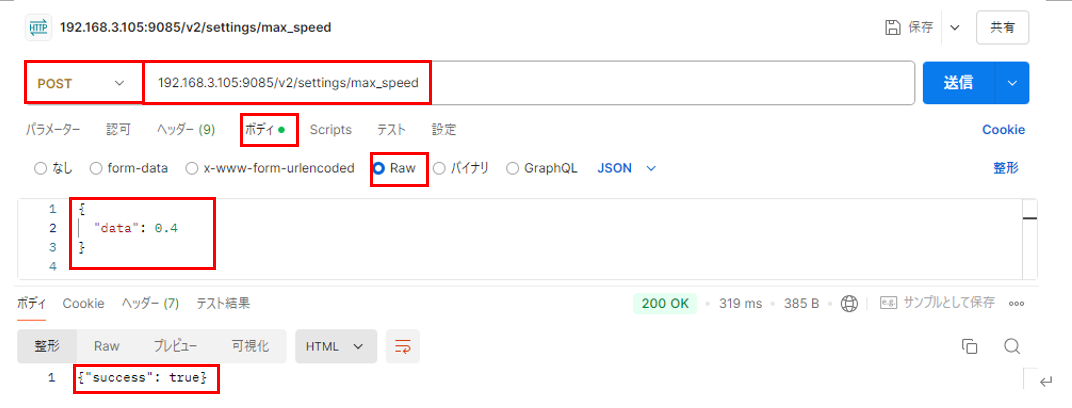
</script>STG2 KeiganALIの最高速度を変更
| Path | Method | Function |
|---|---|---|
| /v2/settings/max_speed | POST | KeiganALIの最高速度を変更する |
Request Body
{
  "data": <float32>   #max_speed: 0.5m/s *1m/sec対応(オプション)されたAliは、 max 1m/sec
}
Response Body
{
 "success": <bool>
}
APIプラットフォーム(例:Postman)
参考コード例 Python
import requests                                                		#「requests」ライブラリのインストールが必要です
import json

url = 'http://xxx.xxx.x.xxx:9085/v2/settings/max_speed'         	#IPアドレスを入力
params = {
          "data":xxx,                        		#ALIの最高速度を入力
}
res = requests.post(url, json=params)
data = json.loads(res.text)
print(data)
参考コード例 Javascript
<script>
let request = new XMLHttpRequest();
request.open('POST', 'http://xxx.xxx.x.xxx:9085/v2/settings/max_speed', true); //IPアドレスを入力
request.setRequestHeader('content-type', 'application/json;charset=UTF-8');
request.responseType = 'json';
let body = {
'data':xxx, //ALIの最高速度を入力
};
request.send(JSON.stringify(body));
request.onload = function() {
window.alert( JSON.stringify( this.response ) );
};
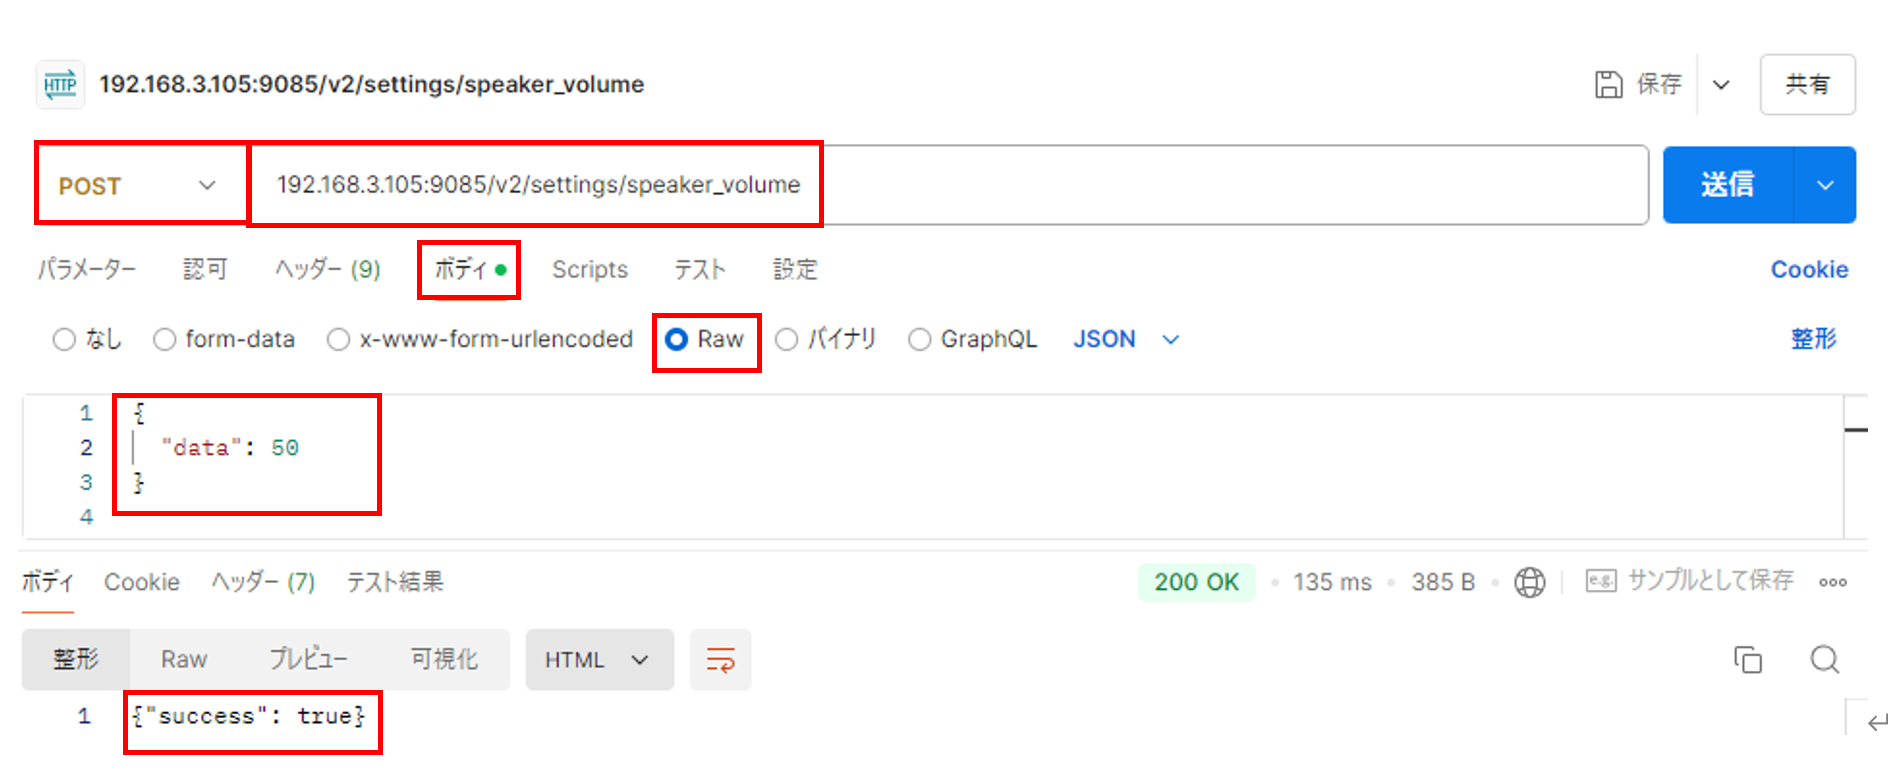
</script>STG3 スピーカーの音量を変更
| Path | Method | Function |
|---|---|---|
| /v2/settings/speaker_volume | POST | KeiganALIのスピーカーの音量を変更する |
Request Body
{
  "data": <int32>   # 0 to 100
}
Response Body
{
 "success": <bool>
}
APIプラットフォーム(例:Postman)
参考コード例 Python
import requests                                               		#「requests」ライブラリのインストールが必要です
import json
url = 'http://xxx.xxx.x.xxx:9085/v2/settings/speaker_volume'   	#IPアドレスを入力
params = {
    "data":xxx,                     				#スピーカーの音量を入力
}
res = requests.post(url, json=params)
data = json.loads(res.text)
print(data)
参考コード例 Javascript
<script>
let request = new XMLHttpRequest();
request.open('POST', 'http://192.XXX.X.XX:9085/v2/settings/speaker_volume', true); //IPアドレスを入力
request.setRequestHeader('content-type', 'application/json;charset=UTF-8');
request.responseType = 'json';
let body = {
'data':xxx, //スピーカーの音量を入力
};
request.send(JSON.stringify(body));
request.onload = function() {
window.alert( JSON.stringify( this.response ) );
};
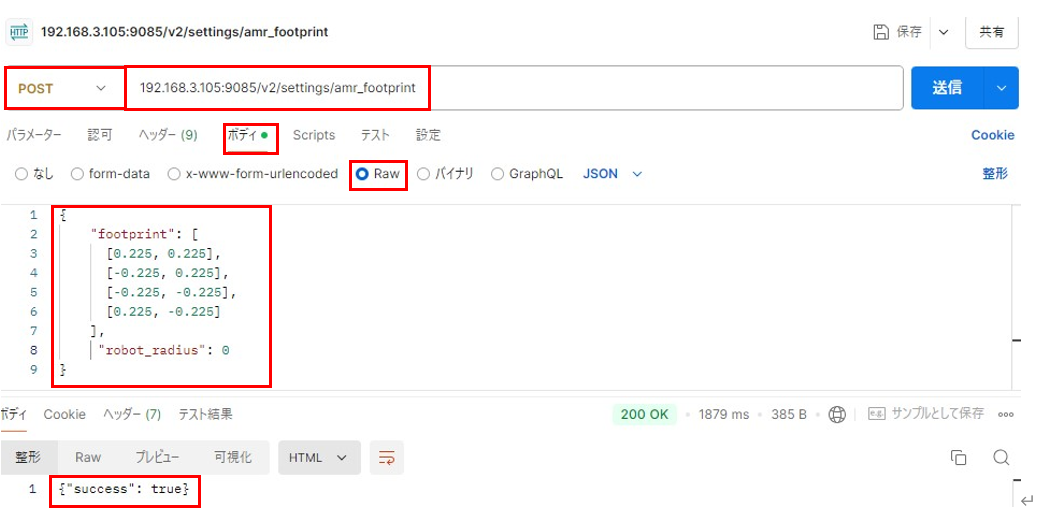
</script>STG4 フットプリントを設定
| Path | Method | Function |
|---|---|---|
| /v2/settings/amr_footprint | POST | KeiganALIのフットプリントの値を変更する |
Request Body
{
    "footprint":[                                		#フットプリントの値を入力
	 [<string>, <string>],
	 [<string>, <string>],
	 [<string>, <string>],
	 [<string>, <string>]
	],
  "robot_radius": <float64>
}
Response Body
{
 "success": <bool>
}
APIプラットフォーム(例:Postman)
参考コード例 Python
import requests                                                		#「requests」ライブラリのインストールが必要です
import json
url = 'http://xxx.xxxx.x.xxx:9085/v2/settings/amr_footprint'    	#IPアドレスを入力
params = {
    "footprint":[                               		#フットプリントの値を入力
	 [xxx, xxx],
	 [xxx, xxx],
	 [xxx, xxx],
	 [xxx, xxx]
	],
"robot_radius":xxx
}
res = requests.post(url, json=params)
data = json.loads(res.text)
print(data)
参考コード例 Javascript
<script>
let request = new XMLHttpRequest();
request.open('POST', 'http://xxx.xxx.x.xxx:9085/v2/settings/amr_footprint', true); //IPアドレスを入力
request.setRequestHeader('content-type', 'application/json;charset=UTF-8');
request.responseType = 'json';
let body = {
"footprint":[ //フットプリントの値を入力
[xxx, xxx],
[xxx, xxx],
[xxx, xxx],
[xxx, xxx]
],
"robot_radius":xxx
};
request.send(JSON.stringify(body));
request.onload = function() {
window.alert( JSON.stringify( this.response ) );
};
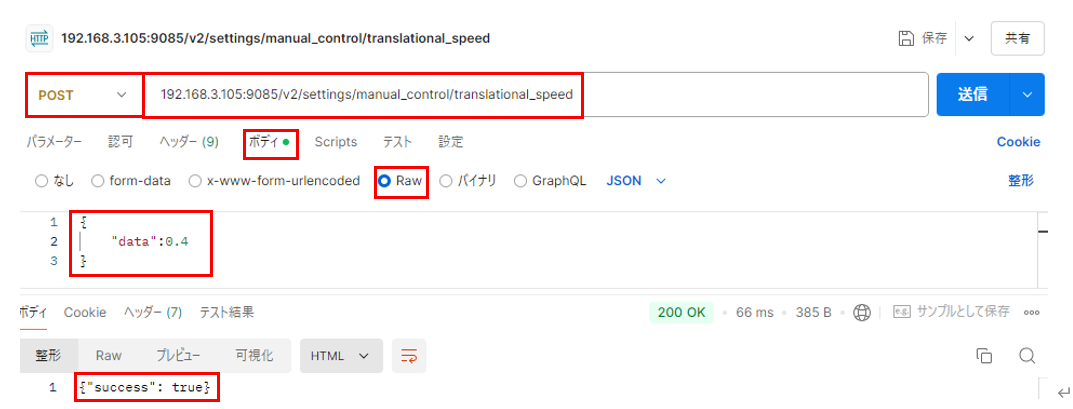
</script>STG5 JOG運転時の直進速度の変更
| Path | Method | Function |
|---|---|---|
| /v2/settings/manual_control/translational_speed | POST | JOG運転時の直進速度を変更する |
Request Body
{
  "data": <float32>    #設定可能範囲は0.05~0.5 [m/s]
}
Response Body
{
 "success": <bool>
}
APIプラットフォーム(例:Postman)
参考コード例 Python
import requests                                               				#「requests」ライブラリのインストールが必要です
import json
url = 'http://xxx.xxx.x.xxx:9085/v2/settings/manual_control/translational_speed'  	#IPアドレスを入力
params = {
    "data":xxx,                                         			#マニュアル操作時の直進速度(単位:m/s)を設定
}
res = requests.post(url, json=params)
data = json.loads(res.text)
print(data)
参考コード例 Javascript
<script>
let request = new XMLHttpRequest();
request.open('POST', 'http://xxx.xxx.x.xxx:9085/v2/settings/manual_control/translational_speed', true); //IPアドレスを入力
request.setRequestHeader('content-type', 'application/json;charset=UTF-8');
request.responseType = 'json';
let body = {
'data':xxx, //マニュアル操作時の直進速度(単位:m/s)を設定
};
request.send(JSON.stringify(body));
request.onload = function() {
window.alert( JSON.stringify( this.response ) );
};
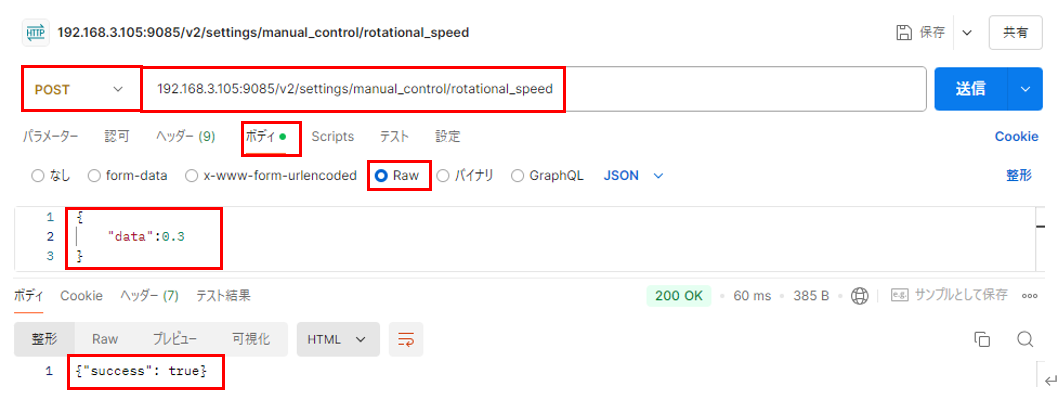
</script>STG6 JOG運転時の旋回速度の変更
| Path | Method | Function |
|---|---|---|
| /v2/settings/manual_control/rotational_speed | POST | JOG運転時の旋回速度を変更する |
Request Body
{
  "data": <float32>        #設定可能範囲は0.1~0.7 [rad/s]
}
Response Body
{
  "success": <bool>
}
APIプラットフォーム(例:Postman)
参考コード例 Python
import requests                                               			#「requests」ライブラリのインストールが必要です
import json
url = 'http://xxx.xxx.x.xxx:9085/v2/settings/manual_control/rotational_speed'  #IPアドレスを入力
params = {
          "data":xxx,                                         	#旋回速度(単位:rad/s)を設定
}
res = requests.post(url, json=params)
data = json.loads(res.text)
print(data)
参考コード例 Javascript
<script>
    let request = new XMLHttpRequest();
    request.open('POST', 'http://xxx.xxx.x.xxx:9085/v2/settings/manual_control/rotational_speed', true);		//IPアドレスを入力
    request.setRequestHeader('content-type', 'application/json;charset=UTF-8');
    request.responseType = 'json';
    let body = {
       'data':xxx,                 									//旋回速度(単位:rad/s)を設定
    };
  request.send(JSON.stringify(body));
   request.onload = function() {
       window.alert( JSON.stringify( this.response ) );
     };
</script>
STG7 クリフセンサ(崖)センサの有効/無効設定
| Path | Method | Function |
|---|---|---|
| /v2/settings/cliff_detection | POST | クリフ(崖)センサ左右の有効/無効を設定する |
Request Body
{
  "enable_left": <bool>,         #true:有効, false:無効
  "enable_right": <bool>,        #true:有効, false:無効
}
Response Body
{
  "success": <bool>
}
APIプラットフォーム(例:Postman)

参考コード例 Python
import requests                                          		#「requests」ライブラリのインストールが必要です
import json
url = 'http://xxx.xxx.x.xxx:9085/v2/settings/cliff_detection'  	#IPアドレスを入力
params = {
         "enable_left": <bool>,         			#True:有効, False:無効
         "enable_right": <bool>,        			#True:有効, False:無効
}
res = requests.post(url, json=params)
data = json.loads(res.text)
print(data)
参考コード例 Javascript
<script>
let request = new XMLHttpRequest();
request.open('POST', 'http://xxx.xxx.x.xxx:9085/v2/settings/cliff_detection', true); //IPアドレスを入力
request.setRequestHeader('content-type', 'application/json;charset=UTF-8');
request.responseType = 'json';
let body = {
‘enable_left’: <bool>, //true:有効, false:無効
‘enable_right’: <bool> //true:有効, false:無効
};
request.send(JSON.stringify(body));
request.onload = function() {
window.alert( JSON.stringify( this.response ) );
};
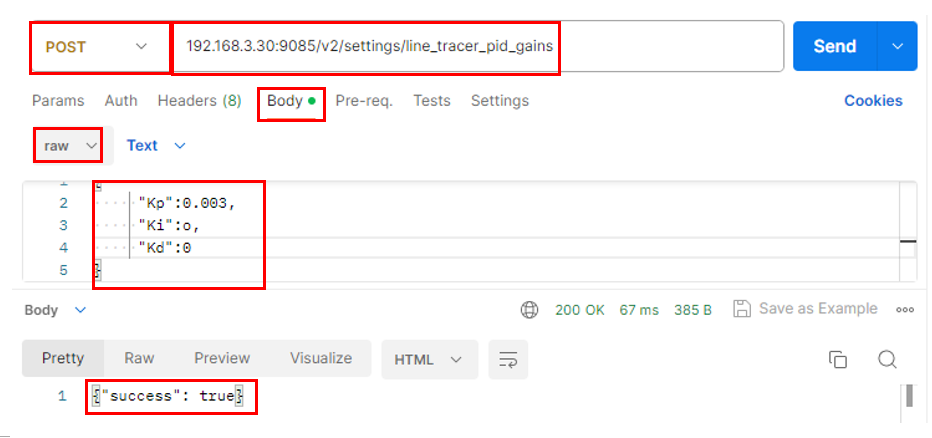
</script>STG8ライントレースゲイン (PID) 値の設定
| Path | Method | Function |
|---|---|---|
| /v2/settings/cliff_detection | POST | ライントレースゲイン(PID)値を設定する |
Request Body
{
  "Kp": <float64>,         #ライントレースゲインKp値
  "Ki": <float64>,         #ライントレースゲインKi値
  "Kd": <float64>          #ライントレースゲインKd値
}
Response Body
{
 "success": <bool>
}
APIプラットフォーム(例:Postman)
参考コード例 Python
import requests                                               #「requests」ライブラリのインストールが必要です
import json

url = 'http://xxx.xxx.x.xxx:9085/v2/settings/line_tracer_pid_gains'  #IPアドレスを入力
params = {
        "Kp": <float64>, 	#ライントレースゲインKp値
        "Ki": <float64>,		#ライントレースゲインKi値
        "Kd": <float64> 	#ライントレースゲインKd値
          }
res = requests.post(url, json=params)
data = json.loads(res.text)
print(data)
参考コード例 Javascript
<script>
let request = new XMLHttpRequest();
request.open('POST', 'http://192.XXX.X.XX:9085/v2/settings/line_tracer_pid_gains', true); //IPアドレスを入力
request.setRequestHeader('content-type', 'application/json;charset=UTF-8');
request.responseType = 'json';
let body = {
Kp: <float64>, //ライントレースゲインKp値
Ki: <float64>, //ライントレースゲインKi値
Kd: <float64> //ライントレースゲインKd値
};
request.send(JSON.stringify(body));
request.onload = function() {
window.alert( JSON.stringify( this.response ) );
};
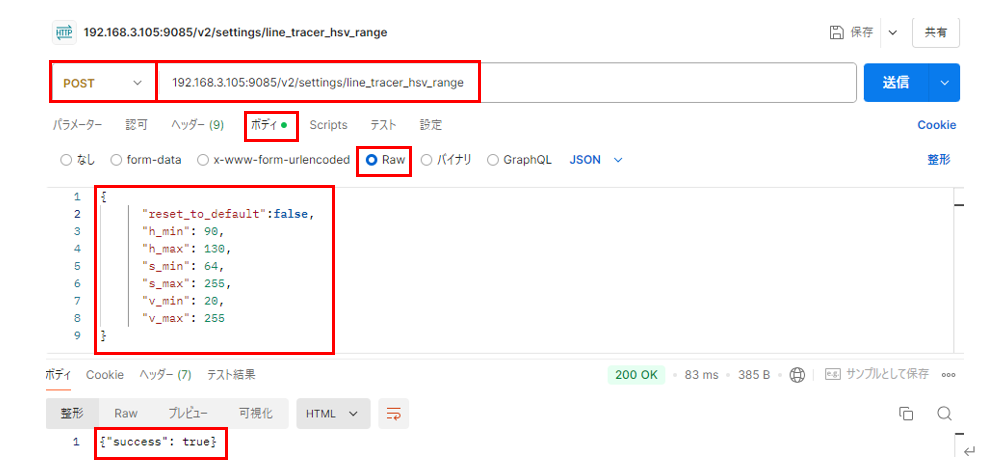
</script>STG9 ライントレースHSV rangeの設定
| Path | Method | Function |
|---|---|---|
| /v2/settings/ v2/settings/line_tracer_hsv_range | POST | ライントレースのHSV rangeを設定する |
Request Body
{
"reset_to_default": <bool>				#デフォルト設定値にリセットする
      "h_min": <unit8>,					#h(色相)最小値(0-179)
      "h_max": <unit8>,					#h(色相)最大値(0-179)
      "s_min": <unit8>,					#s(色彩)最小値(0-255)
      "s_max": <unit8>,					#s(彩度)最大値	(0-255)
      “v_min”: <unit8>,					#v(明度)最小値(0-255)
      "v_max": <unit8>,					#v(明度)最大値(0-255)
)
Response Body
{
 "success": <bool>
}
APIプラットフォーム(例:Postman)
参考コード例 Python
import requests                                               		#「requests」ライブラリのインストールが必要です
import json
url = 'http://xxx.xxx.x.xxx:9085/v2/settings/line_tracer_hsv_range '  	#IPアドレスを入力
params = {
      "reset_to_default": <bool>				#デフォルト設定値にリセットする
      "h_min": <unit8>,					#h(色相)最小値(0-179)
      "h_max": <unit8>,					#h(色相)最大値(0-179)
      "s_min": <unit8>,					#s(色彩)最小値(0-255)
      "s_max": <unit8>,					#s(彩度)最大値	(0-255)
      “v_min”: <unit8>,					#v(明度)最小値(0-255)
      "v_max": <unit8>,					#v(明度)最大値(0-255)
}
res = requests.post(url, json=params)
data = json.loads(res.text)
print(data)
参考コード例 Javascript
<script>
let request = new XMLHttpRequest();
request.open('POST', 'http://xxx.xxx.x.xxx:9085/v2/settings/line_tracer_pid_gains', true); //IPアドレスを入力
request.setRequestHeader('content-type', 'application/json;charset=UTF-8');
request.responseType = 'json';
let body = {
reset_to_default": <bool>, //デフォルト設定値にリセットする
h_min": <unit8>, //h(色相)最小値(0-179)
h_max": <unit8>, //h(色相)最大値(0-179)
s_min": <unit8>, //s(色彩)最小値(0-255)
s_max": <unit8>, //s(彩度)最大値(0-255)
v_min”: <unit8>, //v(明度)最小値(0-255)
v_max": <unit8> //v(明度)最大値(0-255)
};
request.send(JSON.stringify(body));
request.onload = function() {
window.alert( JSON.stringify( this.response ) );
};
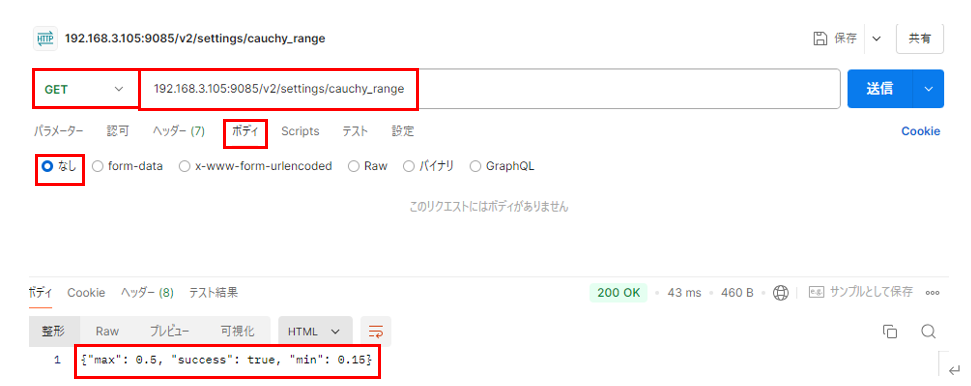
</script>STG10 自己位置測位パラメーターの取得
| Path | Method | Function |
|---|---|---|
| /v2/settings/ v2/settings/cauchy_range | GET | 自己位置測位パラメーターを取得する |
Request Body なし
Response Body
{
 "success": <bool>
  "max": <float64>,		#厳密性max
  "min": <float64>		#厳密性min
}
APIプラットフォーム(例:Postman)
参考コード例 Python
import requests                                               		#「requests」ライブラリのインストールが必要です
import json
url = 'http://xxx.xxx.x.xxx:9085/v2/settings/cauchy_range'  	#IPアドレスを入力
res = requests.get(url)
data = json.loads(res.text)
print(data)
参考コード例 Javascript
<script>
let request = new XMLHttpRequest();
request.open('GET', 'http://xxx.xxx.x.xxx:9085/v2/settings/cauchy_range', true); //IPアドレスを入力
request.setRequestHeader('content-type', 'application/json;charset=UTF-8');
request.responseType = 'json';
request.send();
request.onload = function() {
window.alert( JSON.stringify( this.response ) );
};
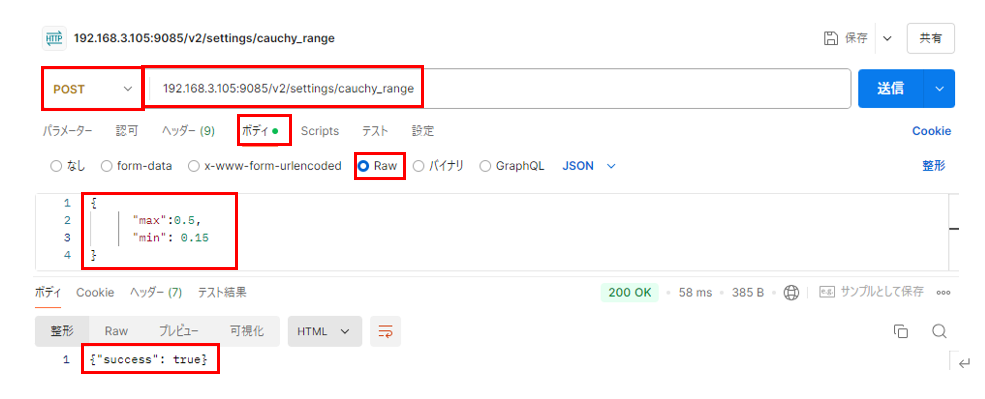
</script>STG11 自己位置測位パラメーターの設定
| Path | Method | Function |
|---|---|---|
| /v2/settings/ v2/settings/cauchy_range | POST | 自己位置測位パラメーターを設定する |
※パラメーターを変更した場合、自動運転時の挙動が変化する場合があります。必要に応じて、マップの再作成を行って下さい。
※設定の目安:- デフォルト: 厳密性Min:0.15、 厳密性Max:0.5
Request Body
{
  "max": <float64>,		#厳密性max
  "min": <float64>		#厳密性min
)
Response Body
{
 "success": <bool>
}
APIプラットフォーム(例:Postman)
参考コード例 Python
import requests                                               		#「requests」ライブラリのインストールが必要です
import json
url = 'http://xxx.xxx.x.xxx:9085/v2/settings/cauchy_range'  	#IPアドレスを入力
params = {
      "max": xxx,						#厳密性max
      "min": xxx,					#厳密性min
}
res = requests.post(url, json=params)
data = json.loads(res.text)
print(data)
参考コード例 Javascript
<script>
let request = new XMLHttpRequest();
request.open('POST', 'http://xxx.xxx.x.xxx:9085/v2/settings/cauchy_range', true); //IPアドレスを入力
request.setRequestHeader('content-type', 'application/json;charset=UTF-8');
request.responseType = 'json';
let body = {
max : xxx, //厳密性max
min : xxx //厳密性min
};
request.send(JSON.stringify(body));
request.onload = function() {
window.alert( JSON.stringify( this.response ) );
};
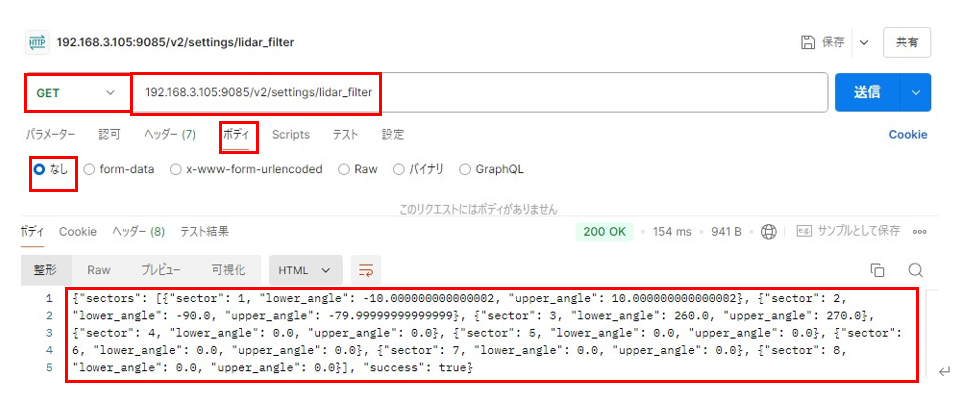
</script>STG12 LiDARフィルターの取得
| Path | Method | Function |
|---|---|---|
| /v2/settings/ v2/settings/ lidar_filter | GET | LiDARフィルターを取得する |
Request Body なし
Response Body
{
	"sectors": [
		{
			"sector": 1,
			"lower_angle": <float64>,		#セクター1 下限角度
			"upper_angle": <float64>	#セクター1 上限角度
		},
		{
			"sector": 2,
			"lower_angle": <float64>,		#セクター2 下限角度
			"upper_angle": <float64>	#セクター2 上限角度
		},
		{
			"sector": 3,
			"lower_angle": <float64>,		#セクター3 下限角度
			"upper_angle": <float64>	#セクター3 上限角度
		},
		{
			"sector": 4,
			"lower_angle": <float64>,		#セクター4 下限角度
			"upper_angle": <float64>	#セクター4 上限角度
		},
		{
			"sector": 5,
			"lower_angle": <float64>,		#セクター5 下限角度
			"upper_angle": <float64>	#セクター5 上限角度
		},
		{
			"sector": 6,
			"lower_angle": <float64>,		#セクター6 下限角度
			"upper_angle": <float64>	#セクター6 上限角度
		},
		{
			"sector": 7,
			"lower_angle": <float64>,		#セクター7 下限角度
			"upper_angle": <float64>	#セクター7 上限角度
		},
		{
			"sector": 8,
			"lower_angle": <float64>,		#セクター8 下限角度
			"upper_angle": <float64>	#セクター8 上限角度
		}
	],
	"success": true
}
APIプラットフォーム(例:Postman)
参考コード例 Python
import requests                                               		#「requests」ライブラリのインストールが必要です
import json
url = 'http://xxx.xxx.x.xxx:9085/v2/settings/lidar_filter'  		#IPアドレスを入力
res = requests.get(url)
data = json.loads(res.text)
print(data)
参考コード例 Javascript
<script>
    let request = new XMLHttpRequest();
    request.open('GET', 'http://xxx.xxx.x.xxx:9085/v2/settings/cauchy_range', true);	//IPアドレスを入力
    request.setRequestHeader('content-type', 'application/json;charset=UTF-8');
    request.responseType = 'json';
    request.send();
     request.onload = function() {
       window.alert( JSON.stringify( this.response ) );
     };
</script>
STG13 LiDARフィルターの設定
| Path | Method | Function |
|---|---|---|
| /v2/settings/ v2/settings/ lidar_filter | POST | LiDARフィルターを設定する |
Request Body
{
		"sector": x,				#セクター番号:xは、1~8
		"lower_angle": <float64>,			#セクターx 下限角度
		"upper_angle": <float64>		#セクターx 上限角度
}
Response Body
{
	"success": true
}
APIプラットフォーム(例:Postman)
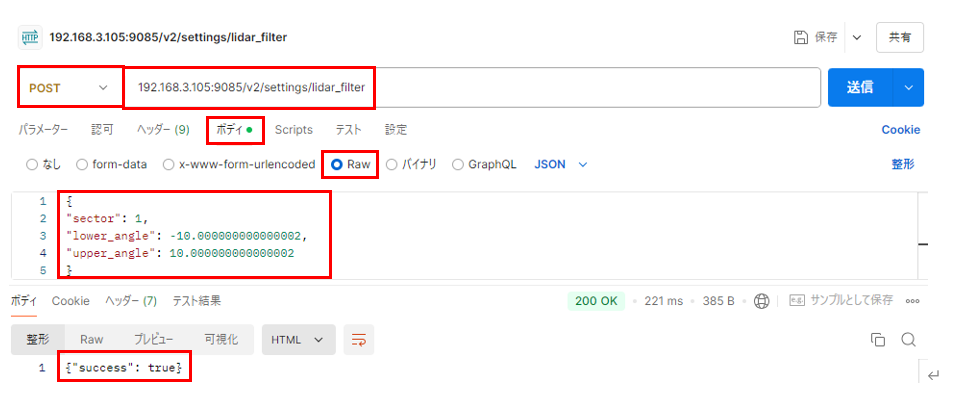
参考コード例 Python
import requests                                               	#「requests」ライブラリのインストールが必要です
import json
url = 'http://xxx.xxx.x.xxx:9085/v2/settings/lidar_filter'  	#IPアドレスを入力
params = {
	"sector": x,					#セクター番号:xは、1~8
		"lower_angle": <float64>,				#セクターx 下限角度
		"upper_angle": <float64>			#セクターx 上限角度
}
res = requests.post(url, json=params)
data = json.loads(res.text)
print(data)
参考コード例 Javascript
<script>
    let request = new XMLHttpRequest();
    request.open('POST', 'http://xxx.xxx.x.xxx:9085/v2/settings/lidar_filter', true);	//IPアドレスを入力
    request.setRequestHeader('content-type', 'application/json;charset=UTF-8');
    request.responseType = 'json';
   let body = {
	sector : x,					#セクター番号:xは、1~8
		lower_angle : <float64>,				#セクターx 下限角度
		upper_angle : <float64>			#セクターx 上限角度
    };
    request.send(JSON.stringify(body));
     request.onload = function() {
       window.alert( JSON.stringify( this.response ) );
     };
</script>
STG14 直進ゲインの有効/無効設定
| Path | Method | Function |
|---|---|---|
| v2/settings/move_straight_pid_control | POST | 直進ゲインの有効/無効を設定する |
Request Body
{
		"enable" : <bool>			#True:有効, False:無効
}
Response Body
{
		"success": true
}
APIプラットフォーム(例:Postman)
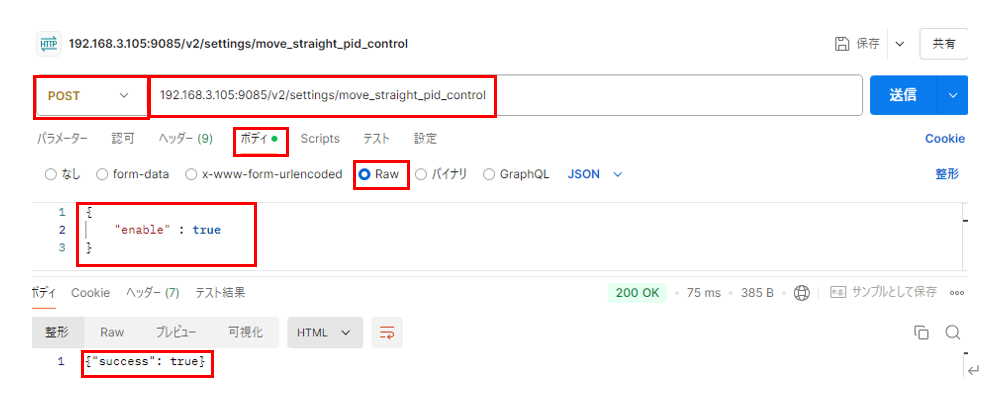
参考コード例 Python
import requests                                               		#「requests」ライブラリのインストールが必要です
import json
url = 'http://xxx.xxx.x.xxx:9085/v2/settings/move_straight_pid_control'  	#IPアドレスを入力
params = {
	"enable": <bool>						#直進ゲインの有効(True)/無効(False)
}
res = requests.post(url, json=params)
data = json.loads(res.text)
print(data)
参考コード例 Javascript
<script>
    let request = new XMLHttpRequest();
    request.open('POST', 'http://xxx.xxx.x.xxx:9085/v2/settings/move_straight_pid_control', true);	//IPアドレスを入力
    request.setRequestHeader('content-type', 'application/json;charset=UTF-8');
    request.responseType = 'json';
   let body = {
	enable : <bool> 							//直進ゲインの有効(True)/無効(False)
    };
    request.send(JSON.stringify(body));
     request.onload = function() {
       window.alert( JSON.stringify( this.response ) );
     };
</script>
STG15 直進ゲインの設定
| Path | Method | Function |
|---|---|---|
| v2/settings/ move_straight_pid_gains | POST | 直進ゲイン(Kp, Ki, Kd)を設定する |
Request Body
{
    "Kp": <int>				#直進ゲインKp値
    "Ki": <int>				#直進ゲインKi値
    "Kd": <int>				#直進ゲインKd値
}
Response Body
{
		"success": true
}
APIプラットフォーム(例:Postman)
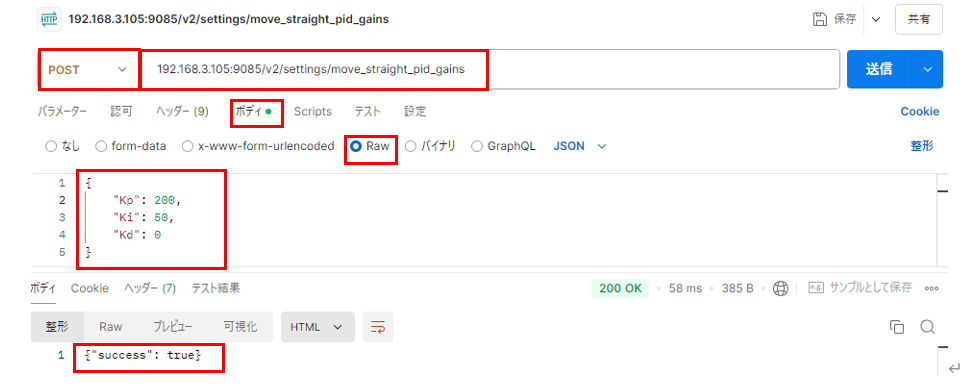
参考コード例 Python
import requests                                               		#「requests」ライブラリのインストールが必要です
import json
url = 'http://xxx.xxx.x.xxx:9085/v2/settings/move_straight_pid_gains'  	#IPアドレスを入力
params = {
	"Kp": <int>,			#直進ゲインKp値
"Ki": <int>,			#直進ゲインKi値
	"Kd": <int>			#直進ゲインKd値
}
res = requests.post(url, json=params)
data = json.loads(res.text)
print(data)
参考コード例 Javascript
<script>
let request = new XMLHttpRequest();
request.open('POST', 'http://xxx.xxx.x.xxx:9085/v2/settings/move_straight_pid_gains', true); //IPアドレスを入力
request.setRequestHeader('content-type', 'application/json;charset=UTF-8');
request.responseType = 'json';
let body = {
Kp : <int>, #直進ゲインKp値
Ki : <int>, #直進ゲインKi値
Kd : <int> #直進ゲインKd値
};
request.send(JSON.stringify(body));
request.onload = function() {
window.alert( JSON.stringify( this.response ) );
};
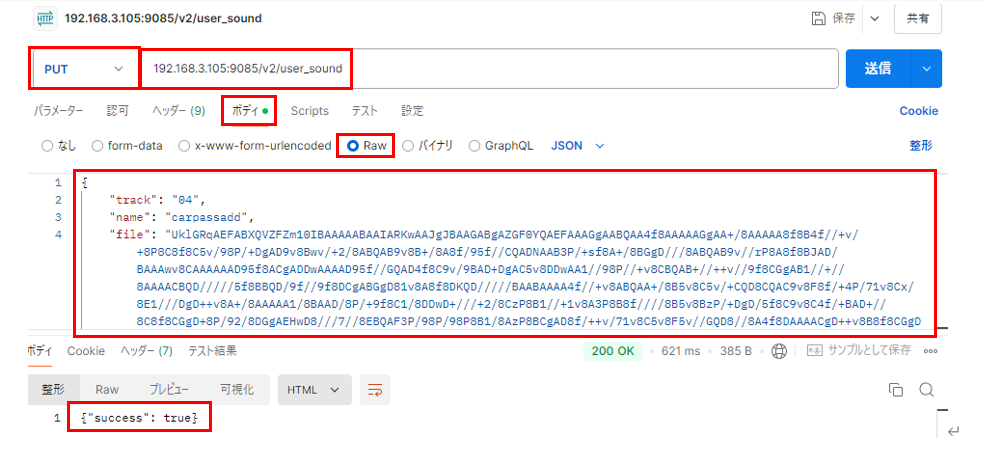
</script>STG16 ユーザーサウンドの追加
| Path | Method | Function |
|---|---|---|
| /v2/ user_sound | PUT | ユーザーサウンドの追加 |
Request Body
{
    "track": <string>			#追加するトラック番号
    "name": <string>			#追加するユーザーサウンドの名称
    "file": <string Base64>		#追加するユーザーサウンドのファイル
}
Response Body
{
"success": <bool>
}APIプラットフォーム(例:Postman)
参考コード例 Python
import requests #「requests」ライブラリのインストールが必要です
import json
url = 'http://xxx.xxx.x.xxx:9085/v2/user_sound' #IPアドレスを入力
params = {
"track": <string> #追加するトラック番号
"name": <string> #追加するユーザーサウンドの名称
"file": <string Base64> #追加するユーザーサウンドのファイル(waveファイルを、base64に変換が必要)
}
res = requests.put(url, json=params)
data = json.loads(res.text)
print(data)参考コード例 Javascript
<script>
let request = new XMLHttpRequest();
request.open("PUT", "http://xxx.xxx.x.xxx:9085/v2/user_sound", true); //IPアドレスを入力
request.setRequestHeader("content-type", "application/json;charset=UTF-8");
request.responseType = "json";
let body = {
track: <string> //追加するトラック番号
name: <string> //追加するユーザーサウンドの名称
file: <string Base64> //追加するユーザーサウンドのファイル(waveファイルを、base64に変換が必要)
};
request.send(JSON.stringify(body));
request.onload = function () {
window.alert(JSON.stringify(this.response));
};
</script>STG17 ユーザーサウンドの削除
| Path | Method | Function |
|---|---|---|
| /v2/user_sound | DELETE | ユーザーサウンドを削除する |
Request Body
{
"track" <string> #削除したいトラック番号
}Response Body
{
"success":<bool>
}APIプラットフォーム(例:Postman)
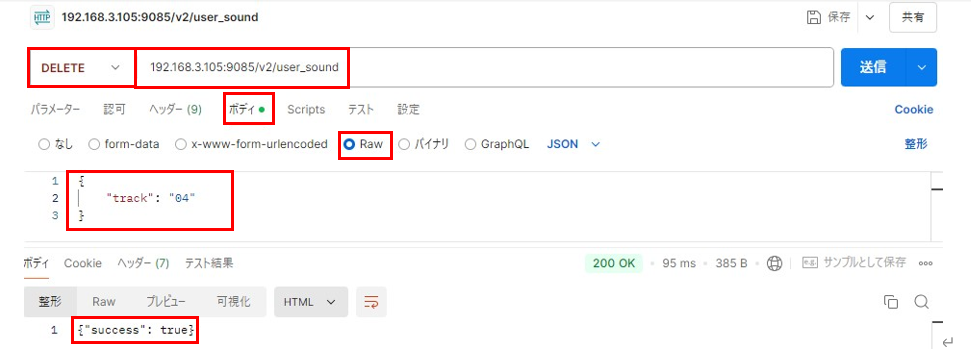
参考コード例 Python
import requests #「requests」ライブラリのインストールが必要です
import json
url = 'http://xxx.xxx.x.xxx:9085/v2/user_sound' #IPアドレスを入力
params = {'track': xxx } #削除したいトラック番号を入力
res = requests.delete(url, json=params)
data = json.loads(res.text)
print(data)参考コード例 Javascript
<script>
let request = new XMLHttpRequest();
request.open('DELETE', 'http://192.XXX.X.XX:9085/v2/user_sound', true); //IPアドレスを入力
request.setRequestHeader('content-type', 'application/json;charset=UTF-8');
request.responseType = 'json';
let body ={track:XXX}; //削除したいトラック番号を入力
request.send(JSON.stringify(body));
request.onload = function() {
window.alert( JSON.stringify( this.response ) );
};
</script>STG18 ユーザーサウンドの取得
| Path | Method | Function |
|---|---|---|
| /v2/user_sound | GET | ユーザーサウンドを取得する |
Request Body
{
"track" <string> #取得したいトラック番号
}Response Body
{
"success":<bool>,
"track": <string>, #トラック番号
"name": <string>, #ユーザーサウンドの名称
"file": <string,Base64> #ユーザーサウンドのファイル
}APIプラットフォーム(例:Postman)
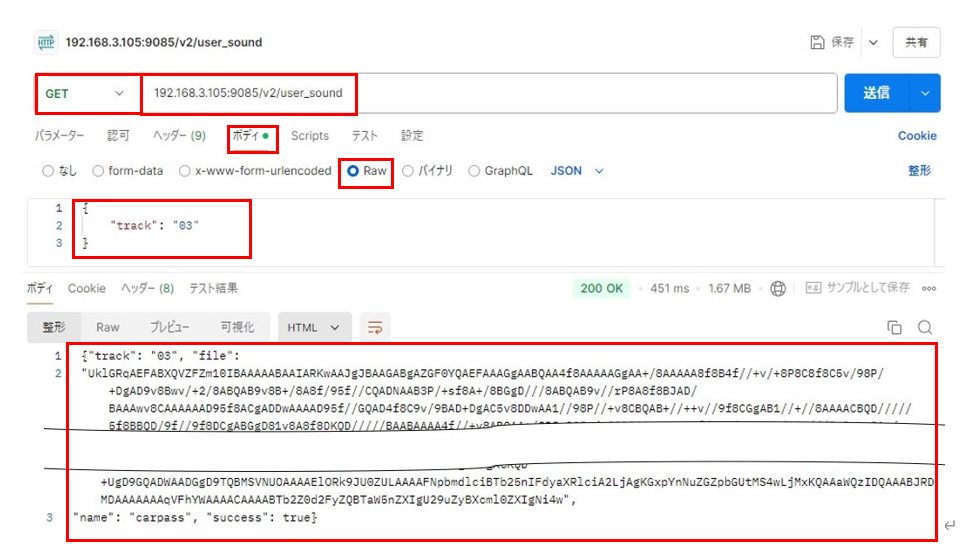
参考コード例 Python
import requests #「requests」ライブラリのインストールが必要です
import json
url = 'http://xxx.xxx.x.xxx:9085/v2/user_sound' #IPアドレスを入力
params = {'track': xxx } #取得したいトラック番号を入力
res = requests.get(url, json=params)
data = json.loads(res.text)
print(data)参考コード例 Javascript
<script>
let request = new XMLHttpRequest();
request.open('GET', 'http://xxx.xxx.x.xxx:9085/v2/user_sound', true); //IPアドレスを入力
request.setRequestHeader('content-type', 'application/json;charset=UTF-8');
request.responseType = 'json';
let body ={track:xxx}; //取得したいトラック番号を入力
request.send(JSON.stringify(body));
request.onload = function() {
window.alert( JSON.stringify( this.response ) );
};
</script>STG19 ユーザーサウンドリストの取得
| Path | Method | Function |
|---|---|---|
| /v2/user_sound/list | GET | ユーザーサウンドリストを取得する |
Request Body なし
Response Body
{
"list": [
{
"track": "01",
"name": <string>,
"file": <string>
},
.
.
{
"track": "20",
"name": "",
"file": ""
}
],
"success": <bool>
}APIプラットフォーム(例:Postman)
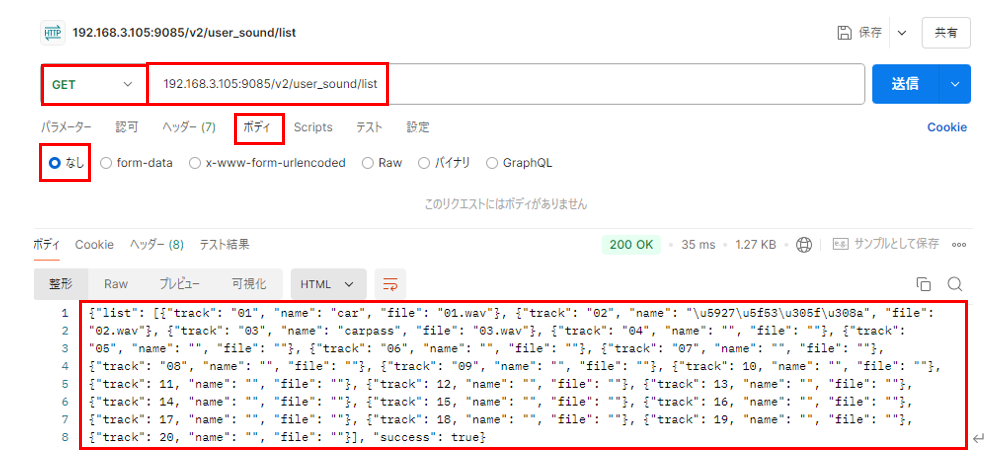
参考コード例 Python
import requests #「requests」ライブラリのインストールが必要です
import json
url = 'http://xxx.xxx.x.xxx:9085/v2/user_sound/list' #IPアドレスを入力
res = requests.get(url)
data = json.loads(res.text)
print(data)参考コード例 Javascript
<script>
let request = new XMLHttpRequest();
request.open("GET", "http://xxx.xxx.x.xxx:9085/v2/user_sound/list", true); //IPアドレスを入力
request.setRequestHeader("content-type", "application/json;charset=UTF-8");
request.responseType = "json";
request.send();
request.onload = function () {
window.alert(JSON.stringify(this.response));
};
</script>S1 メインコントローラのシャットダウン
| Path | Method | Function |
|---|---|---|
| /v2/system/shutdown | POST | メインコントローラ のシャットダウンを⾏う |
Request Body: なし
Response Body
{
"success":<bool>
}APIプラットフォーム(例:Postman)
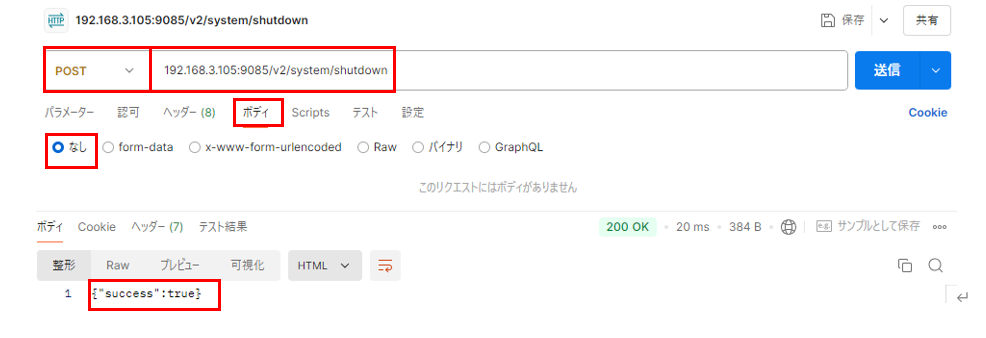
参考コード例 Python
import requests #「requests」ライブラリのインストールが必要です
import json
url = 'http://xxx.xxx.x.xxx:9085/v2/system/shutdown' #IPアドレスを入力
res = requests.post(url)
data = json.loads(res.text)
print(data)参考コード例 Javascript
<script>
let request = new XMLHttpRequest();
request.open('POST', 'http://xxx.xxx.x.xxx:9085/v2/system/shutdown', true); //IPアドレスを入力
request.setRequestHeader('content-type', 'application/json;charset=UTF-8');
request.responseType = 'json';
request.send();
request.onload = function() {
window.alert( JSON.stringify( this.response ) );
};
</script>S2 メインコントローラの再起動
| Path | Method | Function |
|---|---|---|
| /v2/system/restart | POST | メインコントローラ の再起動を⾏う |
Request Body: なし
Response Body
{
"success":<bool>
}APIプラットフォーム(例:Postman)

参考コード例 Python
import requests #「requests」ライブラリのインストールが必要です
import json
url = 'http://xxx.xxx.x.xxx:9085/v2/system/restart' #IPアドレスを入力
res = requests.post(url)
data = json.loads(res.text)
print(data)参考コード例 Javascript
<script>
let request = new XMLHttpRequest();
request.open('POST', 'http://xxx.xxx.x.xxx:9085/v2/system/restart', true); //IPアドレスを入力
request.setRequestHeader('content-type', 'application/json;charset=UTF-8');
request.responseType = 'json';
request.send();
request.onload = function() {
window.alert( JSON.stringify( this.response ) );
};
</script>S3 ロボットコントローラの再起動
| Path | Method | Function |
|---|---|---|
| /v2/system/controller/reboot | POST | ロボットコントローラ の再起動を⾏う |
Request Body: なし
Response Body
{
"success":<bool>
}APIプラットフォーム(例:Postman)
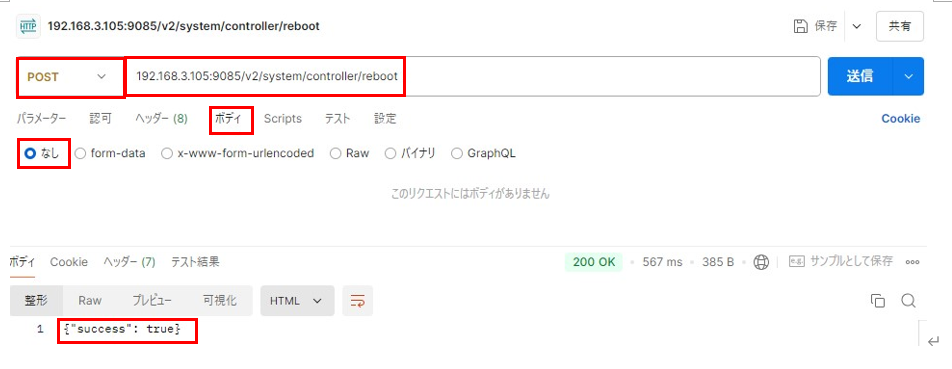
参考コード例 Python
import requests #「requests」ライブラリのインストールが必要です
import json
url = 'http://192.XXX.X.XX:9085/v2/system/controller/reboot' #IPアドレスを入力
res = requests.post(url, json=params)
data = json.loads(res.text)
print(data)参考コード例 Javascript
<script>
let request = new XMLHttpRequest();
request.open('POST', 'http://192.XXX.X.XX:9085/v2/system/controller/reboot', true); #IPアドレスを入力
request.setRequestHeader('content-type', 'application/json;charset=UTF-8');
request.responseType = 'json';
request.send();
request.onload = function() {
window.alert( JSON.stringify( this.response ) );
};
</script>C1ライントレースのオフセット値(前後)の取得
| Path | Method | Function |
|---|---|---|
| /v2/calibration/line_tracer_offset | GET | ライントレースのオフセット値(前後)を取得する |
Request Body: なし
Response Body
{
"offset_correction": <float32>, #ライントレースのオフセット値(前後)
"success": <bool >
}APIプラットフォーム(例:Postman)
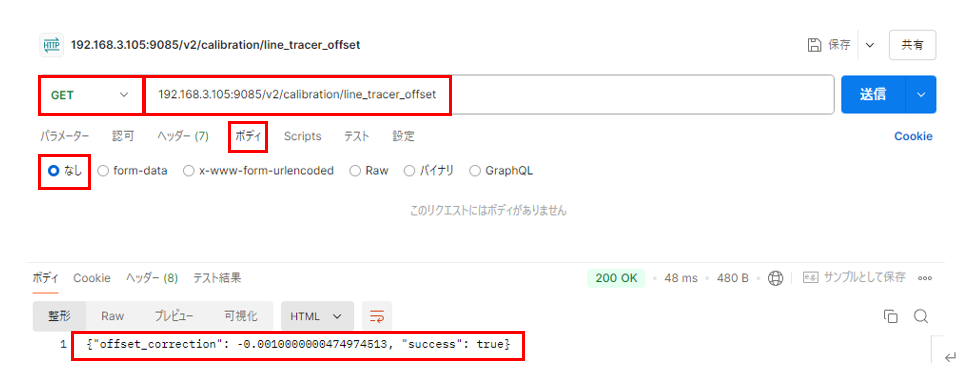
参考コード例 Python
import requests #「requests」ライブラリのインストールが必要です
import json
url = 'http://xxx.xxx.x.xxx:9085/v2/calibration/line_tracer_offset' #IPアドレスを入力
res = requests.get(url)
data = json.loads(res.text)
print(data)参考コード例 Javascript
<script>
let request = new XMLHttpRequest();
request.open('GET', 'http://xxx.xxx.x.xxx:9085/v2/calibration/line_tracer_offset', true); //IPアドレスを入力
request.setRequestHeader('content-type', 'application/json;charset=UTF-8');
request.responseType = 'json';
request.send();
request.onload = function() {
window.alert( JSON.stringify( this.response ) );
};
</script>C2ライントレースのオフセット値(前後)の取得
| Path | Method | Function |
|---|---|---|
| /v2/calibration/line_tracer_offset | POST | ライントレースのオフセット値(前後)を設定する |
Request Body
{
"offset_correction": <float32>, #ライントレースのオフセット値(前後)
}Response Body
{
"success": <bool>
}APIプラットフォーム(例:Postman)
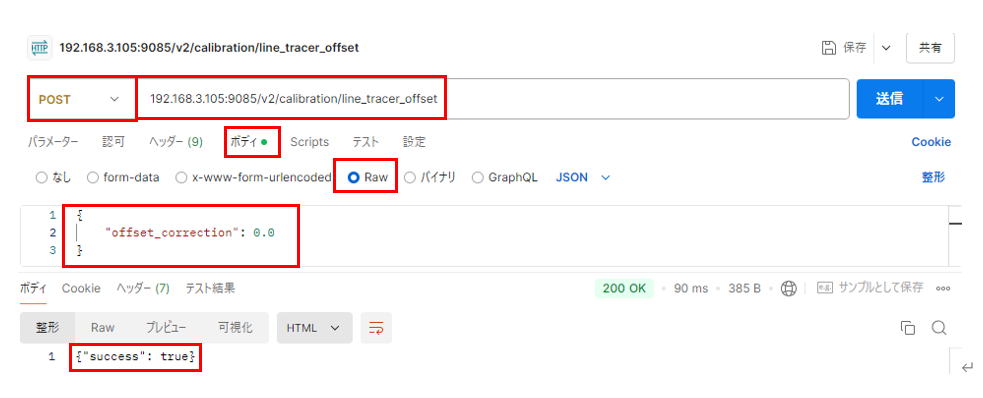
参考コード例 Python
import requests #「requests」ライブラリのインストールが必要です
import json
url = 'http://xxx.xxx.x.xxx:9085/v2/calibration/line_tracer_offset' #IPアドレスを入力
params = {
"offset_correction": <float32> #ライントレースのオフセット値(前後)
}
res = requests.post(url, json=params)
data = json.loads(res.text)
print(data)参考コード例 Javascript
<script>
let request = new XMLHttpRequest();
request.open('POST', 'http://xxx.xxx.x.xxx:9085/v2/settings/line_tracer_offset', true); //IPアドレスを入力
request.setRequestHeader('content-type', 'application/json;charset=UTF-8');
request.responseType = 'json';
let body {
offset_correction: <float32> //ライントレースのオフセット値(前後)
};
request.send(JSON.stringify(body));
request.onload = function() {
window.alert( JSON.stringify( this.response ) );
};
</script>C3 ライントレースのオフセット値(左右)の取得
| Path | Method | Function |
|---|---|---|
| /v2/calibration/line_tracer_side_offset | GET | ライントレースのオフセット値(左右)を取得する |
Request Body: なし
Response Body
{
"side_offset_correction": <int32>, #ライントレースのオフセット値(前後)[pixel]
"success": <bool >
}APIプラットフォーム(例:Postman)
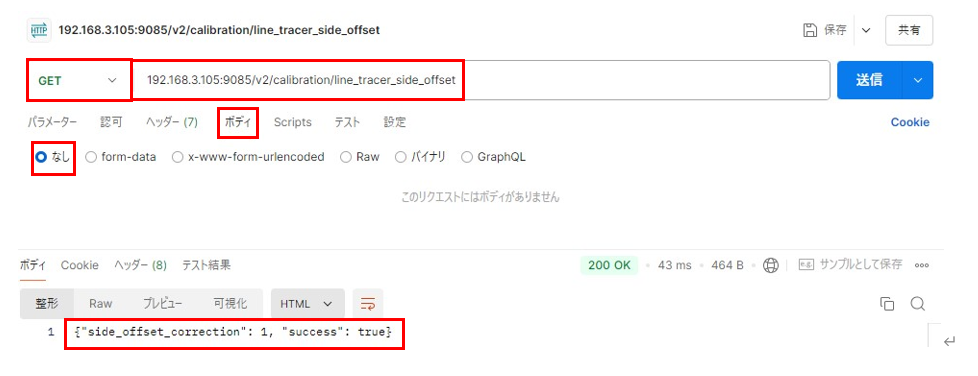
参考コード例 Python
import requests #「requests」ライブラリのインストールが必要です
import json
url = 'http://xxx.xxx.x.xxx:9085/v2/calibration/line_tracer_side_offset' #IPアドレスを入力
res = requests.get(url)
data = json.loads(res.text)
print(data)参考コード例 Javascript
<script>
let request = new XMLHttpRequest();
request.open('GET', 'http://xxx.xxx.x.xxx:9085/v2/calibration/line_tracer_side_offset', true); //IPアドレスを入力
request.setRequestHeader('content-type', 'application/json;charset=UTF-8');
request.responseType = 'json';
request.send();
request.onload = function() {
window.alert( JSON.stringify( this.response ) );
};
</script>C4ライントレースオフセット値(左右)の設定
| Path | Method | Function |
|---|---|---|
| /v2/calibration/line_tracer_side_offset | POST | ライントレースのオフセット値(左右)を設定する |
Request Body
{
"side_offset_correction": <int32>, #ライントレースのオフセット値(左右)
"auto_calibrate": <bool> #自動キャリブレーション機能の有効/無効設定
}Response Body
{
"success": <bool>
}APIプラットフォーム(例:Postman)
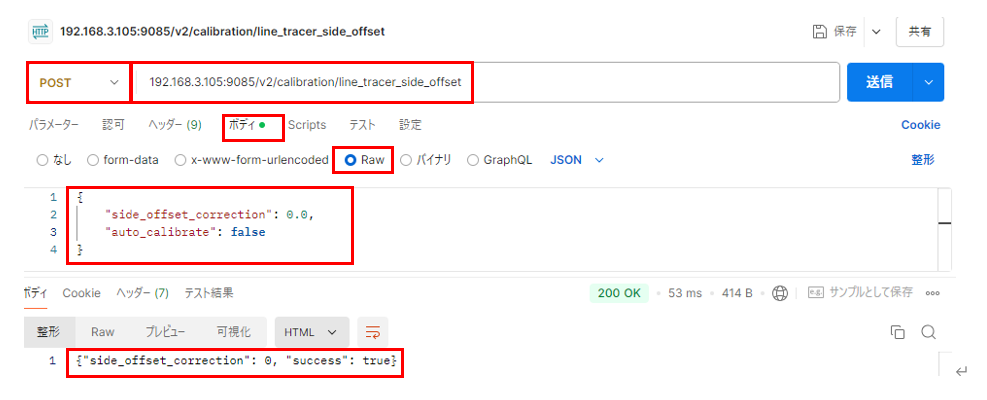
参考コード例 Python
import requests #「requests」ライブラリのインストールが必要です
import json
url = 'http://xxx.xxx.x.xxx:9085/v2/calibration/line_tracer_side_offset' #IPアドレスを入力
params = {
"side_offset_correction": <int32>, #ライントレースのオフセット値(左右)[pixel]
"auto_calibrate": <bool> #自動キャリブレーション機能の有効/無効設定
}
res = requests.post(url, json=params)
data = json.loads(res.text)
print(data)参考コード例 Javascript
<script>
let request = new XMLHttpRequest();
request.open('POST', 'http://192.XXX.X.XX:9085/v2/calibration/line_tracer_side_offset ', true); //IPアドレスを入力
request.setRequestHeader('content-type', 'application/json;charset=UTF-8');
request.responseType = 'json';
let body = {
‘side_offset_correction’: <int32>, //ライントレースのオフセット値(左右)
‘auto_calibrate’: <bool> //自動キャリブレーション機能の有効/無効設定
};
request.send(JSON.stringify(body));
request.onload = function() {
window.alert( JSON.stringify( this.response ) );
};
</script>C5 ライントレースのオフセット値(壁際で停止)の取得
| Path | Method | Function |
|---|---|---|
| /v2/calibration/line_tracer_wall_distance_offset | GET | ライントレースのオフセット値(壁際で停止)を取得する |
Request Body
なし
Response Body
{
"right_side_offset": <float32>, #ライントレース(壁際で停止)のオフセット値(右)
"left_side_offset": <float32>, #ライントレース(壁際で停止)のオフセット値(左)
"success": <bool >
}APIプラットフォーム(例:Postman)
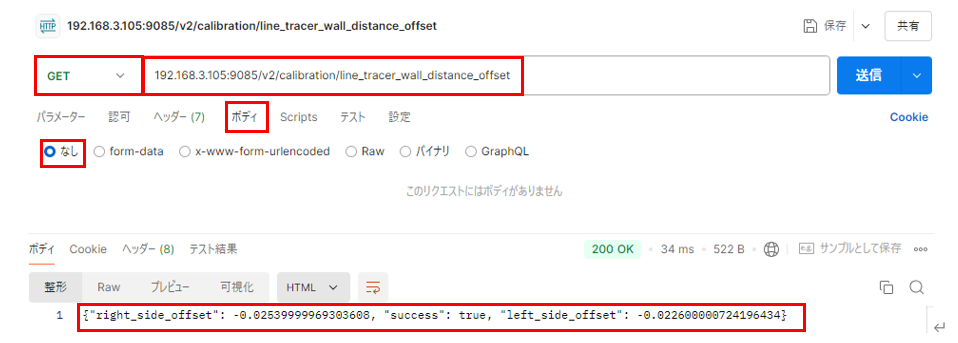
参考コード例 Python
import requests #「requests」ライブラリのインストールが必要です
import json
url = 'http://xxx.xxx.x.xxx:9085/v2/calibration/line_tracer_wall_distance_offset' #IPアドレスを入力
res = requests.get(url)
data = json.loads(res.text)
print(data)参考コード例 Javascript
<script>
let request = new XMLHttpRequest();
request.open('GET', 'http://xxx.xxx.x.xxx:9085/v2/calibration/line_tracer_wall_distance_offset', true); //IPアドレスを入力
request.setRequestHeader('content-type', 'application/json;charset=UTF-8');
request.responseType = 'json';
request.send();
request.onload = function() {
window.alert( JSON.stringify( this.response ) );
};
</script>C6ライントレースオフセット値(壁際で停止)の設定
| Path | Method | Function |
|---|---|---|
| /v2/calibration/line_tracer_wall_distance_offset | POST | ライントレースのオフセット値(壁際で停止)を設定する |
Request Body
{
"right_side_offset": <float32>, #ライントレース(壁際で停止)のオフセット値(右)
"left_side_offset": <float32>, #ライントレース(壁際で停止)のオフセット値(左)
"auto_calibrate": <bool>, #自動キャリブレーション機能の有効/無効設定
"wall_distance": <float32>, #Aliの前面から壁際までの距離
}Response Body
{
"right_side_offset": <float32>, #ライントレース(壁際で停止)のオフセット値(右)
"left_side_offset": <float32>, #ライントレース(壁際で停止)のオフセット値(左)
"success": <bool >
}APIプラットフォーム(例:Postman)
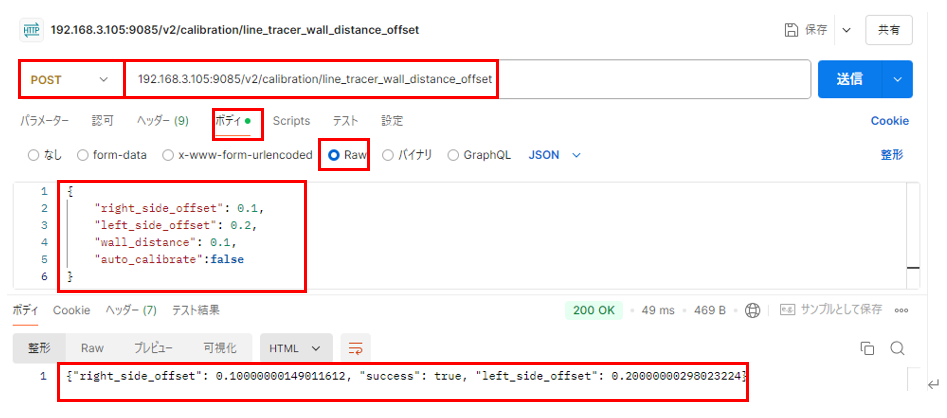
参考コード例 Python
import requests #「requests」ライブラリのインストールが必要です
import json
url = 'http://xxx.xxx.x.xxx:9085/v2/calibration/line_tracer_wall_distance_offset' #IPアドレスを入力
params = {
"right_side_offset": <float32>, #ライントレース(壁際で停止)のオフセット値(右)
"left_side_offset": <float32>, #ライントレース(壁際で停止)のオフセット値(左)
"wall_distance": <float32>, #ライントレース壁までの距離
"auto_calibrate": <bool> #自動キャリブレーション機能の有効/無効設定
}
res = requests.post(url, json=params)
data = json.loads(res.text)
print(data)参考コード例 Javascript
<script>
let request = new XMLHttpRequest();
request.open('POST', 'http://192.XXX.X.XX:9085/v2/calibration/line_tracer_side_offset ', true); //IPアドレスを入力
request.setRequestHeader('content-type', 'application/json;charset=UTF-8');
request.responseType = 'json';
let body = {
right_side_offset: <float32>, //#ライントレース(壁際で停止)のオフセット値(右)
left_side_offset: <float32>, #//ライントレース(壁際で停止)のオフセット値(左)
wall_distance: <float32>, #//ライントレース壁までの距離
auto_calibrate: <bool>
};
request.send(JSON.stringify(body));
request.onload = function() {
window.alert( JSON.stringify( this.response ) );
};
</script>C7 充電ドッキング距離のオフセットの取得
| Path | Method | Function |
|---|---|---|
| /v2/calibration/dockingl_distance_offset | GET | 充電ドッキング距離のオフセット値を取得する |
Request Body
なし
Response Body
{
"offset": <float32>, #充電ドッキング距離のオフセット値
“success”: <bool >
}APIプラットフォーム(例:Postman)
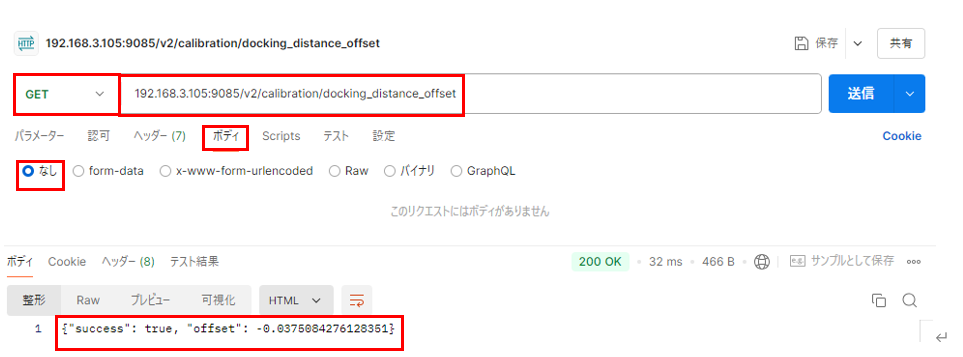
参考コード例 Python
import requests #「requests」ライブラリのインストールが必要です
import json
url = 'http://xxx.xxx.x.xxx:9085/v2/calibration/docking_distance_offset' #IPアドレスを入力
res = requests.get(url)
data = json.loads(res.text)
print(data)参考コード例 Javascript
<script>
let request = new XMLHttpRequest();
request.open('GET', 'http://xxx.xxx.x.xxx:9085/v2/calibration/docking_distance_offset', true); //IPアドレスを入力
request.setRequestHeader('content-type', 'application/json;charset=UTF-8');
request.responseType = 'json';
request.send();
request.onload = function() {
window.alert( JSON.stringify( this.response ) );
};
</script>C8充電ドッキング距離のオフセットの設定
| Path | Method | Function |
|---|---|---|
| /v2/calibration/docking_distance_offset | POST | 充電ドッキング距離を設定する |
Request Body
{
"offset": <float32>, #充電ドッキング距離のオフセット値
"auto_calibrate": <bool>, #自動キャリブレーション機能の有効/無効設定
}Response Body
{
"offset": <float32>, #充電ドッキング距離のオフセット値
"success": <bool >
}APIプラットフォーム(例:Postman)
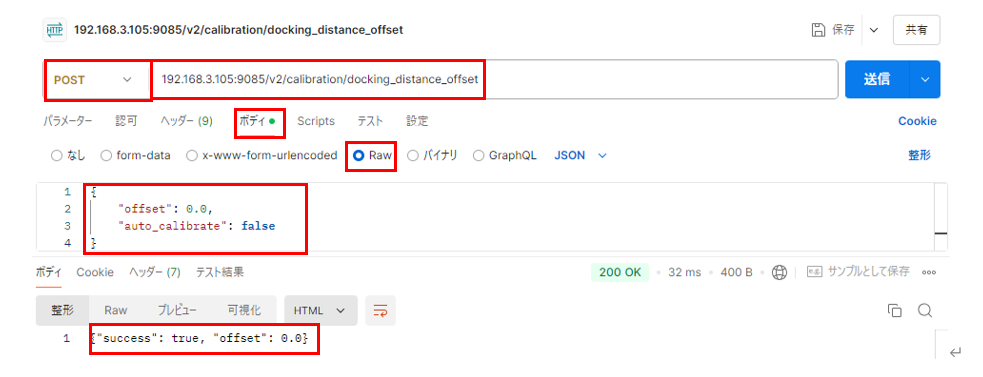
参考コード例 Python
import requests #「requests」ライブラリのインストールが必要です
import json
url = 'http://xxx.xxx.x.xxx:9085/v2/calibration/docking_distance_offset' #IPアドレスを入力
params = {
"offset": <float32>, #充電ドッキング距離のオフセット値
"auto_calibrate": <bool> #自動キャリブレーション機能の有効/無効設定
}
res = requests.post(url, json=params)
data = json.loads(res.text)
print(data)参考コード例 Javascript
<script>
let request = new XMLHttpRequest();
request.open('POST', 'http://192.XXX.X.XX:9085/v2/calibration/docking_distance_offset ', true); //IPアドレスを入力
request.setRequestHeader('content-type', 'application/json;charset=UTF-8');
request.responseType = 'json';
let body = {
offset: <float32>, //充電ドッキング距離のオフセット値
auto_calibrate: <bool> //自動キャリブレーション機能の有効/無効設定
};
request.send(JSON.stringify(body));
request.onload = function() {
window.alert( JSON.stringify( this.response ) );
};
</script>cmdsについて
cmds の配列内には、cmd (タスク) を格納する。
cmd 内で タスクの種類は cmdType で定義する。
タスクは上から順番に実⾏される。
cmds の例
cmd Type 100 の例を以下に示す。
{
"arg":{
"disableReplanning": false,
"disableStartAnnouncement": false,
"disableStopAnnouncement": false,
"enableObstacleAvoidance": true,
"enableRerouteRecovery": false,
"ignoreTheta": true,
"mode": 1,
"name": "",
"obstacleTimeout": 0,
"passingPoint": false,
"pathWidth": 2,
"theta": 0.2104844733192039,
"type": 0,
"x": -2.4687551467702415,
"y": 0.11556883023304287
},
"cmdType": 100
}cmdType の定義は次項参照。
cmdType の定義
MoveToPosition の座標指定について、詳細は後半 「座標指定について」 を参照下さい。
| Cmd Type | Name |
|---|---|
| 10 | Wait For Time 一定時間待機 |
| 20 | Pause taskset execution タスクセットの一時停止 |
| 100 | Move To Position 座標移動 |
| 110 | Follow path 経路移動 |
| 200 | LineTracer ライントレーサ |
| 300 | Wait For GPIO Input GPIO入力待機 |
| 310 | Write GPIO Output GPIO出力書込 |
| 320 | Send message by MQTT MQTTメッセージの送信 |
| 400 | Turn In Place 回転 |
| 410 | Move Straight 直進 |
| 500 | Play Sound サウンド再生 |
| 600 | Enable Power Output 電源出⼒ |
| 610 | Set Footprint フットプリント変更 |
| 620 | Set OBS Sensor State 障害物センサ切替 |
| 630 | Set Max Speed 最⼤速度変更 |
cmd 10: 一定時間待機
Data Scheme:
コードを表示するためにクリックしてください
{
"cmds":[{
"arg":{
"time":<uint32> #Wait time ms
},
"cmdType":10
}]
}コードを表示するためにクリックしてください
{
"cmds":[{
"arg":{
"time":3000
},
"cmdType":10
}]
}cmd 20: タスクセットの一時停止
Data Scheme:
コードを表示するためにクリックしてください
{
"cmds":[{
“arg”:{} ,
"cmdType":20
}]
}コードを表示するためにクリックしてください
{
"cmds":[{
“arg”:{},
"cmdType":20
}]
}cmd 100: 座標移動
Data Scheme:
コードを表示するためにクリックしてください
{
"cmds":[{
"cmdType":100,
"arg":{
"disableReplanning": false,
"disableStartAnnouncement": false,
"disableStopAnnouncement": false,
"enableObstacleAvoidance": true,
- "enableRerouteRecovery": false,
"ignoreTheta": true,
"mode": 1,
"name": "",
"obstacleTimeout": 0,
"passingPoint": false,
"pathWidth": 2,
"theta": 0.2104844733192039,
"type": 0,
"x": -2.4687551467702415,
"y": 0.11556883023304287
}
}]
}コードを表示するためにクリックしてください
{
"cmds":[{
"cmdType":100,
"arg":{
"disableReplanning": false,
"disableStartAnnouncement": false,
"disableStopAnnouncement": false,
"enableObstacleAvoidance": true,
- "enableRerouteRecovery": false,
"ignoreTheta": true,
"mode": 1,
"name": "",
"obstacleTimeout": 0,
"passingPoint": false,
"pathWidth": 2,
"theta": 0.2104844733192039,
"type": 0,
"x": -2.4687551467702415,
"y": 0.11556883023304287
}
}]
}cmd 110: 経路移動
Data Scheme:
コードを表示するためにクリックしてください
{
"cmds":[{
"cmdType":110,
"arg":{
"disableStartAnnouncement":<bool>,
"disableStopAnnouncement":<bool>,
"enableObstacleAvoidance":<bool>,
"ignoreTheta":<bool>,
# if true, the direction(angle) isn’t considered.
"path":[{"x":<float64>,
"y":<float64>},
・・・
{"x":<float64>,
"y":<float64>}]
"width":<float64>,
#Avoid obstacles in a range of [m] in diameter.
"theta":<float64>,
"passingPoint":<bool>,
#if true, AMR will pass the point without stopping
}
}]
}コードを表示するためにクリックしてください
{
"cmds":[{
"cmdType":110,
"arg":{
"disableStartAnnouncement": true,
"disableStopAnnouncement": true,
"enableObstacleAvoidance": true,
"ignoreTheta": true
"path":[{"x":3.947,
"y":0.134},
{"x":5.126,
"y":0.320}],
"width":1.0,
"theta":1.343,
"passingPoint":false,
}
}]
}cmd 200: ライントレーサ
Data Scheme:
コードを表示するためにクリックしてください
{
"cmds":[{
"arg":{
"distance":<float64>,
#only available mode:2, unit:[m]
"disableStartAnnouncement":<bool>,
"marker_size":<float64>,
#Reserve
"mode":<int>,
#0:STOP_INTERSECTION,2:STOP_DISTANCE
"marker_distance":<float64>,
#Reserve
"speed":<float64>,
#line trace speed.
“marker_id”:<int>
},
"cmdType":200
}]
}コードを表示するためにクリックしてください
{
"cmds":[{
"arg":{
"distance":1.0,
"disableStartAnnouncement":true,
"marker_size":0.05,
"mode":2,
"marker_distance":0.3,
"speed":0.25,
"marker_id":1,
},
"cmdType":200
}]
}cmd 300: GPIO入力待機
Data Scheme:
コードを表示するためにクリックしてください
{
"cmds":[{
"arg":{
“pin”:<int>,
#pin number {101: IN1, 102: IN2}
"action":<int>,
#{1: LOW->HIGH, 2: HIGH->LOW,
# 3: TOGGLE, 4: HIGH, 5: LOW}
# action of signal timeout
"timeout":<float32>
# timeout (sec) to go to error "110"
},
"cmdType":300
}]
}
# timeout :0 waits indefinitely
# action HIGH / LOW moves to next task
# if it is already in the state.コードを表示するためにクリックしてください
{
"cmds":[{
"arg":{
"pin":101,
"action":2,
"timeout":2000
},
"cmdType":300
}]
}cmd 310: GPIO出力書込
Data Scheme:
コードを表示するためにクリックしてください
{
"cmds":[{
"arg":{
"pin":<int>,
#pin number {201: OUT1, 202: OUT2}
"action":<int>
#{1: HIGH, 2: LOW, 3: TOGGLE}
# action of signal
},
"cmdType":310
}]
}コードを表示するためにクリックしてください
{
"cmds":[{
"arg":{
"pin":201,
"action":2
},
"cmdType":310
}]
}cmd 320: MQTTメッセージの送信
Data Scheme:
コードを表示するためにクリックしてください
{
"cmds":[{
"arg":{
"message":<string>
#MQTT message
},
"cmdType":320
}]
}コードを表示するためにクリックしてください
{
"cmds":[{
"arg":{
"message": “End of task”
},
"cmdType":320
}]
}cmd 400: 回転
Data Scheme:
コードを表示するためにクリックしてください
{
"cmds":[{
"arg":{
"angle":<float32>, #degrees
"velocity":<float32>, #degrees/sec
"direction":<int>
#{0:clockwise, 1:counterclockwise}
},
"cmdType":400
}]
}コードを表示するためにクリックしてください
{
"cmds":[{
"arg":{
"angle":90,
"velocity":30,
"direction":0
},
"cmdType":400
}]
}cmd 410: 直進
Data Scheme:
コードを表示するためにクリックしてください
{
"cmds":[{
"arg":{
"direction":<int>,
#{0: FORWARD, 1: BACKWARD}
#direction to move
"distance":<float32>,
#meters to
"velocity":<float32>
#meters /sec
},
"cmdType":410
}]
}コードを表示するためにクリックしてください
{
"cmds":[{
"arg":{
"direction":0,
"distance":1,
"velocity":0.3
},
"cmdType":410
}]
}cmd 500: サウンド再生
Data Scheme:
コードを表示するためにクリックしてください
{
"cmds":[{
"arg":{
"track": <int32>,
#track number choose from menu.
#-1 for stop ping sound
"loop": <bool>
# if true, play sound continuously on repeat
# (e.g. sound while moving)
},
"cmdType":500
}]
}コードを表示するためにクリックしてください
{
"cmds":[{
"arg":{
"track":1,
"loop":false
},
"cmdType":500
}]
}cmd 600: 電源出⼒
Data Scheme:
コードを表示するためにクリックしてください
{
"cmds":[{
"arg":{
"enable_5V":<bool> ,
# enable/disable 5 V output via relay
"enable_24V":<bool>
# enable/disable 24 V output via relay
},
"cmdType":600
}]
}コードを表示するためにクリックしてください
{
"cmds":[{
"arg":{
"enable_5V":true,
"enable_24V":true
},
"cmdType":600
}]
}cmd 610: フットプリント変更
Data Scheme:
コードを表示するためにクリックしてください
{
"cmds":[{
"arg":{
"footprint":<string>,
# list of 2d points to make footprint
"robot_radius":0.0
# robot_radius is always 0.
#Only used if footprint is empty.
},
"cmdType":610
}]
}コードを表示するためにクリックしてください
{
"cmds":[{
"arg":{
"footprint":"[[0.3,0.3],[0.3,-0.3].[-0.3,-0.3],[-0.3,0.3]]",
"robot_radius":0.0
},
"cmdType":610
}]
}cmd 620: 障害物センサ切替
Data Scheme:
コードを表示するためにクリックしてください
{
"cmds":[{
"arg":{
"enable_cliff_center":<bool>,
"enable_cliff_left":<bool>,
"enable_cliff_right":<bool>,
"enable_front_center":<bool>,
"enable_front_left":<bool>,
"enable_front_right":<bool>,
"enable_left":<bool>,
"enable_right":<bool>
#if true, obstacle sensors detection should be enabled.
},
"cmdType":620
}]
}コードを表示するためにクリックしてください
{
"cmds":[{
"arg":{
"enable_cliff_center": true,
"enable_cliff_left":<bool>,
"enable_cliff_right":<bool>,
"enable_front_center":<bool>,
"enable_front_left":<bool>,
"enable_front_right":<bool>,
"enable_left":<bool>,
"enable_right":<bool>
},
"cmdType":620
}]
}cmd 630: 最⼤速度変更
Data Scheme:
コードを表示するためにクリックしてください
{
"cmds":[{
"arg":{
"max_speed":<float32>
# maximum forward velocity,
#must be equal or less than 0.5 [m/s]
},
"cmdType":630
}]
}コードを表示するためにクリックしてください
{
"cmds":[{
"arg":{
"max_speed":0.3
},
"cmdType":630
}]
}タスクセットの実行が完了して 「Idle」 状態となったとき、フットプリントは元の設定値に戻ります。
マップ座標指定
マップ原点 (Origin)
先ず、マップ原点 origin の定義が必要となる。KeiganALI でマップを作成した場合には、マップ原点は⾃動的に設定される。マップ原点は、M4 /map API で取得できる response 内の、yaml 情報に格納される。
origin の, x, y は、下図におけるそれぞれ X0, Y0 となる。 (基本的にマイナスまたは0の値)
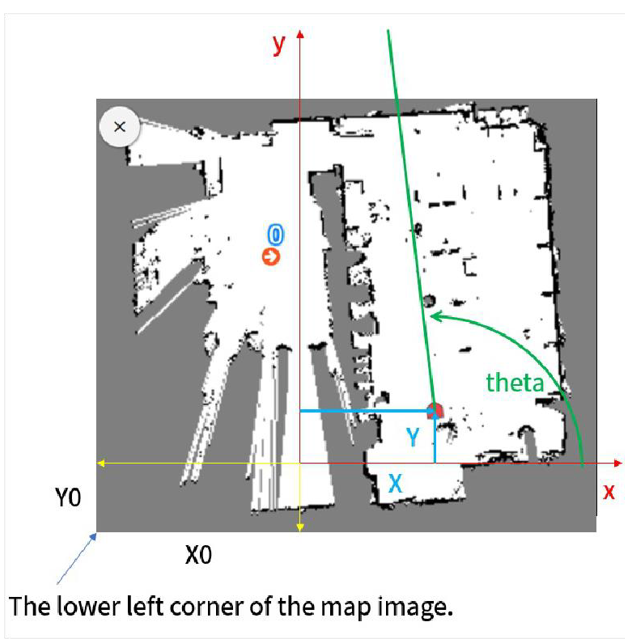
AMRの位置指定
このとき、AMRの位置はマップ原点に対する位置 (x, y) = (X, Y) として指定できる。
AMRの向きは、θ(theta)で指定され、x軸からの⾓度で定義できる。
θの範囲は、-π 〜 +π (-180°〜 +180°)となる。
MoveToPosition 等の命令では、AMRの⽬標位置 x, y 及び向き θ を指定する必要がある。
MQTT API /status で取得できる location も同様となる。